Now you can easily see git diff, use CLI editors, or third-party IDEs like Visual Studio Code to leverage Co-Pilot with your Node-RED based projects. This node will write template and function node source code properties to a src sub-folder adjacent to the project's flows file; and it will allow you to merge changes back into your flows when you're done editing.
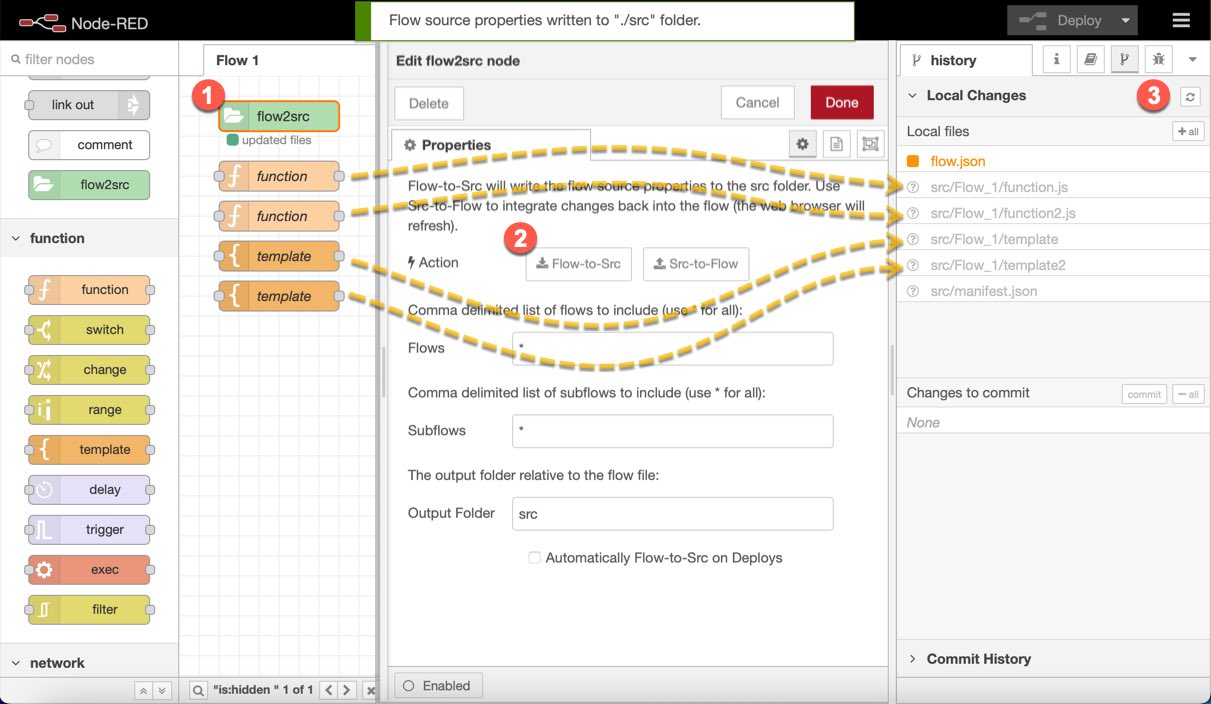
Simply include the flow2src node on one of your project's flows. When enabling Node-RED's project mode, the files can be easily managed within Node-RED itself. See the screenshot below for reference:
- Include the flow2src node on one of your flows and open its property sheet.
- Click the "Flow-to-Src" button; flow2src will generate the files.
- Click Node-RED's "Refresh changes" button in the history tab.
By default, flow2src will look for all flows and subflows for template and function nodes and create a src folder. Within the src folder are a number of subfolders of the same name as your flow tabs and subflows. Source code files with properly named extensions (i.e. .js, .html, .json, .css, etc.) are written to the folders. The filename extensions are derived from the node type (i.e. function node creates .js files) or the 'Syntax Highlight' mode setting for template nodes. You can override the filename extension by explicitly naming your node with an extension. Nodes that share the same name within a given flow will automatically be iterated, i.e. function_1.js, function_2.js, etc.
After making edits to the files in your src folder; use the "Src-to-Flow" button to merge changes back into your flow file.
You can further customize which flows and subflows are exported and where they are exported using the following textbox options:
- Flows - specify a flow by name, or mulitple flows by seperating names by a comma. Use an asterick for all flows.
- Subflows - specify a subflow by name, or mulitple subflows by seperating names by a comma. Use an asterick for all subflows.
- Output Folder - By default the folder is named 'src'; you can specify a different path relative to your project's flow file.
Lastly, you can invoke the "Flow-to-Src" button automatically using the checkbox for "Automatiaclly Flow-to-Src on Deploys".
You can install flow2src via Node-RED's built in palette manager and searching for node-red-flow2src
or
Run the following command in your Node-RED user directory (typically ~/.node-red):
npm install @steveorevo/node-red-flow2src
The flow2src node will appear in the palette under the common group.
The flow2src node was built using the same author's Node-Maker project. Included in this repo is the flow2src.json file containing the flow needed to build flow2src. Simply import this flow into Node-RED and click the associated inject button. The current version of node-red-flow2src folder will appear in your Node-RED's node_modules folder.
You can help Steveorevo's open source development endeavors by donating any amount. Your donation, no matter how large or small helps pay for his time and resources to create MIT and GPL licensed projects that you and the world can benefit from. Click the link below to donate today :)
