基于腾讯云推送服务(Push),支持 iOS 和 Android 推送,同时适配各大厂商推送。
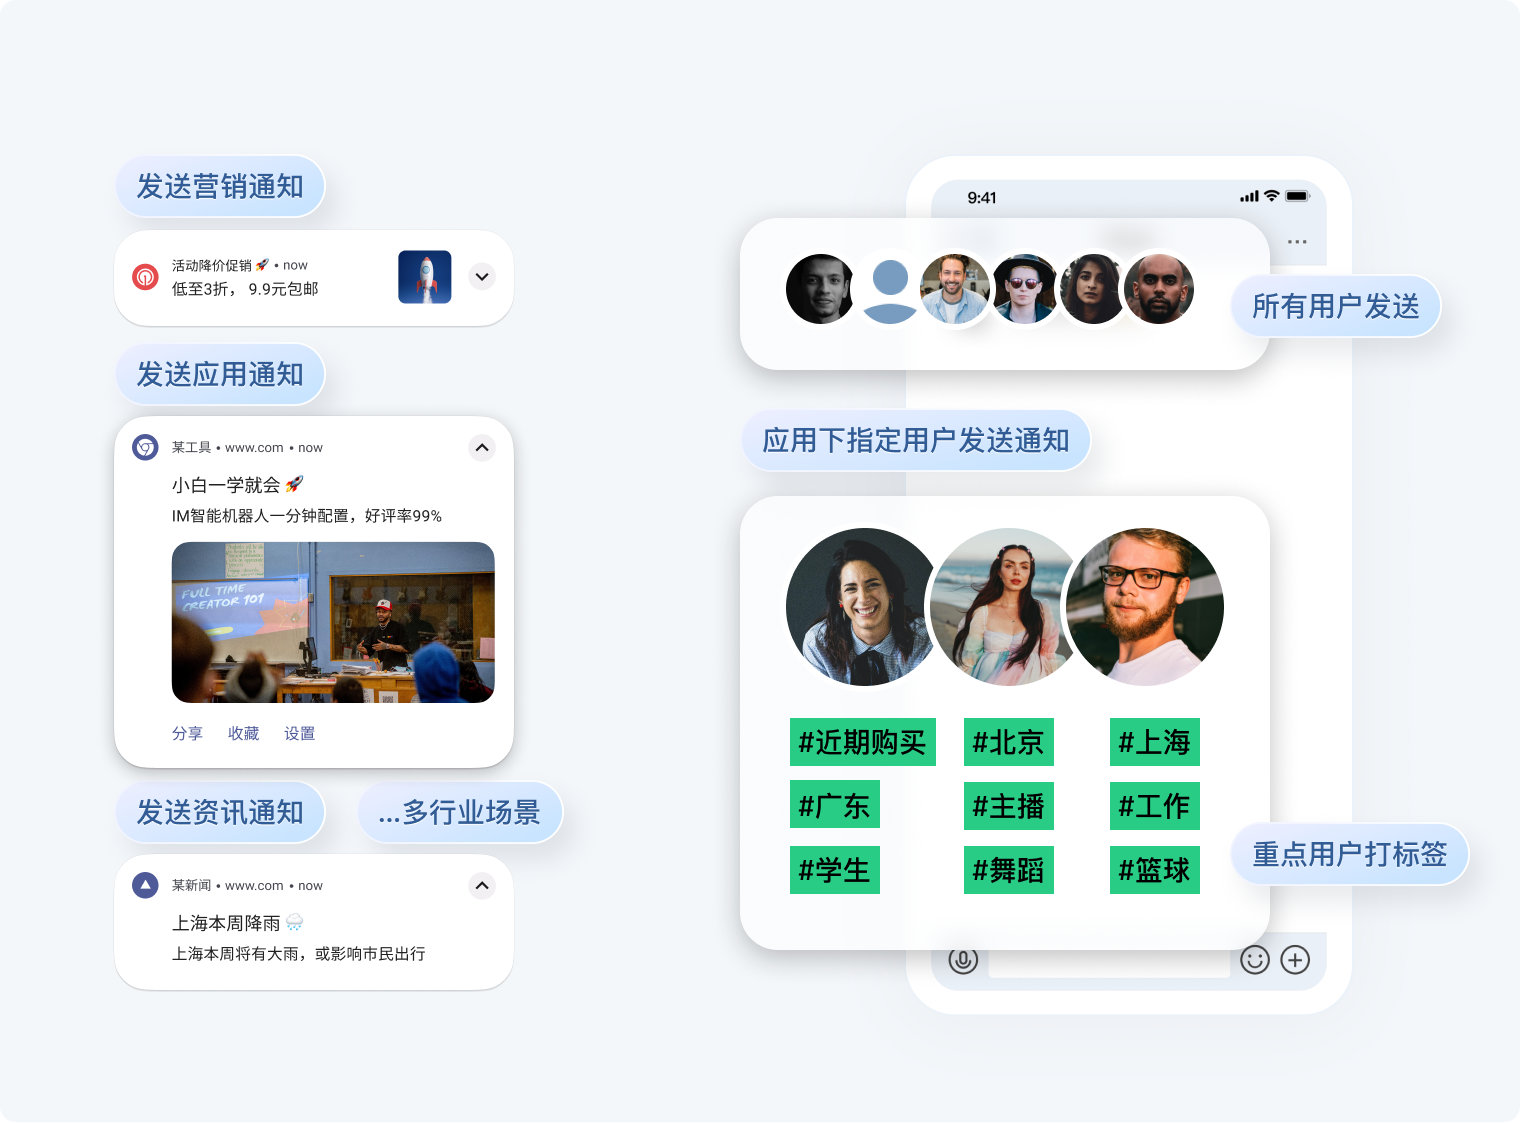
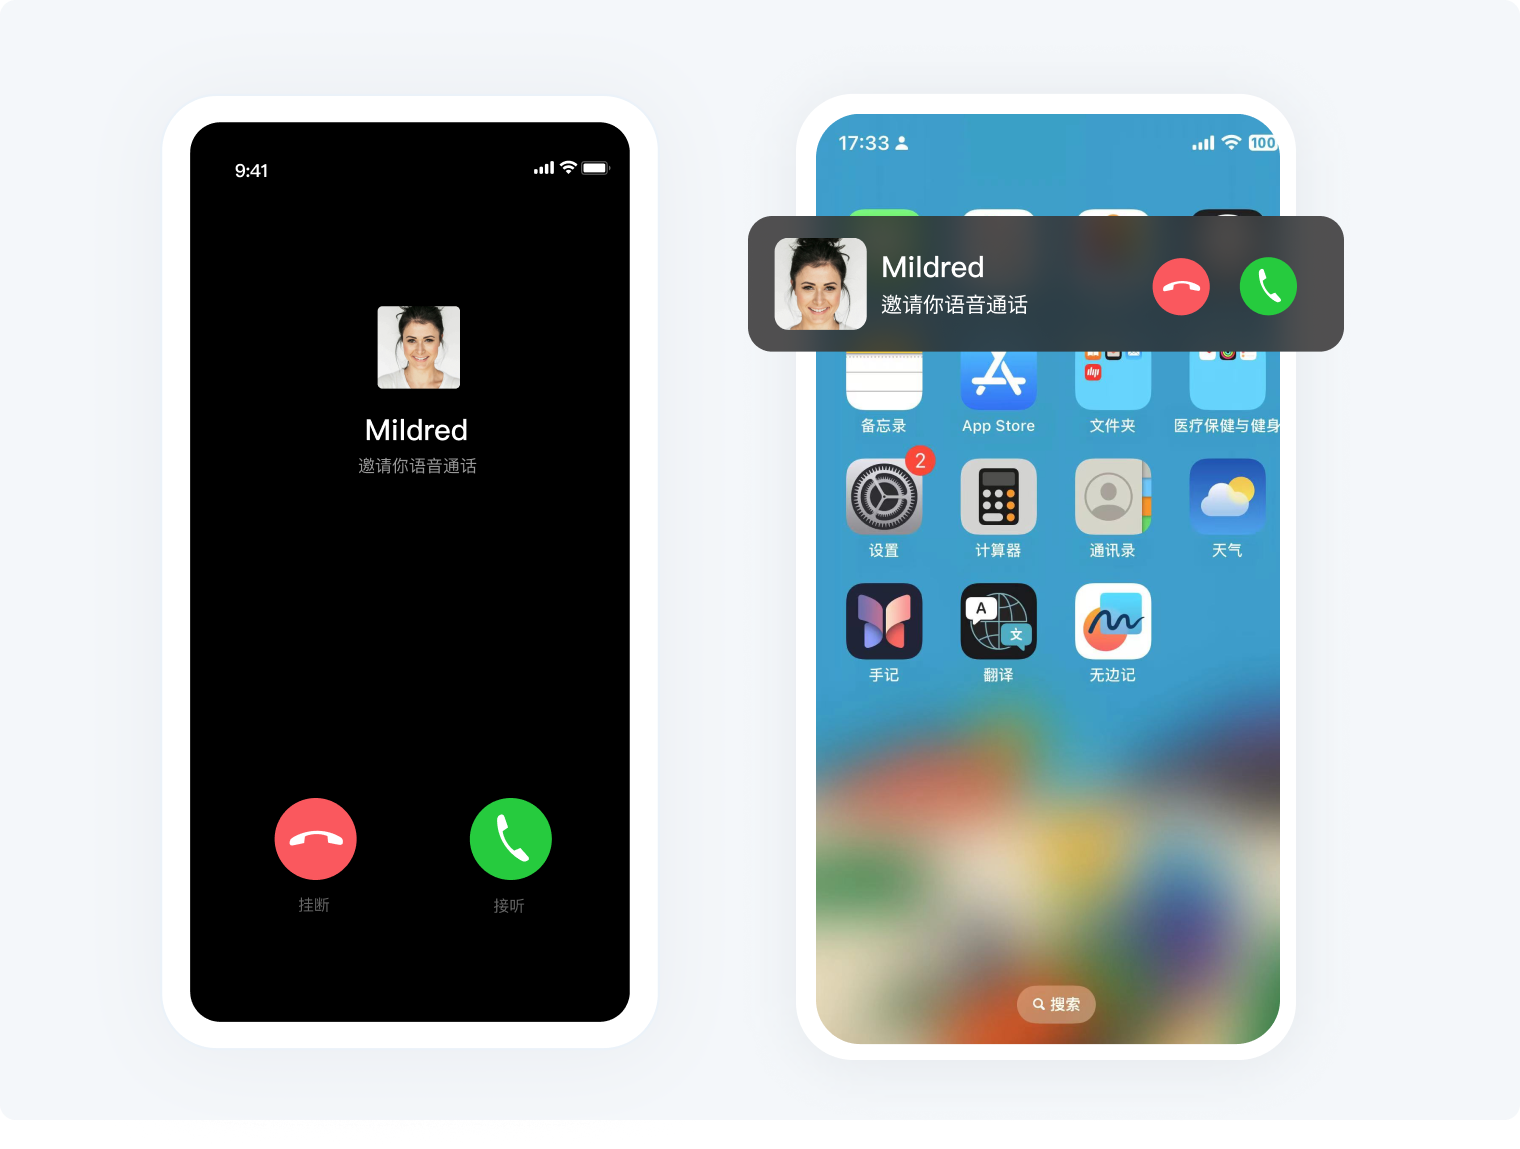
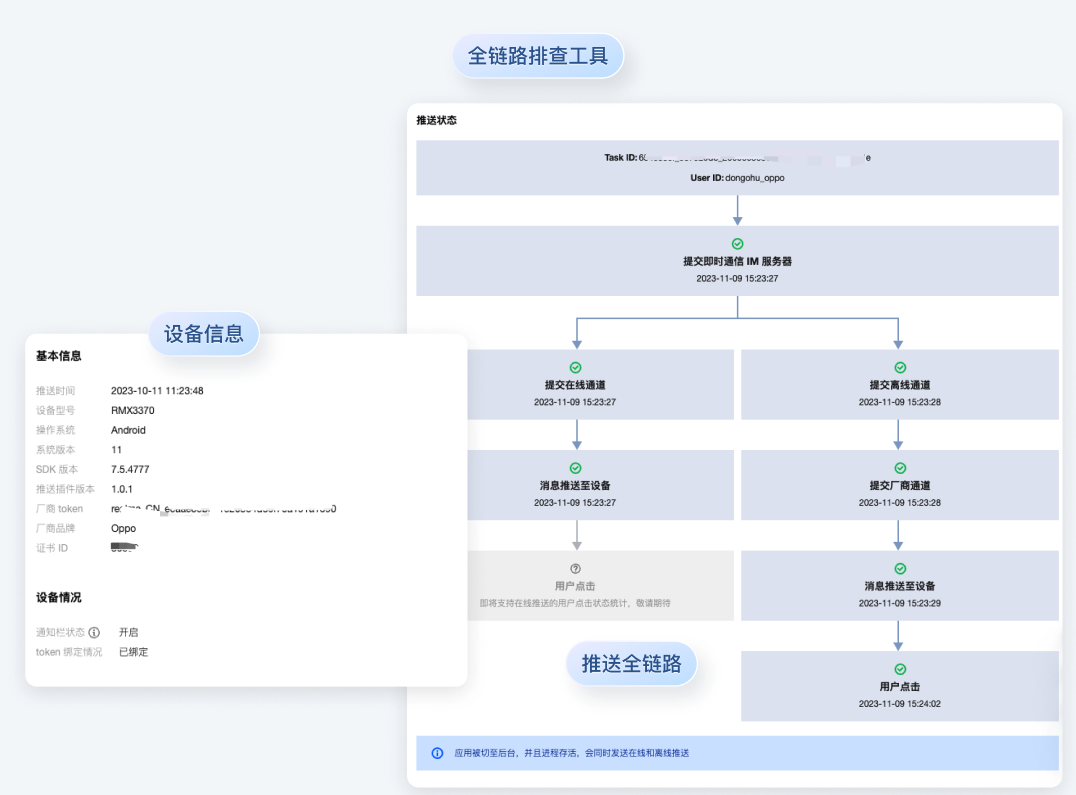
腾讯云推送服务(Push)提供一站式 App 推送解决方案,助您轻松提升用户留存和互动活跃度,支持与腾讯云即时通信 IM SDK、实时音视频 TRTC SDK、音视频通话 SDK、直播 SDK等音视频终端产品协同集成,在不同场景联合使用,提升业务整体功能体验。
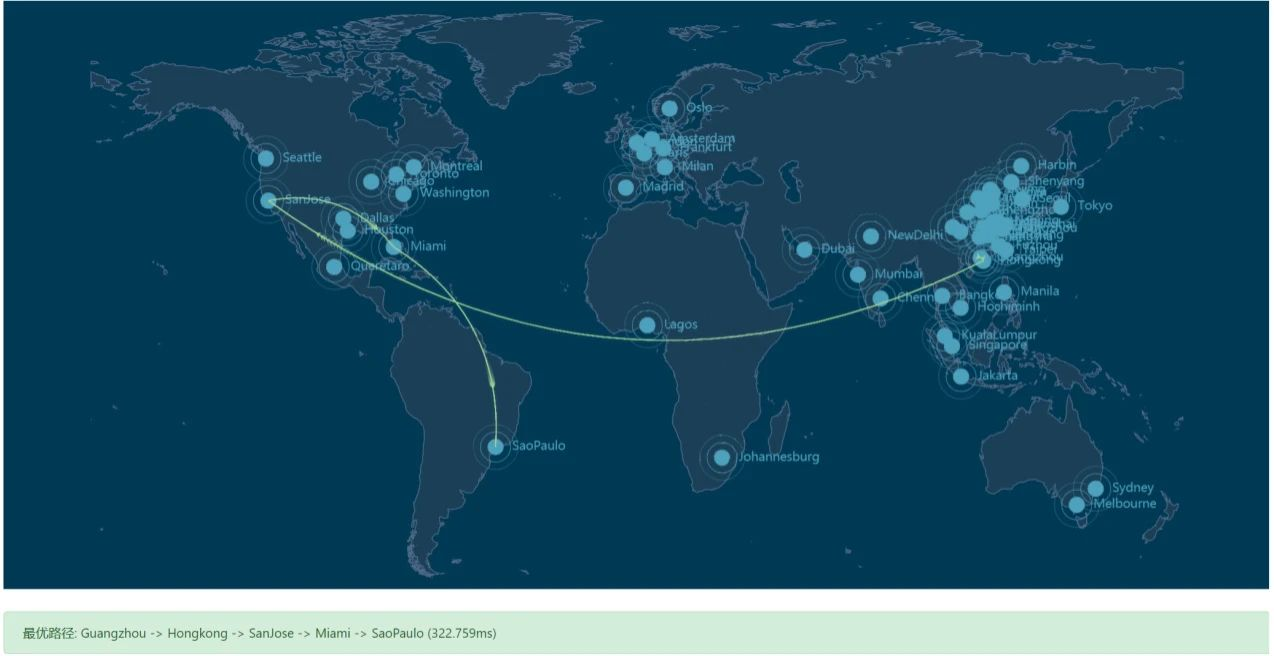
提供了中国、东南亚(新加坡、印尼雅加达)、东北亚(韩国首尔)、欧洲(德国法兰克福)以及北美(美国硅谷)数据存储中心供选择,每个数据中心均支持全球接入。如果您的应用在境外上线且用户主要在境外,您可以根据消息传输需求及合规要求,选择适合您业务的境外数据中心,保障您的数据安全。
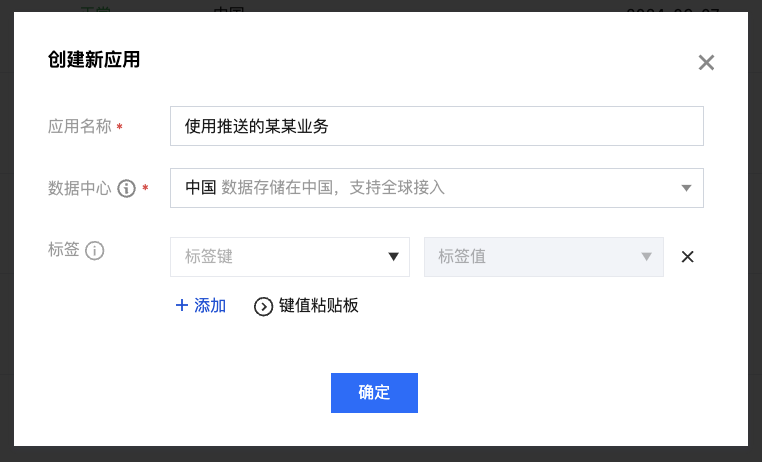
步骤1:创建应用
进入 控制台 ,单击创建应用,填写应用名称,选择数据中心,单击确定,完成应用创建。
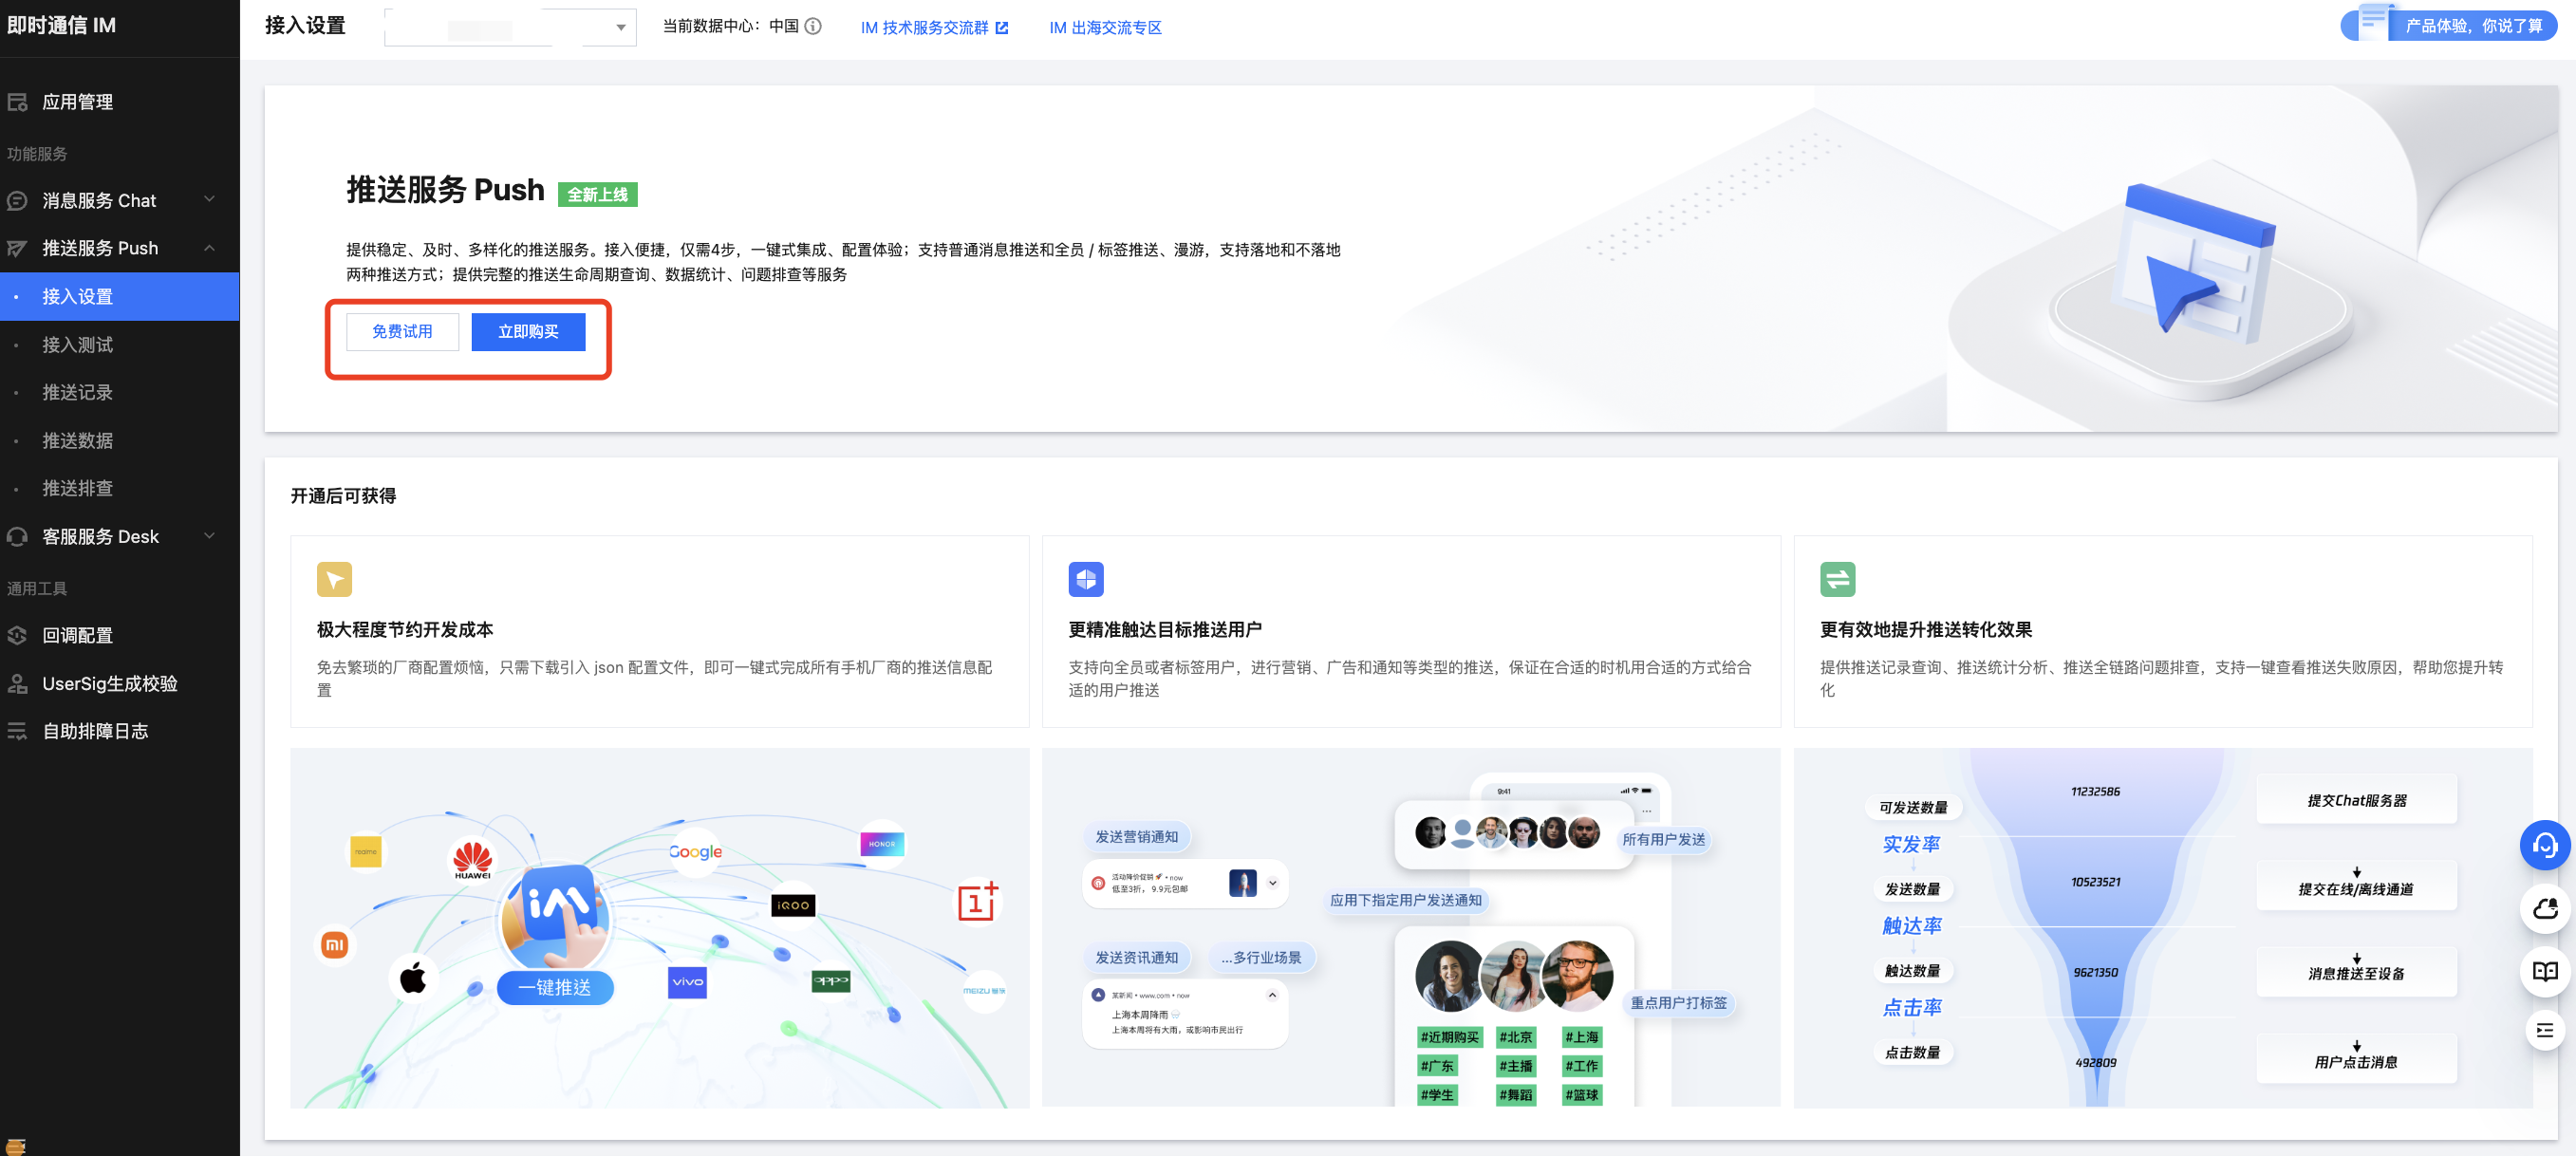
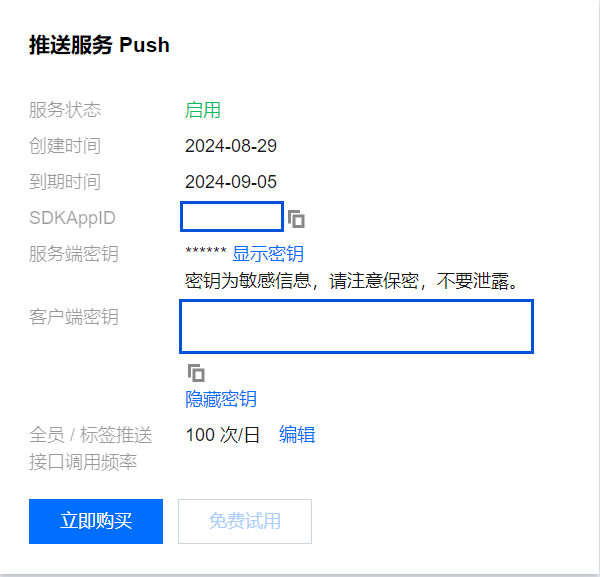
步骤2:开通推送服务 Push
进入 推送服务 Push,单击立即购买或免费试用 。(每个应用可免费试用一次,有效期7天)
步骤3:创建一个 React Native 项目(已有项目可忽略此步骤)
npx @react-native-community/cli@latest init MyReactNativeApp --version 0.75.0步骤4:集成 @tencentcloud/react-native-push
npm install @tencentcloud/react-native-push --save步骤5:注册推送
复制下面的代码到 App.tsx,并将 SDKAppID 和 appKey 替换为您的应用的信息
import Push from '@tencentcloud/react-native-push';

const SDKAppID = 0; // 您的 SDKAppID
const appKey = ''; // 客户端密钥
if (Push) {
  Push.registerPush(SDKAppID, appKey, (data) => {
    console.log('registerPush ok', data);
    Push.getRegistrationID((registrationID) => {
      console.log('getRegistrationID ok', registrationID);
    });
  }, (errCode, errMsg) => {
    console.error('registerPush failed', errCode, errMsg);
  });

  // 监听通知栏点击事件,获取推送扩展信息
  Push.addPushListener(Push.EVENT.NOTIFICATION_CLICKED, (res) => {
      // res 为推送扩展信息
      console.log('notification clicked', res);
  });

  // 监听在线推送
  Push.addPushListener(Push.EVENT.MESSAGE_RECEIVED, (res) => {
    // res 为消息内容
    console.log('message received', res);
  });

  // 监听在线推送被撤回
  Push.addPushListener(Push.EVENT.MESSAGE_REVOKED, (res) => {
    // res 为被撤回的消息 ID
    console.log('message revoked', res);
  });
}
步骤6:配置 Native Modules 和相关依赖
For Android:
1)使用 Android Stuido 打开 MyReactNativeApp 目录下的 android 项目。
2)如果您的项目入口文件是 MainApplication.kt,请按如下方式修改:
...
import com.tencent.qcloud.rntimpush.TencentCloudPushApplication

// Replace Application with TencentCloudPushApplication
class MainApplication : TencentCloudPushApplication(), ReactApplication {
  ...
  //  add TencentCloudPushPackage to the list of packages returned in ReactNativeHost's getPackages() method
  override fun getPackages(): List<ReactPackage> =
    PackageList(this).packages.apply {
        // Packages that cannot be autolinked yet can be added manually here, for example:
        // add(MyReactNativePackage())
    }
}
3)如果您的项目入口文件是 MainApplication.java,请按如下方式修改:
...
import com.tencent.qcloud.rntimpush.TencentCloudPushApplication;

// Replace Application with TencentCloudPushApplication
public class MainApplication extends TencentCloudPushApplication implements ReactApplication {
  ...
  // add TencentCloudPushPackage to the list of packages returned in ReactNativeHost's getPackages() method
  @Override
  protected List<ReactPackage> getPackages() {
    List<ReactPackage> packages = new PackageList(this).getPackages();
    // Packages that cannot be autolinked yet can be added manually here, for example:
    // packages.add(new MyReactNativePackage());
    return packages;
  }
  ...
}
4)以上操作完成后,选择 File > Sync Project with Gradle Files。
For iOS:
1)安装 TIMPush 组件。
pod install
# 如果无法安装最新版本,执行以下命令更新本地的 CocoaPods 仓库列表
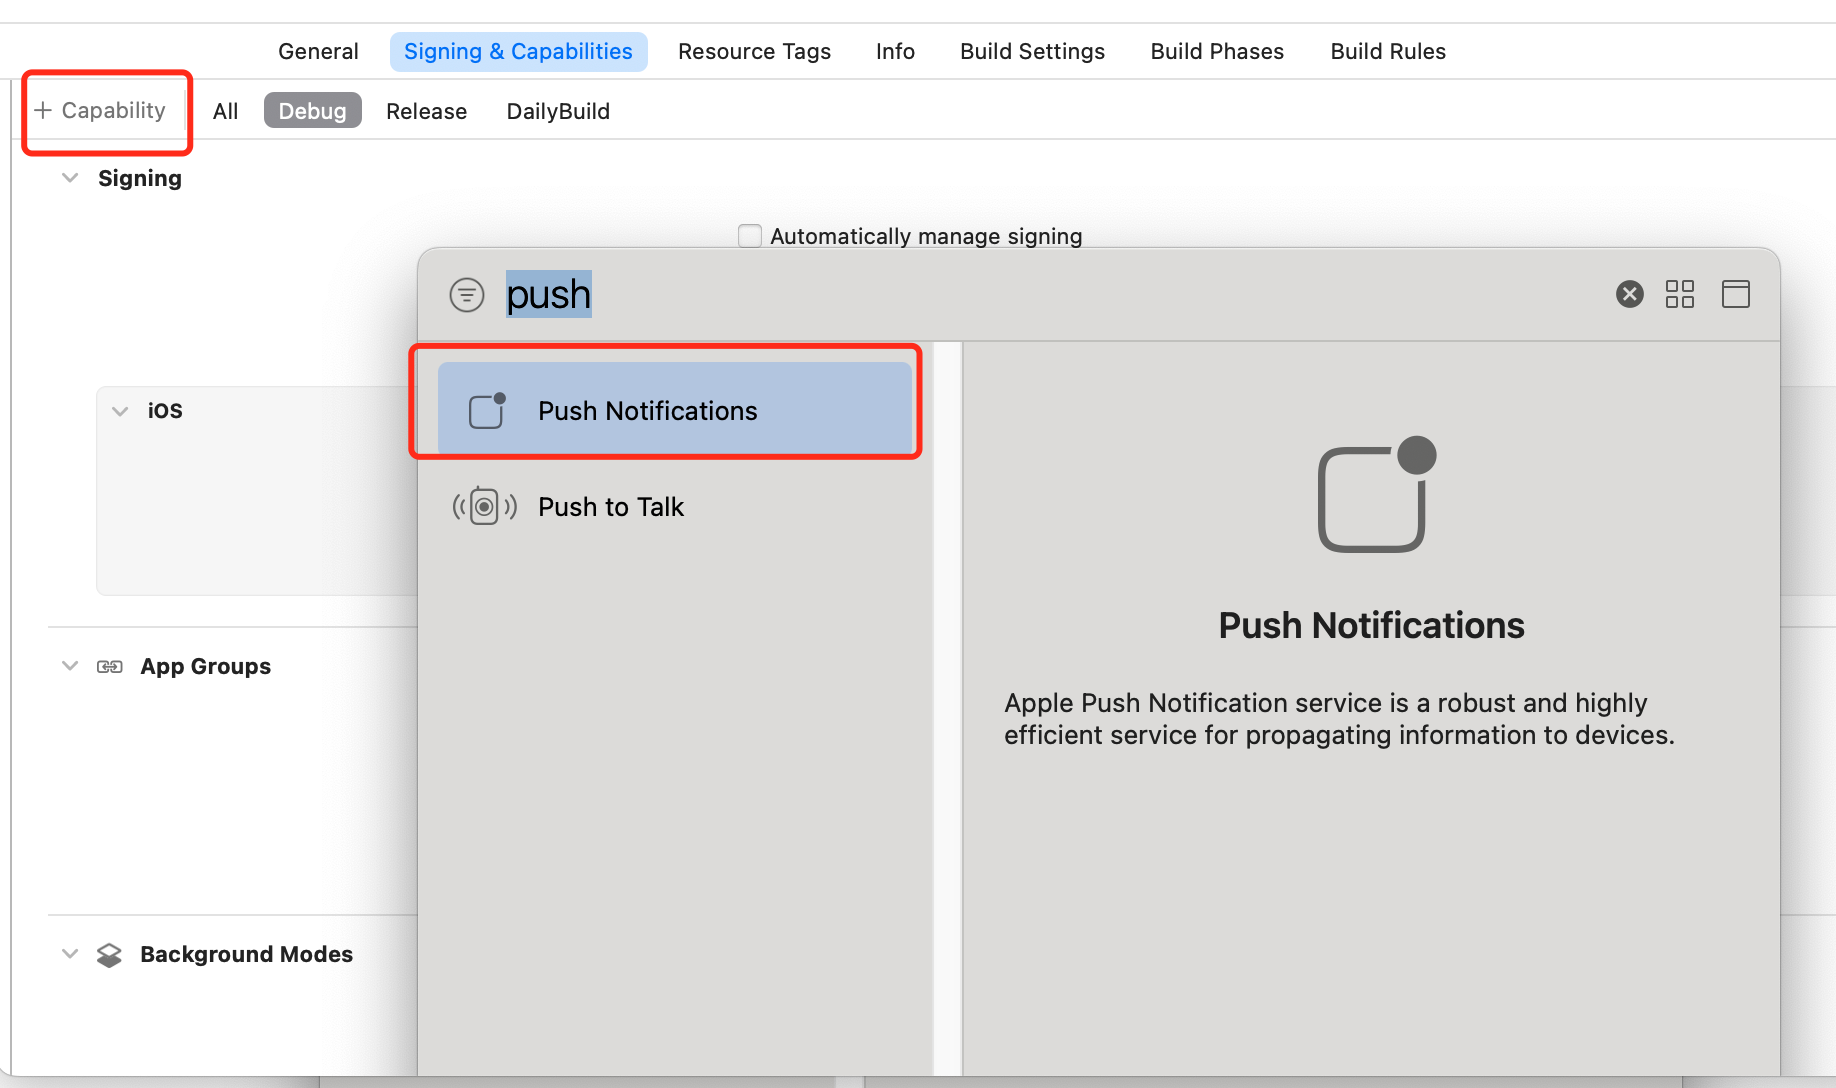
pod repo update2)在App中添加推送权限,请在 Xcode 项目中启用推送通知功能。打开 Xcode 项目,在 Project > Target > Capabilities 页面中点击红框中的加号按钮,然后选择并添加 Push Notifications 。
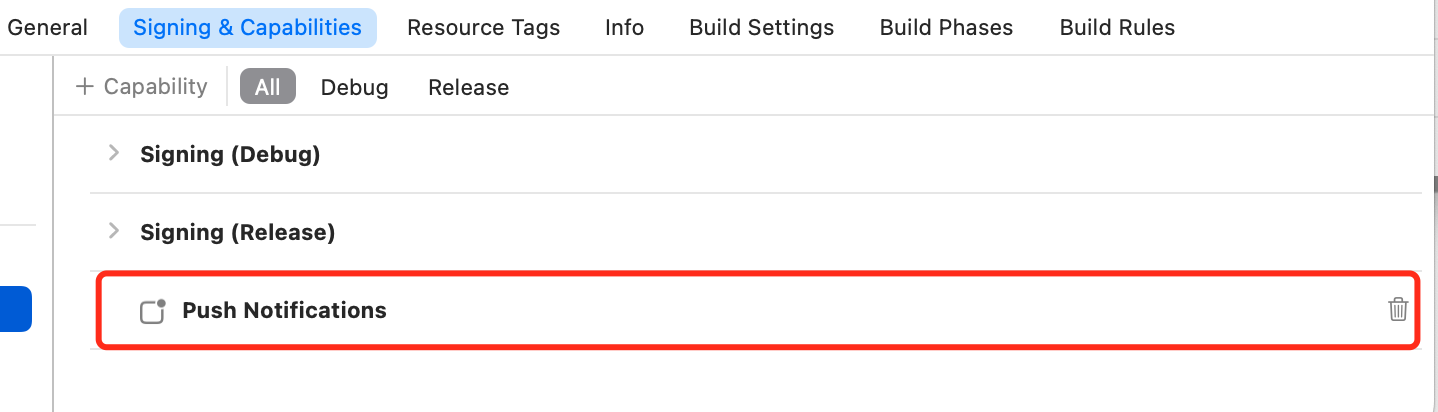
添加后的结果如图中红框所示。
步骤7:在真机上运行(测试前请务必打开手机通知权限,允许应用通知。)
从项目根目录开始,在命令提示符中运行以下命令,在设备上安装并启动您的应用程序:
For Android:
npm run androidFor iOS:
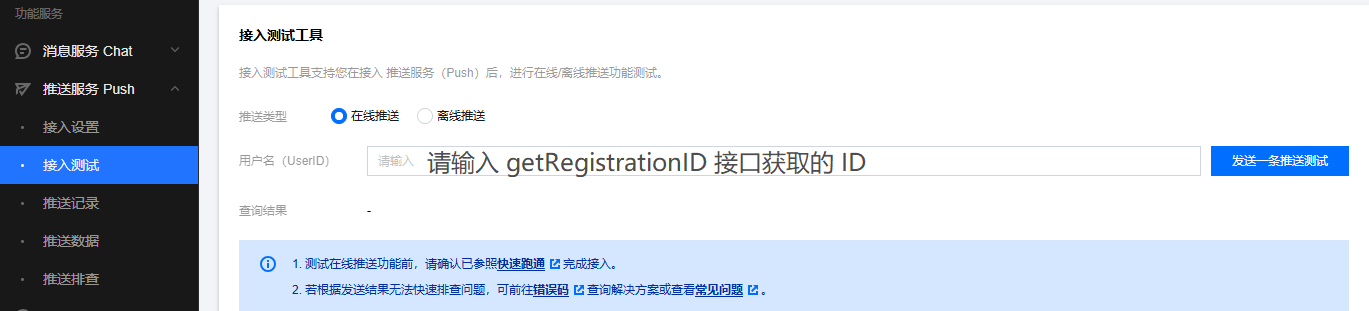
npm run ios步骤8:登录 控制台,使用测试工具进行在线推送测试。
For Android:
1)编辑 android/build.gradle 文件,更新 repositories,dependencies 和 allprojects。
buildscript {
    ...
    repositories {
        ...
        google()
        mavenCentral()
        maven { url 'https://mirrors.tencent.com/nexus/repository/maven-public/' }
        // 配置 HMS Core SDK 的 Maven 仓地址。
        maven { url 'https://developer.huawei.com/repo/' }
        maven { url 'https://developer.hihonor.com/repo' }
    }
    dependencies {
        ...
        // 如果您创建的项目 com.android.tools.build:gradle 未带版本号,请设置为 8.5.0
        // classpath("com.android.tools.build:gradle:8.5.0")
        classpath 'com.google.gms:google-services:4.3.15'
        classpath 'com.huawei.agconnect:agcp:1.9.1.301'
        classpath 'com.hihonor.mcs:asplugin:2.0.1.300'
    }
}

allprojects {
    repositories {
        mavenCentral()
        maven { url 'https://mirrors.tencent.com/nexus/repository/maven-public/' }
        // 配置HMS Core SDK的Maven仓地址。
        maven { url 'https://developer.huawei.com/repo/' }
        maven { url 'https://developer.hihonor.com/repo' }
    }
}
...
2)编辑 android/app/build.gradle 文件,按需配置厂商的推送包并应用插件。
...
// 如果您的 APP 需要 FCM 推送,请取消下行的注释
// apply plugin: 'com.google.gms.google-services'
// 如果您的 APP 需要华为推送,请取消下行的注释
// apply plugin: 'com.huawei.agconnect'
// 如果您的 APP 需要荣耀推送,请取消下行的注释
// apply plugin: 'com.hihonor.mcs.asplugin'

...

android {
    ...
    defaultConfig {
        ...
        // 按照配置 荣耀、vivo
        manifestPlaceholders = [
            "VIVO_APPKEY" : "0", // 如果您的 APP 需要 vivo 推送,请配置 'VIVO_APPKEY' 和 'VIVO_APPID'
            "VIVO_APPID" : "0",
            "HONOR_APPID" : "" // 如果您的 APP 需要 荣耀推送,请配置 'HONOR_APPID'
        ]
    }
}

dependencies {
  ...
  // 请您根据需要,引入下列全部或者部分厂商的推送包。只有引入对应厂商的推送包,才能启用该厂商的原生推送能力。
  implementation 'com.tencent.timpush:huawei:8.3.6498'
  implementation 'com.tencent.timpush:xiaomi:8.3.6498'
  implementation 'com.tencent.timpush:oppo:8.3.6498'
  implementation 'com.tencent.timpush:vivo:8.3.6498'
  implementation 'com.tencent.timpush:honor:8.3.6498'
  implementation 'com.tencent.timpush:meizu:8.3.6498'
  implementation 'com.tencent.timpush:fcm:8.3.6498'
}
3)以上操作完成后,选择 File > Sync Project with Gradle Files。
4)配置完成后,从控制台下载 timpush-configs.json 文件并添加到项目的 android/app/src/main/assets 目录下,如果该目录不存在,请手动创建。
For iOS:
1)iOS 详细配置指引请参考 厂商配置。
2)在 MyReactNativeApp/ios/MyReactNativeApp 目录下新建 Resources 目录,在 Resources 目录下新建 timpush-configs.json 文件,将您控制台的证书 ID 填入后保存,如下所示:
{
  "businessID": "您的证书 ID"
}
3)使用 XCode 打开 MyReactNativeApp/ios/MyReactNativeApp.xcworkspace,右键点击项目 > Add Files to "MyReactNativeApp",添加上一步创建的 timpush-configs.json 文件夹到工程,然后重新构建 app 安装到手机运行。
| API | 描述 |
|---|---|
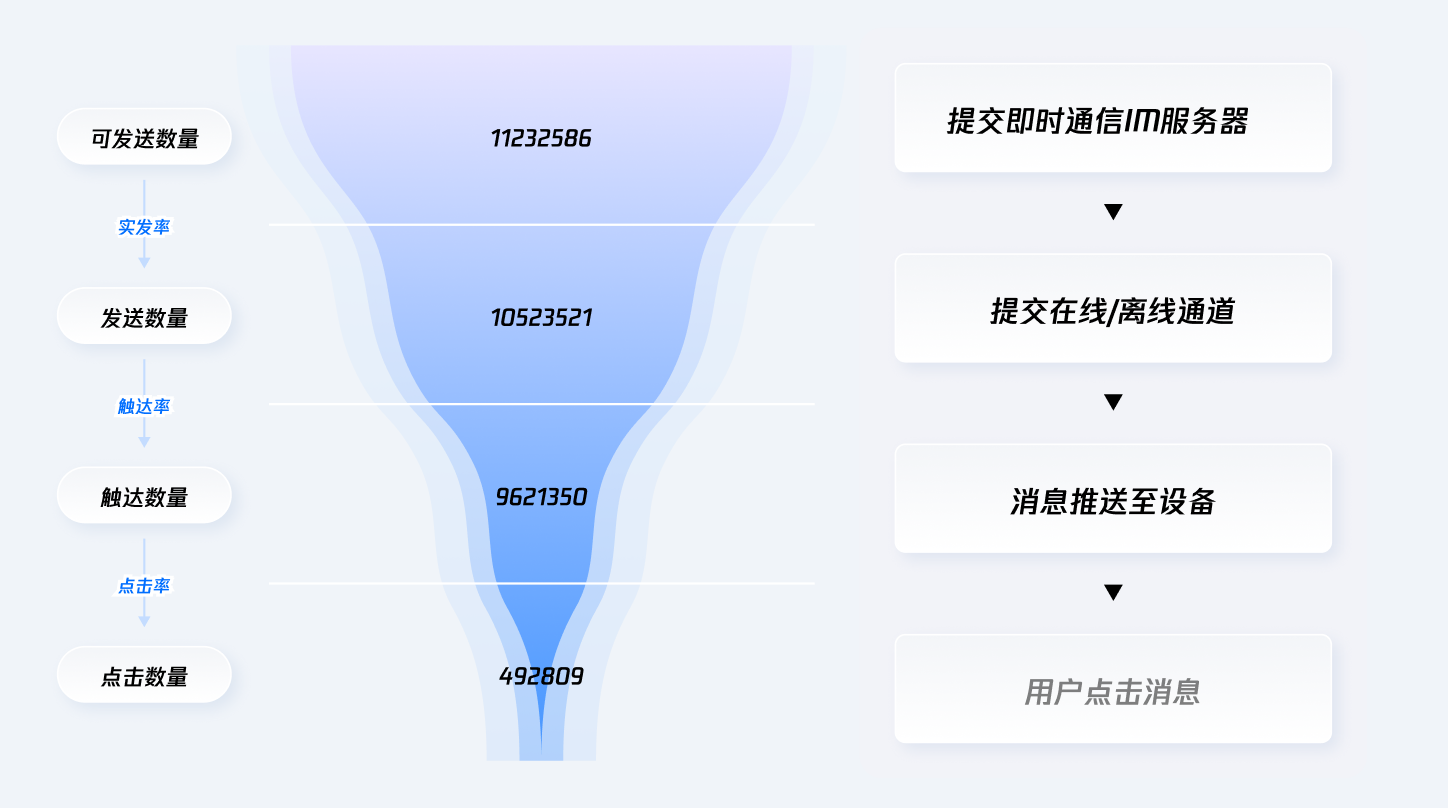
| registerPush | 注册推送服务 (必须在 App 用户同意了隐私政策,并且允许为 App 用户提供推送服务后,再调用该接口使用推送服务)。 首次注册成功后,TencentCloud-Push SDK 生成该设备的标识 - RegistrationID。 业务侧可以把这个 RegistrationID 保存到业务服务器。业务侧根据 RegistrationID 向设备推送消息或者通知。 |
| unRegisterPush | 反注册关闭推送服务。 |
| setRegistrationID | 设置注册推送服务使用的推送 ID 标识,即 RegistrationID。 如果业务侧期望业务账号 ID 和推送 ID 一致,方便使用,可使用此接口,此时需注意,此接口需在 registerPush(注册推送服务)之前调用。 |
| getRegistrationID | 注册推送服务成功后,获取推送 ID 标识,即 RegistrationID。 |
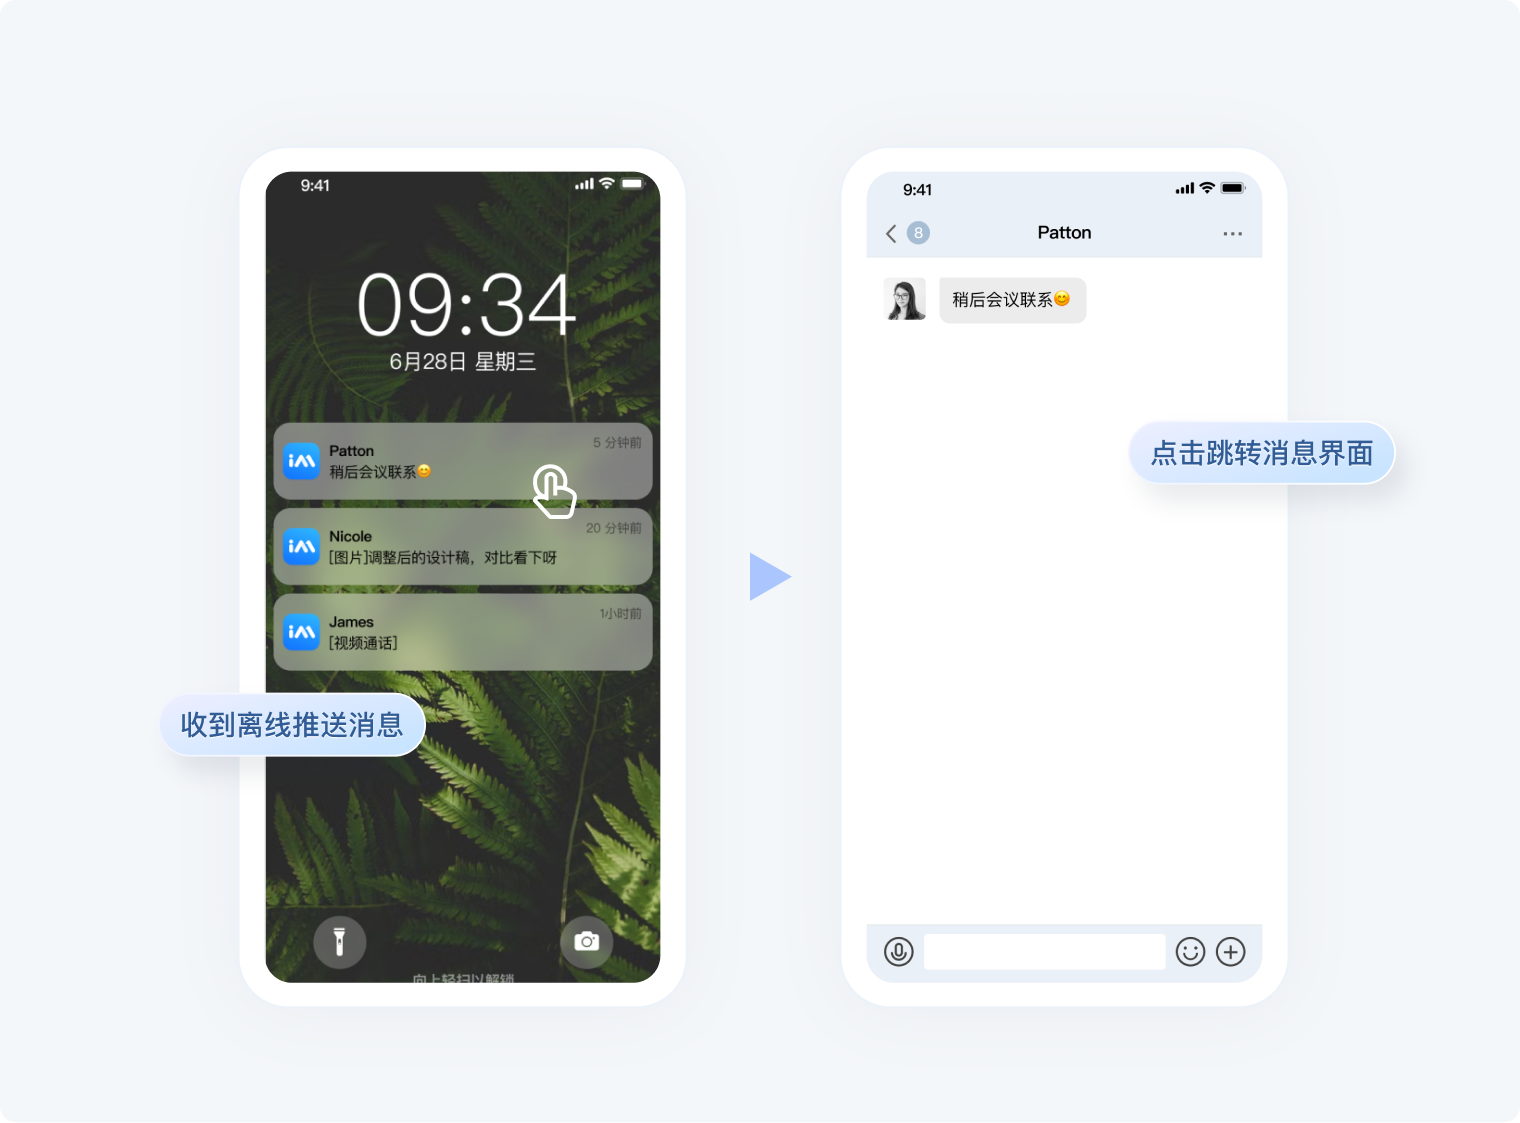
| getNotificationExtInfo | 收到离线推送时,点击通知栏拉起 app,调用此接口可获取推送扩展信息。 |
| addPushListener | 添加 Push 监听器。 |
| removePushListener | 移除 Push 监听器。 |
| disablePostNotificationInForeground | 应用在前台时,开/关通知栏通知(默认开)。 |
| createNotificationChannel | 创建客户端通知 channel。 |
registerPush(SDKAppID: number, appKey: string, onSuccess: (data: string) => void, onError?: (errCode: number, errMsg: string) => void);| 属性 | 类型 | 必填 | 说明 |
|---|---|---|---|
| SDKAppID | number | 是 | 推送(Push)应用 ID |
| appKey | string | 是 | 推送(Push)应用客户端密钥 |
| onSuccess | function | 是 | 接口调用成功的回调函数 |
| onError | function | 否 | 接口调用失败的回调函数 |
unRegisterPush(onSuccess: () => void, onError?: (errCode: number, errMsg: string) => void): void;| 属性 | 类型 | 必填 | 说明 |
|---|---|---|---|
| onSuccess | function | 是 | 接口调用成功的回调函数 |
| onError | function | 否 | 接口调用失败的回调函数 |
setRegistrationID(registrationID: string, onSuccess: () => void): void;| 属性 | 类型 | 必填 | 说明 |
|---|---|---|---|
| registrationID | string | 是 | 设备的推送标识 ID,卸载重装会改变。 |
| onSuccess | function | 是 | 接口调用成功的回调函数 |
getRegistrationID(onSuccess: (registrationID: string) => void): void;| 属性 | 类型 | 必填 | 说明 |
|---|---|---|---|
| onSuccess | function | 是 | 接口调用成功的回调函数 |
getNotificationExtInfo(onSuccess: (extInfo: string) => void): void;| 属性 | 类型 | 必填 | 说明 |
|---|---|---|---|
| onSuccess | function | 是 | 接口调用成功的回调函数 |
addPushListener(eventName: string, listener: (data: any) => void);| 属性 | 类型 | 必填 | 说明 |
|---|---|---|---|
| eventName | string | 是 | 推送事件类型 |
| listener | function | 是 | 推送事件处理方法 |
removePushListener(eventName: string, listener?: (data: any) => void);| 属性 | 类型 | 必填 | 说明 |
|---|---|---|---|
| eventName | string | 是 | 推送事件类型 |
| listener | function | 否 | 推送事件处理方法 |
disablePostNotificationInForeground(disable: boolean);| 属性 | 类型 | 必填 | 说明 |
|---|---|---|---|
| disable | boolean | 是 | 应用在前台时,开/关通知栏通知,默认开 - true: 应用在前台时,关闭通知栏通知。 - false: 应用在前台时,开启通知栏通知。 |
createNotificationChannel(options: Record<string, any>, onSuccess: (data: any) => void);| 属性 | 类型 | 必填 | 说明 |
|---|---|---|---|
| options.channelID | string | 是 | 自定义 channel 的 ID |
| options.channelName | string | 是 | 自定义 channel 的名称 |
| options.channelDesc | string | 否 | 自定义 channel 的描述 |
| options.channelSound | string | 否 | 自定义 channel 的铃音,音频文件名,不带后缀,音频文件需要放到 MyReactNativeApp/android/app/src/main/res/raw 中。例如: options.channelSound = private_ring, 即设置 MyReactNativeApp/android/app/src/main/res/raw/private_ring.mp3 为自定义铃音 |
| onSuccess | string | 是 | 接口调用成功的回调函数 |