Install by npm:
npm install --save @do-while-for-each/tree-cellor install with yarn:
yarn add @do-while-for-each/tree-celltree-cell is another implementation of pull-based reactivity. If you don't know what it is yet, then perhaps you know about such projects as: Vue.js or MobX – yes, they use this type of reactivity. Quite well they gave an introductory here: What is Reactivity?
Consider an example from MobX - Observable state:
import {actualizeScheduledCells, autorun, cell, makeObservable} from '@do-while-for-each/tree-cell';

class Doubler {
  constructor(private value) {
    makeObservable(this, {
      value: cell,  // observable
      double: cell, // observable
    });
  }

  get double() {
    return this.value * 2;
  }

  increment() {
    this.value++;
  }
}

const obj = new Doubler(1);

const dispose = autorun(() => { // create observable cell tree
  console.log(obj.double);
});

obj.increment();
actualizeScheduledCells();
obj.increment();
actualizeScheduledCells();
obj.increment();

dispose();
output:
2
4
6
8
if comment out actualizeScheduledCells(); then the output will be like this:
2 // autorun => creating the observable cell tree
8 // result of auto-actualization of the observable cell tree
this is because when multiple state changes happen:
obj.increment();
//actualizeScheduledCells();
obj.increment();
//actualizeScheduledCells();
obj.increment();
by default, only the latest state is taken into account at the moment changes are applied.
⚠ New changes will be applied automatically only after changes stop happening in the system (after clearing the call stack).
Thus, if you don't need this kind of debouncing, then call function actualizeScheduledCells(); in appropriate places.
If you need to actualize the entire cell tree after each state change, then it is better to make a change to the method itself:
class Doubler {
  //...

  increment() {
    this.value++;
    actualizeScheduledCells();
  }
}

//...

obj.increment();
obj.increment();
obj.increment();
output:
2
4
6
8
Let's look at another example:
import {autorun, cell, makeObservable} from '@do-while-for-each/tree-cell';

class TomAndJerry {
  name = 'Tom';
  kind = 'Cat';

  constructor() {
    makeObservable(this, {
      name: cell, // observable
      kind: cell, // observable
      full: cell, // computed
    });
  }

  get full() {
    return this.name + ' ' + this.kind;
  }
}

const obj = new TomAndJerry();

const dispose = autorun(() => { // create observable cell tree
  console.log(obj.full);
});

obj.name = 'Jerry';
obj.kind = 'Mouse';

dispose();
output:
Tom Cat
Jerry Mouse
As you can see, despite the fact that the state of two cells changed sequentially, the result was computed only once.
As you probably already noticed, it is required to annotate the object properties.
The following annotations are available:
-
asyncCell– binds a property to a cell of typeAsyncCell– the cell whose value changes asynchronously. The passed function is expected to return a value of one of the following types:Promise,AsyncIterableorIterable. Or you can set value of these types directly to the property. -
obsValueCell– binds a property to a cell of typeObsValueCell– the cell whose value can be observable. The cell listens for Changes of value and propagates them. Observable values are created using functions:createObsArray,createObsMap,createObsSet,createObsObject. -
cell– binds a property to a cell of typeCell– if the previous annotation options didn't suit you, then just use this one.
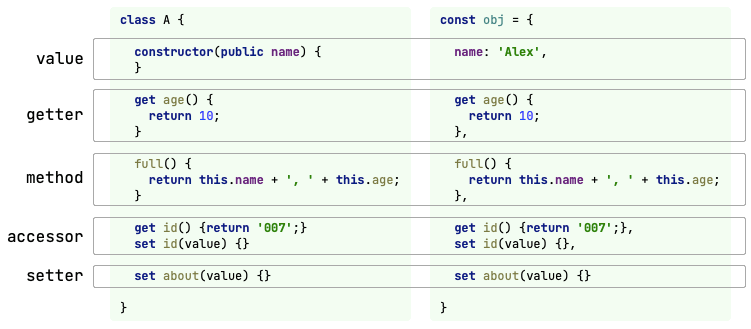
The following property type designations are used here:
Accordingly, the following properties can be annotated:
| annotation | method | value | getter | accessor | setter |
|---|---|---|---|---|---|
asyncCell |
✅ | ✅ | ❌ | ❌ | ❌ |
obsValueCell |
❌ | ✅ | ❌ | ❌ | ❌ |
cell |
✅ | ✅ | ✅ | ❌ | ❌ |
Also, for value properties, a change is performed:
- for annotation
asyncCellthe value is transformed into a getter; - for annotation
obsValueCellandcellthe value is transformed into an accessor.
As a result, the annotated property becomes one of:
| annotation | method | value | getter | accessor | setter |
|---|---|---|---|---|---|
asyncCell |
◉ | ◉ | |||
obsValueCell |
◉ | ||||
cell |
◉ | ◉ | ◉ |
Under the hood, everything just works on cells.
tree-cell doesn't limit you, you can use the makeObservable-annotation-autorun bundle, or you can write code directly using cells, or you can mix both of these approaches.
Let's rewrite the above example TomAndJerry using only cells (you'll see part of the magic that happens when you use the makeObservable-annotation-autorun bundle):
import {Cell} from '@do-while-for-each/tree-cell';

class TomAndJerry {
  name = new Cell('Tom');
  kind = new Cell('Cat');

  constructor() {
    const fullDescr = Object.getOwnPropertyDescriptor(Object.getPrototypeOf(this), 'full')!;
    const fullCell = new Cell(fullDescr.get!.bind(this));
    Object.defineProperty(this, 'full', { // makeObservable
      get() {
        return fullCell.get();
      }
    });
  }

  get full(): string {
    return this.name.get() + ' ' + this.kind.get();
  }
}

const obj = new TomAndJerry();

const rootCell = new Cell(() => { // autorun
  console.log(obj.full);
});
const onChangeHandler = () => {
};
rootCell.onChange(onChangeHandler); // create observable cell tree

obj.name.set('Jerry');
obj.kind.set('Mouse');

rootCell.offChange(onChangeHandler); // dispose
output:
Tom Cat
Jerry Mouse
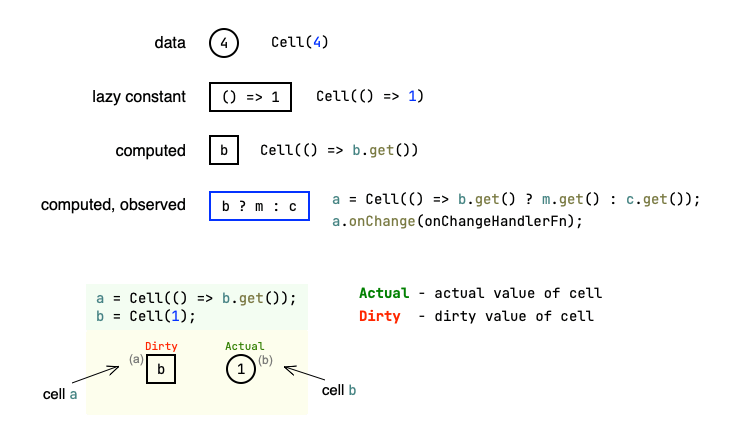
Here name and kind are data cells. And fullCell is a function-based cell or a computed cell.
This function in autorun will run only once:
const a = new Cell(() => b.get());
const b = new Cell(1);
autorun(() => {
  const res = a.get(); // root -> a -> b
  b.set(res + 1);      // and here we change b, oops..
});
This behavior is done to avoid an infinite loop.
But sometimes there are situations when you just need to change the dependency in the tree that is currently in the process of actualizing.
To do this, you need to follow two rules:
- There must be a condition that breaks the infinite loop.
- Changes must occur in a microtask or macrotask.
import {nextTick} from '@do-while-for-each/common';

const a = new Cell(() => b.get());
const b = new Cell(1);
autorun(() => {
  const res = a.get();
  if ('some condition that breaks the infinite loop') {
    nextTick(() => { // or setTimeout
      b.set(res + 1); // and here we change b
    });
  }
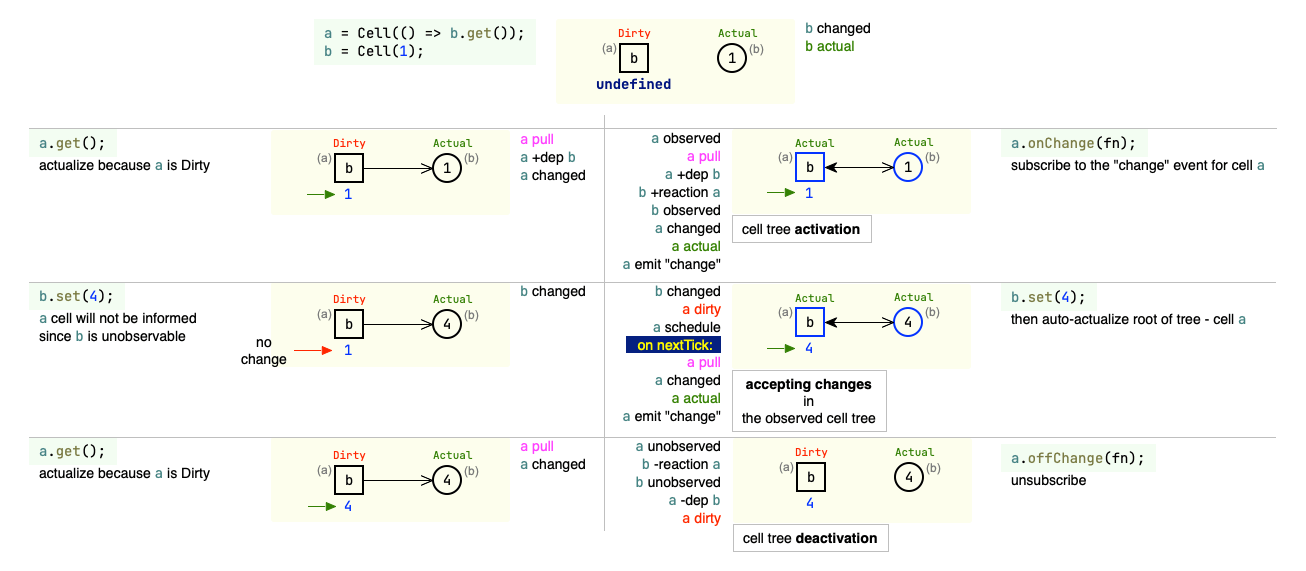
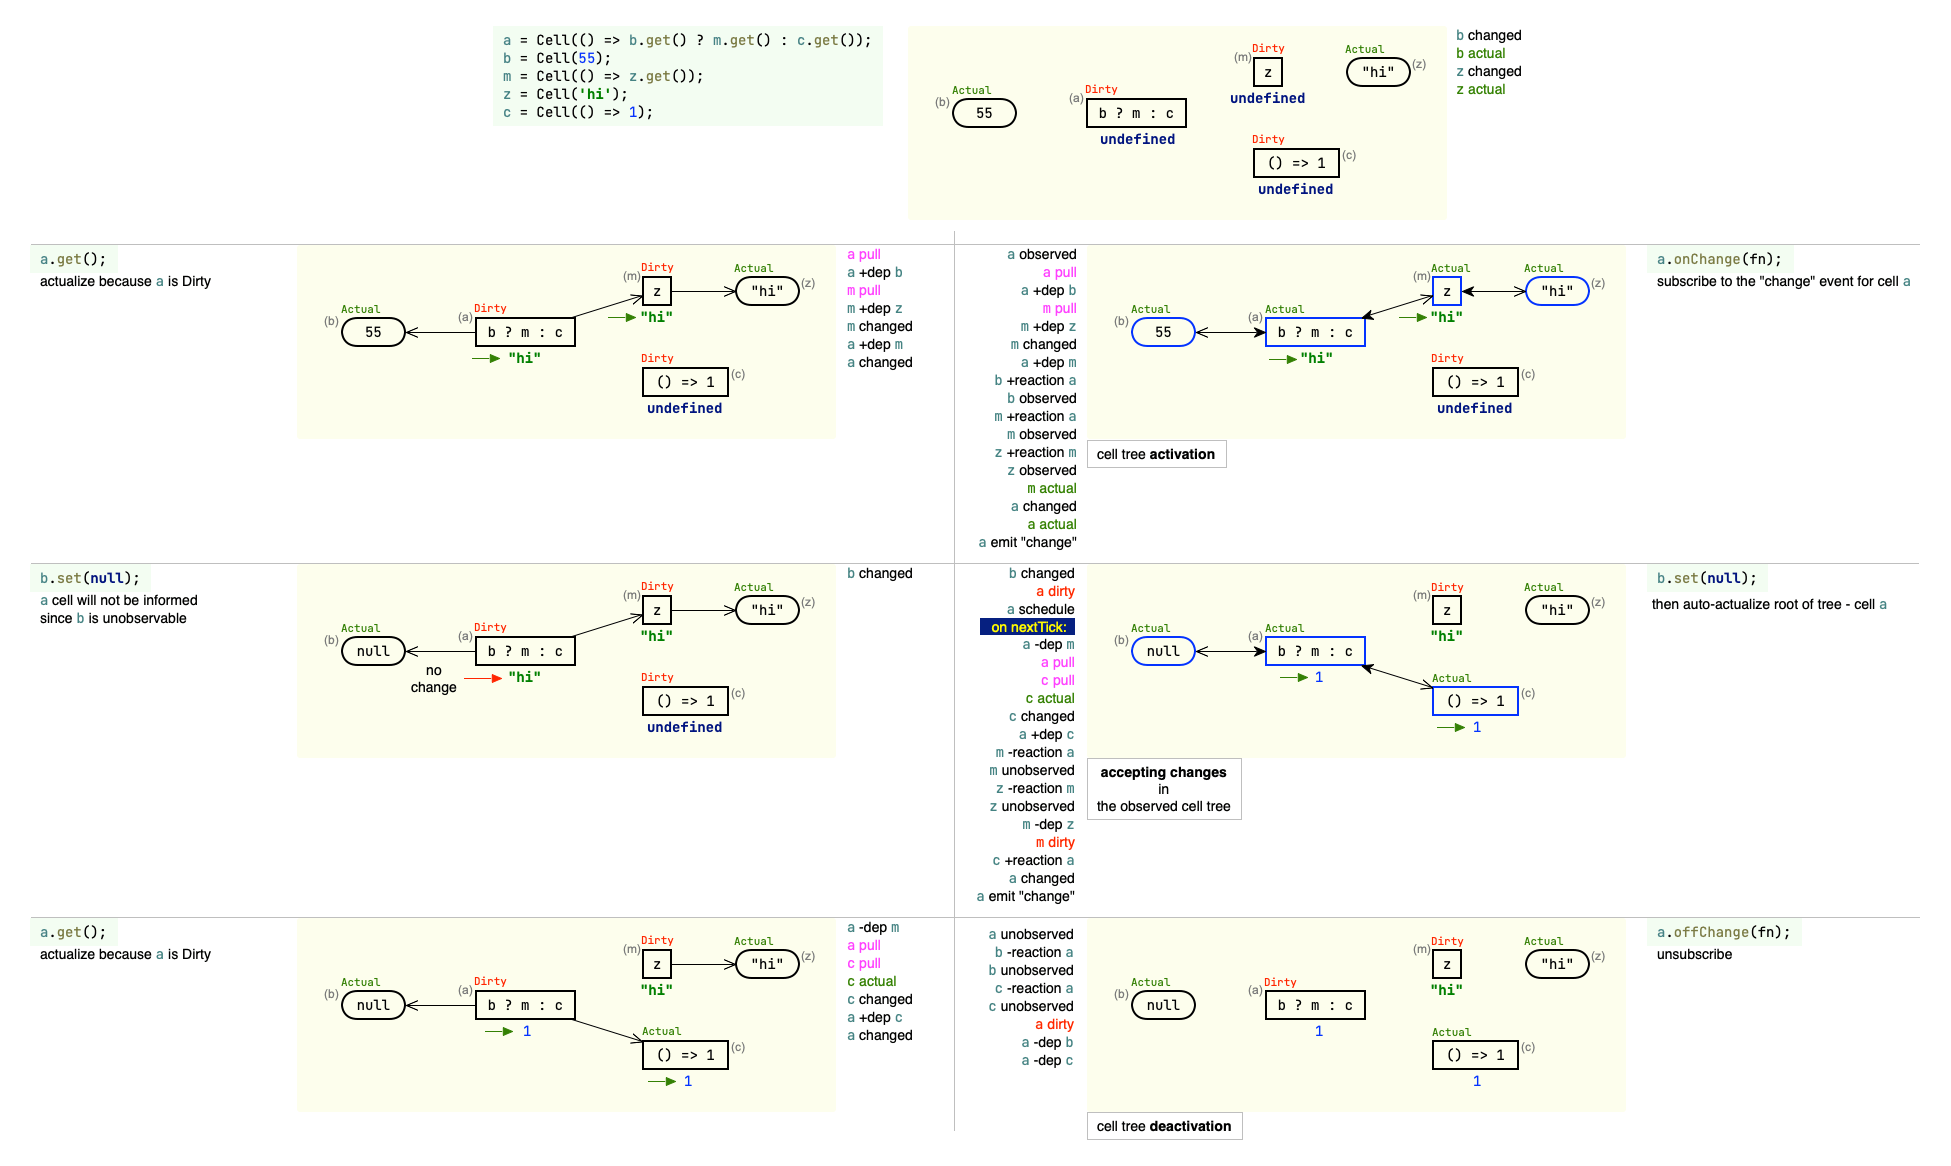
});- Acceptance of changes in the observable cell tree always happens in a nextTick(in the Node.js environment) or in a microtask(in the browser environment).
- As a consequence of (1), by default tree-cell automatically debounce changes. Debouncing speeds up the program, because interim changes are not applied.
- In most cases, it is not necessary to control subscriptions/unsubscribing. Everything happens automatically based on just your code.
- Also, all sorts of merging/switching streams become unnecessary, for example, such:
merge,switchMap,combineLatest, etc. - Built-in
distinctUntilChanged. Each new value is compared for equality with the previous one, usingObject.is. You can also pass your comparison implementation -option.isEqual, as well as map the object fields before comparison -option.equalsMapping. - To get a value, you don't need to do something like this: Observable to Promise -> await Promise -> value.
- There is a feeling that it is more optimal and consumes less memory.
- The program has less unnecessary code and the code is more natural.
RxJS has a wonderful filter operator. In the ideology of cells, it is impossible to apply the same filter to the resulting value.
Consider an example:
const a = new Cell(1);
const b = new Cell(() => a.get(), {filter: value => value > 0});
a.set(-1);
console.log(b.get()); // what will be displayed in the console?
The value of cell a has changed, while b depends on a and must also change, otherwise b becomes invalid.
Accordingly, one cannot simply ignore the change in a just because the filter b does not pass the result.
The only way out is to throw an error.
"How then to be? I need regular filters that don't throw an error"
- Don't use a filter on cells.
- The filtering logic must be implemented in the subscription to the cell you are interested in:
const a = new Cell(1);
const b = new Cell(() => a.get());

b.on('change', ({value}) => {
  if (value > 0)
    console.log(`b`, value);
});


