A CLI tool for generating Node.js projects.
Install globally with npm install -g @mentormate/node-cli and start generating
projects by running node-cli g [project name] inside your root Projects folder.
The generated project will be in its own folder inside the current one.
-
generate/g[project name]- This command starts the process of generating your Node.js project.There are three ways to generate it:
-
node-cli g [project name] --interactive- Interactive mode -
node-cli g [project name] --example-app- Generate an example application -
node-cli g [project name]- No flags. By default, the command will generate a basic express application when no flags are supplied.
-
-
version/v/--version/-v- Outputs the current version of the CLI tool -
help/h/--help/-h- Lists the available commands and their aliases
-
--interactive- Start an interactive mode. You will have to answer a couple of questions so the result will be customized according to your needs. -
--example-app- You will have to choose between express and Nest.js to generate an example ToDo application.
-
When
--example-appflag is used, the generated ToDo app will include the following features:- Language:
typescript - Db:
postgresql - JS code linters:
prettierandeslint - Hooks with
husky:commitlint,commitizen,pre-commit,pre-push - Containerization with
docker - Unit and E2E tests with
jestandsupertest - JWT authentication
- API documentation with
openapi - TypeScript-first schema validation with
zod - Query Builder with
knex - Global error handling
- Language:
-
When
--interactiveflag is used, it will start prompting question so you can customize the project you want to create. After the initial naming you will be provided with the following options:
For an exaustive list of features refer to the features document.
- Express
- Nest.js - this option will automatically install its predefined linter settings and will always use TypeScript
Although you will be provided with two options - TypeScript and JavaScript
the usage of the latter is strongly discouraged. Only for edge cases, small
projects and only after getting permission from your project's architect/team lead
you should choose the JavaScript option
You will be presented with a selection of features that you can choose to be included in your project. The default choice will include all of the listed features. The features are as follows:
-
JS code linters - this option will install
prettierandeslintas dev-dependencies on your project and setup some initial configuration according to a common MentorMate standard. -
Hooks with
husky- this option will setuphuskyfor your project and depending on your choice can add:-
Commit hook - the hook will enforces usage of proper commit messages using
commitlintandcommitizen.commitizenwill guide you through a friendly CLI whennpx czcommand is used instead ofgit commit: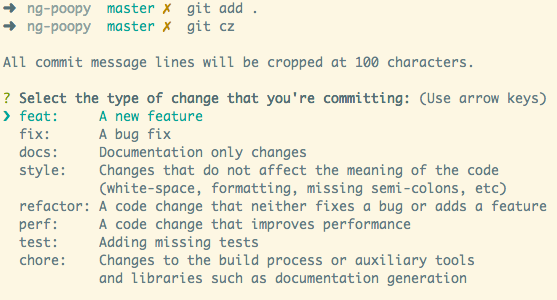
It is all about using Conventional Commits
-
Pre-commit hook - the hook will run code and filename linters on the staged files and check for possible unwanted secrets/keys committed
-
Pre-push hook - this hook is just a placeholder. For now no action will happen here, but you can configure it by your needs
-
-
Containerization with Docker - this option will create a Dockerfile file for building Docker images of your application.
A configured Jest setup will always be included in your project, along with
a GitHub workflow that will run on opening PRs that target the main/master
branch and on every subsequent push to the origin branch of the PR.
If you have supplied --example-app flag, you are going to get a folder
structure already setup for your project. The structure will include
database configuration, models folders, API with controllers, services
folder, tests, etc... In each file there's a short instruction of what
should be included in the current file/folder. Some of the files are optional
or just sample files and can/should be deleted.
MM-NODE-CLI is MIT licensed, as found in the LICENSE file.