A WebdriverIO reporter that creates Jenkins compatible XML based JUnit reports
The easiest way is to keep @wdio/junit-reporter as a devDependency in your package.json, via:
npm install @wdio/junit-reporter --save-devInstructions on how to install WebdriverIO can be found here.
This reporter will output a report for each runner, so in turn you will receive an xml report for each spec file. Below are examples of XML output given different scenarios in the spec file.
describe('a test suite', () => {
    it('a test case', function () {
      // do something
      // assert something
    });
});
becomes
<testsuites>
    <testsuite name="a test suite" timestamp="2019-04-18T13:45:21" time="11.735" tests="0" failures="0" errors="0" skipped="0">
        <properties>
          <property name="specId" value="0"/>
          <property name="suiteName" value="a test suite"/>
          <property name="capabilities" value="chrome"/>
          <property name="file" value=".\test\specs\asuite.spec.js"/>
        </properties>
        <testcase classname="chrome.a_test_case" name="a_test_suite_a_test_case" time="11.706"/>
    </testsuite>
</testsuites>describe('a test suite', () => {
describe('a nested test suite', function() {
it('a test case', function () {
// do something
// assert something
});
});
});becomes
<testsuites>
    <testsuite name="a test suite" timestamp="2019-04-18T13:45:21" time="11.735" tests="0" failures="0" errors="0" skipped="0">
    <properties>
      <property name="specId" value="0"/>
      <property name="suiteName" value="a test suite"/>
      <property name="capabilities" value="chrome"/>
      <property name="file" value=".\test\specs\asuite.spec.js"/>
    </properties>
  </testsuite>
  <testsuite name="a nested test suite" timestamp="2019-04-18T13:45:21" time="11.735" tests="0" failures="0" errors="0" skipped="0">
    <properties>
      <property name="specId" value="0"/>
      <property name="suiteName" value="a nested test suite"/>
      <property name="capabilities" value="chrome"/>
      <property name="file" value=".\test\specs\asuite.spec.js"/>
    </properties>
    <testcase classname="chrome.a_test_case" name="a nested test suite a test case" time="11.706"/>
  </testsuite>
</testsuites>describe('a test suite', () => {
it('a test case', function () {
// do something
// assert something
});
});
describe('a second test suite', () => {
it('a second test case', function () {
// do something
// assert something
});
});becomes
<testsuites>
    <testsuite name="a test suite" timestamp="2019-04-18T13:45:21" time="11.735" tests="0" failures="0" errors="0" skipped="0">
    <properties>
      <property name="specId" value="0"/>
      <property name="suiteName" value="a test suite"/>
      <property name="capabilities" value="chrome"/>
      <property name="file" value=".\test\specs\asuite.spec.js"/>
      <testcase classname="chrome.a_test_case" name="a nested test suite a test case" time="11.706"/>
    </properties>
  </testsuite>
  <testsuite name="a second test suite" timestamp="2019-04-18T13:45:21" time="11.735" tests="0" failures="0" errors="0" skipped="0">
    <properties>
      <property name="specId" value="0"/>
      <property name="suiteName" value="a second test suite"/>
      <property name="capabilities" value="chrome"/>
      <property name="file" value=".\test\specs\asuite.spec.js"/>
    </properties>
    <testcase classname="chrome.a_second_test_case" name="a_second_test_suite_a_second_test_case" time="11.706"/>
  </testsuite>
</testsuites>All test case failures are mapped as JUnit test case errors. A failed test case due to assertion failure or error will look like:
<testcase classname="chrome.a_test_case" name="a_test_suite_a_test_case" time="0.372">
  <failure message="Error: some error"/>
    <system-err>
        <![CDATA[
Error: some assertion failure
    at UserContext.<anonymous> (C:\repo\webdriver-example\test\specs/a_test_suite.spec.js:22:17)
]]>
  </system-err>
</testcase>Following code shows the default wdio test runner configuration. Just add 'junit' as reporter
to the array. To get some output during the test you can run the WDIO Dot Reporter and the WDIO JUnit Reporter at the same time:
// wdio.conf.js
module.exports = {
    // ...
    reporters: [
        'dot',
        ['junit', {
            outputDir: './',
            outputFileFormat: function(options) { // optional
                return `results-${options.cid}.${options.capabilities}.xml`
            }
        }]
    ],
    // ...
};
The following options are supported:
Define a directory where your xml files should get stored.
Type: String
Required
Define the xml files created after the test execution.
Type: Object
Default: function (opts) { return `wdio-${this.cid}-${name}-reporter.log` }
outputFileFormat: function (options) {
    return 'mycustomfilename.xml';
}
Note:
options.capabilitiesis your capabilities object for that runner, so specifying${options.capabilities}in your string will return [Object object]. You must specify which properties of capabilities you want in your filename.
Gives the ability to provide custom regex for formatting test suite name (e.g. in output xml ).
Type: Regex,
Default: /[^a-zA-Z0-9@]+/
// wdio.conf.js
module.exports = {
    // ...
    reporters: [
        'dot',
        ['junit', {
            outputDir: './',
            suiteNameFormat: /[^a-zA-Z0-9@]+/
            outputFileFormat: function(options) { // optional
                return `results-${options.cid}.${options.capabilities}.xml`
            }
        }]
    ],
    // ...
};Adds a file attribute to each testcase. This config is primarily for CircleCI. This setting provides richer details but may break on other CI platforms.
Type: Boolean,
Default: false
You can break out packages by an additional level by setting 'packageName'. For example, if you wanted to iterate over a test suite with different environment variable set:
Type: String
Example:
// wdio.conf.js
module.exports = {
    // ...
    reporters: [
        'dot',
        ['junit', {
            outputDir: './',
            packageName: process.env.USER_ROLE // chrome.41 - administrator
        }]
    ]
    // ...
};Allows to set various combinations of error notifications inside xml.
Given a Jasmine test like expect(true).toBe(false, 'my custom message') you will get this test error:
{
    matcherName: 'toBe',
    message: 'Expected true to be false, \'my custom message\'.',
    stack: 'Error: Expected true to be false, \'my custom message\'.\n    at UserContext.it (/home/mcelotti/Workspace/WebstormProjects/forcebeatwio/test/marco/prova1.spec.js:3:22)',
    passed: false,
    expected: [ false, 'my custom message' ],
    actual: true
}
Therefore you can choose which key will be used where, see the example below.
Type: Object,
Default: errorOptions: { error: "message" }
Example:
// wdio.conf.js
module.exports = {
    // ...
    reporters: [
        'dot',
        ['junit', {
            outputDir: './',
            errorOptions: {
                error: 'message',
                failure: 'message',
                stacktrace: 'stack'
            }
        }]
    ],
    // ...
};Optional parameter, set this parameter to true in order to attach console logs from the test in the reporter.
Type: Boolean
Default: false
Example:
// wdio.conf.js
module.exports = {
    // ...
    reporters: [
        'dot',
        ['junit', {
            outputDir: './',
            addWorkerLogs: true
        }]
    ],
    // ...
};This plugin provides a function addProperty(name, value). This function may be used to add additional junit testcase properties to the currently running test step. These properties will be reported in the resulting xml as <property name="${name}" value="${value}" />.
Typical usecase for this is adding a link to an issue or a testcase.
An example for mocha:
import { addProperty } from '@wdio/junit-reporter'

describe('Suite', () => {
    it('Case', () => {
        addProperty('test_case', 'TC-1234')
    })
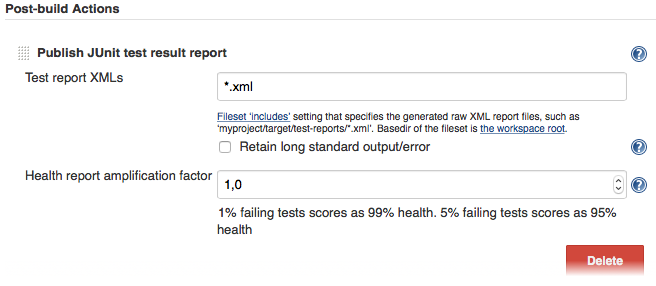
})Last but not least you need to tell your CI job (e.g. Jenkins) where it can find the xml file. To do that, add a post-build action to your job that gets executed after the test has run and point Jenkins (or your desired CI system) to your XML test results:
If there is no such post-build step in your CI system there is probably a plugin for that somewhere on the internet.
For more information on WebdriverIO see the homepage.

