Blink-Diff
A lightweight image comparison tool


![]()


![]()
![]()
![]()
Table of Contents
- Installation
- Usage
- Examples
- API-Documentation
- Tests
- Project Focus
- Project Naming
- Contributions
- Contributors
- Third-party libraries
- License
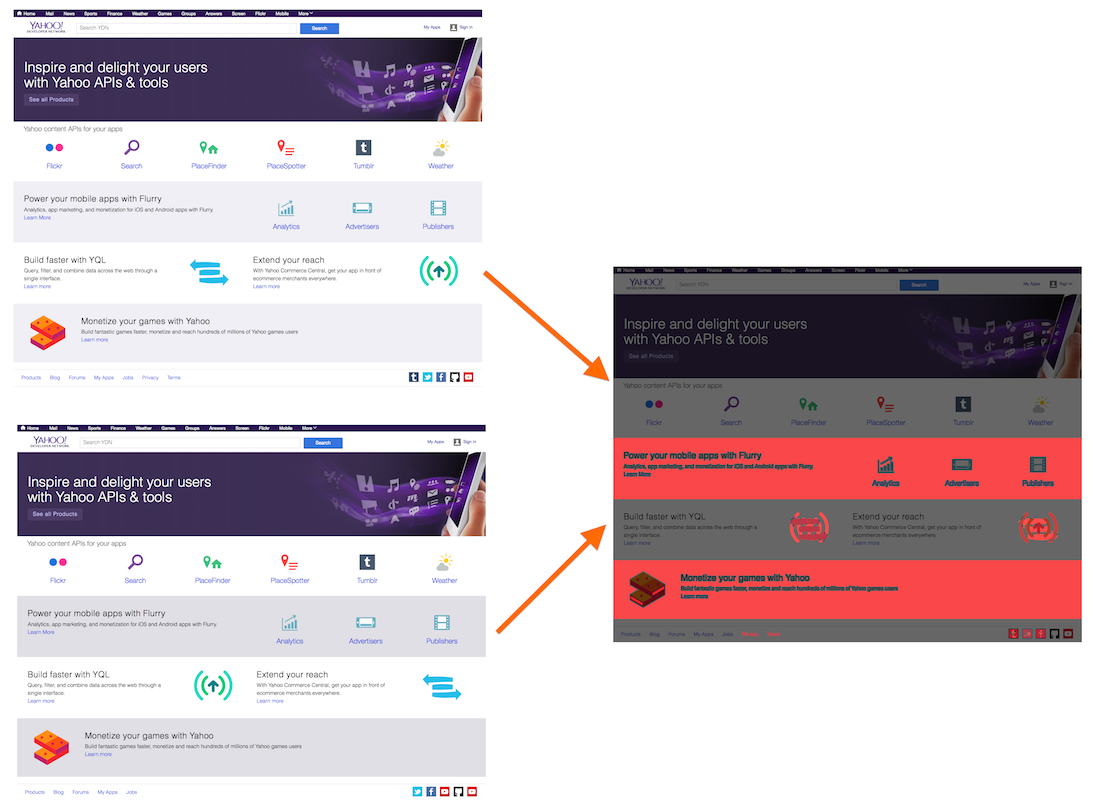
Image Comparison and Result
Installation
Install this module with the following command:
npm install blink-diffAdd the module to your package.json dependencies:
npm install --save blink-diffAdd the module to your package.json dev-dependencies:
npm install --save-dev blink-diffUsage
The package can be used in two different ways:
- per command line
- through an object
Command-Line usage
The command-line tool can be found in the bin directory. You can run the application with
blink-diff --output <output>.png <image1>.png <image2>.pngUse image1 and image2 as the images you want to compare.
Only PNGs are supported at this point.
The command-line tool exposes a couple of flags and parameters for the comparison:
--verbose           Turn on verbose mode
--debug             Turn on debug mode - leaving all filters and modifications on the result
--threshold p       Number of pixels/percent 'p' below which differences are ignored
--threshold-type t  'pixel' and 'percent' as type of threshold. (default: pixel)
--delta p           Max. distance colors in the 4 dimensional color-space without triggering a difference. (default: 20)
--copyImageA        Copies first image to output as base. (default: true)
--copyImageB        Copies second image to output as base.
--no-copy           Doesn't copy anything to output as base.
--output o          Write difference to the file 'o'
--filter f          Filters f (separated with comma) that will be applied before the comparison.
--no-composition    Turns the composition feature off
--compose-ltr       Compose output image from left to right
--compose-ttb       Compose output image from top to bottom
--hide-shift        Hides shift highlighting (default: false)
--h-shift           Acceptable horizontal shift of pixel. (default: 0)
--v-shift           Acceptable vertical shift of pixel. (default: 0)
--block-out x,y,w,h Block-out area. Can be repeated multiple times.
--version           Print version
--help              This help
Object usage
The package can also be used directly in code, without going through the command-line.
Example:
var diff = imageAPath: 'path/to/first/image' // Use file-path imageBPath: 'path/to/second/image' thresholdType: BlinkDiffTHRESHOLD_PERCENT threshold: 001 // 1% threshold imageOutputPath: 'path/to/output/image'; diff;All the parameters that were available in the command-line tool are also available through the class constructor, however they might use slightly different wording. The class exposes additional parameters that are not available from the command-line:
imageAPathDefines the path to the first image that should be compared (required; imageAPath or imageA is required - see example below)imageASupplies first image that should be compared (required; imageAPath or imageA is required - see example below) - This can be a PNGImage instance or a Buffer instance with PNG dataimageBPathDefines the path to the second image that should be compared (required; imageBPath or imageB is required - see example below)imageBSupplies second image that should be compared (required; imageBPath or imageB is required - see example below) - This can be a PNGImage instance or a Buffer instance with PNG dataimageOutputPathDefines the path to the output-file. If you leaves this one off, then this feature is turned-off.imageOutputLimitDefines when an image output should be created. This can be for different images, similar or different images, or all comparisons. (default: BlinkDiff.OUTPUT_ALL)verboseVerbose output (default: false)thresholdTypeType of threshold check. This can be BlinkDiff.THRESHOLD_PIXEL and BlinkDiff.THRESHOLD_PERCENT (default: BlinkDiff.THRESHOLD_PIXEL)thresholdNumber of pixels/percent p below which differences are ignored (default: 500) - For percentage thresholds: 1 = 100%, 0.2 = 20%deltaDistance between the color coordinates in the 4 dimensional color-space that will not trigger a difference. (default: 20)outputMaskRedRed intensity for the difference highlighting in the output file (default: 255)outputMaskGreenGreen intensity for the difference highlighting in the output file (default: 0)outputMaskBlueBlue intensity for the difference highlighting in the output file (default: 0)outputMaskAlphaAlpha intensity for the difference highlighting in the output file (default: 255)outputMaskOpacityOpacity of the pixel for the difference highlighting in the output file (default: 0.7 - slightly transparent)outputShiftRedRed intensity for the shift highlighting in the output file (default: 255)outputShiftGreenGreen intensity for the shift highlighting in the output file (default: 165)outputShiftBlueBlue intensity for the shift highlighting in the output file (default: 0)outputShiftAlphaAlpha intensity for the shift highlighting in the output file (default: 255)outputShiftOpacityOpacity of the pixel for the shift highlighting in the output file (default: 0.7 - slightly transparent)outputBackgroundRedRed intensity for the background in the output file (default: 0)outputBackgroundGreenGreen intensity for the background in the output file (default: 0)outputBackgroundBlueBlue intensity for the background in the output file (default: 0)outputBackgroundAlphaAlpha intensity for the background in the output file (default: undefined)outputBackgroundOpacityOpacity of the pixel for the background in the output file (default: 0.6 - transparent)blockOutObject or list of objects with coordinates that should be blocked before testing.blockOutRedRed intensity for the block-out in the output file (default: 0) This color will only be visible in the result when debug-mode is turned on.blockOutGreenGreen intensity for the block-out in the output file (default: 0) This color will only be visible in the result when debug-mode is turned on.blockOutBlueBlue intensity for the block-out in the output file (default: 0) This color will only be visible in the result when debug-mode is turned on.blockOutAlphaAlpha intensity for the block-out in the output file (default: 255)blockOutOpacityOpacity of the pixel for the block-out in the output file (default: 1.0)copyImageAToOutputCopies the first image to the output image before the comparison begins. This will make sure that the output image will highlight the differences on the first image. (default)copyImageBToOutputCopies the second image to the output image before the comparison begins. This will make sure that the output image will highlight the differences on the second image.filterFilters that will be applied before the comparison. Available filters are: blur, grayScale, lightness, luma, luminosity, sepiadebugWhen set, then the applied filters will be shown on the output image. (default: false)compositionCreates as output a composition of all three images (approved, highlight, and build) (default: true)composeLeftToRightCreates comparison-composition from left to right, otherwise it lets decide the app on what is bestcomposeTopToBottomCreates comparison-composition from top to bottom, otherwise it lets decide the app on what is besthShiftHorizontal shift for possible antialiasing (default: 2) Set to 0 to turn this off.vShiftVertical shift for possible antialiasing (default: 2) Set to 0 to turn this off.hideShiftUses the background color for "highlighting" shifts. (default: false)cropImageACropping for first image (default: no cropping) - Format: { x:, y:, width:, height: }cropImageBCropping for second image (default: no cropping) - Format: { x:, y:, width:, height: }perceptualTurn the perceptual comparison mode on. See below for more information.gammaGamma correction for all colors (will be used as base) (default: none) - Any value here will turn the perceptual comparison mode ongammaRGamma correction for red - Any value here will turn the perceptual comparison mode ongammaGGamma correction for green - Any value here will turn the perceptual comparison mode ongammaBGamma correction for blue - Any value here will turn the perceptual comparison mode on
Example:
var firstImage = PNGImage;Cropping
Images can be cropped before they are compared by using the cropImageA or cropImageB parameters. Single values can be left off, and the system will calculate the correct dimensions. However, x/y coordinates have priority over width/height as the position are usually more important than the dimensions - image will also be clipped by the system when needed.
Perceptual Comparison
The perceptual comparison mode considers the perception of colors in the human brain. It transforms all the colors into a human perception color-space, which is quite different to the typical physical bound RGB color-space. There, in the perceptual color-space, the distance between colors is according to the human perception and should therefore closer resemble the differences a human would perceive seeing the images.
Logging
By default, the logger doesn't log events anywhere, but you can change this behavior by overwriting blinkDiff.log:
var blinkDiff = ...; blinkDiff { // Do whatever you want to do}; ...Block-Out
Sometimes, it is necessary to block-out some specific areas in an image that should be ignored for comparisons. For example, this can be IDs or even time-labels that change with the time. Adding block-outs to images may decrease false positives and therefore stabilizes these comparisons.
The color of the block-outs can be selected by the API parameters. However, the block-out areas will not be visible by default - they are hidden even though they are used. To make them visible, turn the debug-mode on.
Examples
There are some examples in the examples folder, in which I used screenshots of YDN to check for visual regressions (and made some manual modifications to the dom to make differences appear ;-)).
You can find examples for:
- Color changes in
YDN_Color - Missing DOM elements in
YDN_Missing(including some anti-aliasing) - Multiple differences in
YDN_Multi - Disrupted sorting in
YDN_Sort - Swapped items in
YDN_Swap(including block-out areas) - Text capitalization in
YDN_Upper
All screenshots were compared to YDN.png, a previously approved screenshot without a regression.
Each of the regressions has the screenshot and the output result, highlighting the differences.
API-Documentation
Generate the documentation with following command:
npm run docsThe documentation will be generated in the docs folder of the module root.
Tests
Run the tests with the following command:
npm run testThe code-coverage will be written to the coverage folder in the module root.
Project Focus
There are three types of image comparisons:
- Pixel-by-pixel - Used to compare low-frequency images like screenshots from web-sites, making sure that small styling differences trigger
- Perceptual - Used to compare image creation applications, for example rendering engines and photo manipulation applications that are taking the human perception into account, ignoring differences a human probably would not see
- Context - Used to see if parts of images are missing or are severely distorted, but accepts smaller and/or perceptual differences
Blink-Diff was initially created to compare screenshots. These images are generally low-frequency, meaning larger areas with the same color and less gradients than in photos. The pixel-by-pixel comparison was chosen as it will trigger for differences that a human might not be able to see. We believe that a bug is still a bug even if a human won't see it - a regression might have happened that wasn't intended.
A perceptual comparison would not trigger small differences, possibly missing problems that could get worse down the road.
Pixel-by-pixel comparisons have the reputation of triggering too often, adding manual labor, checking images by hand. Blink-Diff was created to keep this in mind and was optimized to reduce false-positives by taking sub-pixeling and anti-aliasing into account. Additional features like thresholds and the pythagorean distance calculation in the four dimensional color-space makes sure that this won't happen too often. Additionally, filters can be applied to the images, for example to compare luminosity of pixels and not the saturation thereof.
Blink-Diff also supports partially the perceptual comparison that can be turned on when supplying perceptual=true. Then, the colors will be compared in accordance with the human perception and not according to the physical world. High-frequency filters, however, are not yet supported.
Project Naming
The name comes from the Blink comparator that was used in Astronomy to recognize differences in multiple photos, taking a picture of the same area in the sky over consecutive days, months, or years. Most notably, it was used to discover Pluto.
Contributions
Feel free to create an issue or create a pull-request if you have an idea on how to improve blink-diff. We are pretty relaxed on the contribution rules; add tests for your pull-requests when possible, but it is also ok if there are none - we'll add them for you. We are trying to improve blink-diff as much as possible, and this can only be done by contributions from the community.
Also, even if you simply gave us an idea for a feature and did not actually write the code, we will still add you as the Contributor down below since it probably wouldn't be there without you. So, keep them coming!
Contributors
Third-party libraries
The following third-party libraries are used by this module:
Dependencies
- promise: https://github.com/then/promise
- pngjs-image: https://github.com/yahoo/pngjs-image
Dev-Dependencies
- chai: http://chaijs.com
- coveralls: https://github.com/cainus/node-coveralls
- codeclimate-test-reporter: https://github.com/codeclimate/javascript-test-reporter
- istanbul: https://github.com/gotwarlost/istanbul
- mocha: https://github.com/visionmedia/mocha
- sinon: http://sinonjs.org
- sinon-chai: https://github.com/domenic/sinon-chai
- yuidocjs: https://github.com/yui/yuidoc
License
The MIT License
Copyright 2014-2015 Yahoo Inc.