Boo UI React组件库
作者: Bruski aka Boo
更新时间: 2020/10/18
项目初步分析
需要思考的问题
- 代码结构
- 需求分析和编码
- 样式解决方案
- 组件测试用例分析和编码
- 代码打包输出和发布
- CI/CD,文档生成
化繁为简,从简单入手,在需求中慢慢复杂
项目结构设计
boo-ui-react/
	README.md
	node_modules/
	package.json
	tsconfig.json
	src/
		components/
			Button/
				button.tsx
				button.test.tsx
				style.scss
        styles/
            ...
       	index.tsx
代码规范
create-react-app 集成了 react-app
vs code 配置 .vscode/setting.json
{
  "eslint.validate": {
    "javascript",
    "javascriptreact",
    {"language": "typescript", "autoFix": true},
    {"language": "typescriptreact", "autoFix": true},
  }
}
样式解决方案分析
-
inline-css
-
css in js
-
styled component
-
sass / less (Picked!)
文件结构
styles/
	_variables.scss  // 变量和可配置项
	_mixins.scss  // 全局 mixins
	_functions.scss  // 全局 functions
components/
	Button/
		style.scss // 组件单独的样式
创建组件库的色彩体系
系统色板:
- 基础色板
- 中性色板
产品色板
- 功能色
色彩体系
组件库样式变量分类
- 基础色彩系统
- 字体系统
- 表单
- 按钮
- 边框和阴影
- 可配置开关
构建sass全局styles
定义色彩系统
src/styles/_variables.scss
/* 系统色板 */
/* ========================== */
/* 中性色 Neutral colors */
$white:   #ffffff   !default;
$black:   #000000   !default;
$gray-100:#f8f9fa   !default;
$gray-200:#e9ecef   !default;
$gray-300:#dee2e6   !default;
$gray-400:#ced4da   !default;
$gray-500:#adb5bd   !default;
$gray-600:#6c757d   !default;
$gray-700:#495057   !default;
$gray-800:#343a40   !default;
$gray-900:#212529   !default;

/* 基础色板 Basic colors */
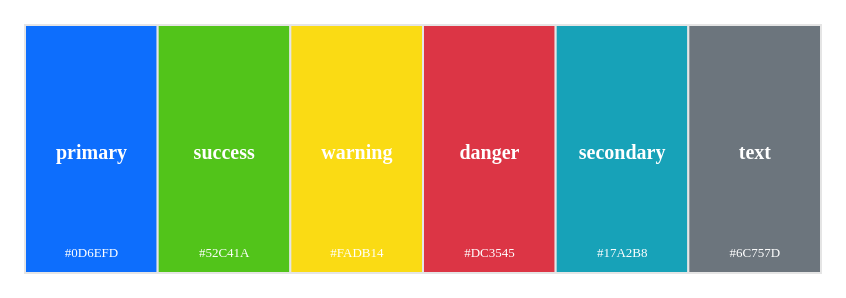
$red:     #dc3545   !default; // 红
$pink:    #d63384   !default; // 粉
$orange:  #fd7e14   !default; // 橙
$yellow:  #fadb14   !default; // 黄
$green:   #52c41a   !default; // 绿
$teal:    #20c997   !default; // 青
$cyan:    #17a2b8   !default; // 蓝绿
$blue:    #0d6efd   !default; // 蓝
$indigo:  #6610f2   !default; // 靛青
$purple:  #6f42c1   !default; // 紫

/* 产品色板 */
/* ========================== */
/* 功能色 */
$primary:   $blue       !default;
$secondary: $gray-600   !default;
$success:   $green      !default;
$info:      $cyan       !default;
$warning:   $yellow     !default;
$danger:    $red        !default;
$light:     $gray-100   !default;
$dark:      $gray-800   !default;
!default 关键字是sass提供,说明该变量可以被覆盖。
跨浏览器样式统一
引入 normalize.css https://github.com/necolas/normalize.css
在其基础上, 混入预定好的 sass 变量.
Sass知识
Partial module
_开头的文件在sass看来是 partial 模块,只能被导入,不可以单独的编译导出(结果为空)。
使用@import不会额外发请求,引入的时候不需要加_
例子
// 假设同层级有 _variables.scss 文件
@import "variables"
组件
Button组件
不同的 Button Type
- Primary
- Default
- Danger
- Link Button
不同的 Button Size
- normal
- small
- large
Disabled状态
- button disable
- link 需要做单独处理
<Button
	size="lg"
	type="primary"
	disabled
	href?=""
	className?=""
	autoFocus?=""
	...
>
	prop children
</Button>
disabled 状态的 css
&.disabled,
&[disabled] {
    cursor: not-allowed;
    opacity: $btn-disabled-opacity;
    box-shadow: none;
    > * {
        pointer-events: none;
    }
}
如何导入button, a 标签 原生属性?
使用 typescript Intersection Types 交叉类型, 即
type NewType = Type1 & Type2
将 React.ButtonHTMLAttributes 类型与 自定义props 结合起来.
又由于 button 和 anchor 存在不同的必选参数, 所以要使用 ts 的 Util type Partial 将必选变为可选.
结果如下:
type NativeButtonProps = BaseButtonProps & React.ButtonHTMLAttributes<HTMLElement>
type AnchorButtonProps = BaseButtonProps & React.AnchorHTMLAttributes<HTMLElement>
type ButtonProps = Partial<NativeButtonProps & AnchorButtonProps>
支持用户自定义class
将props的 className 透传到 class 即可
支持事件, 其他属性
通过解构 props + 透传 实现.
Alert组件
用于页面中展示重要的提示信息, 页面中的非浮层元素, 不会自动消失
功能点
- 点击关闭 整个元素消失
- 支持四种主题颜色: success, default, danger, warning
- 可以包含标题和内容,解释更详细的警告
- 右侧是否显示关闭按钮可配置
设计
<Alert
	title=""
	content=""
	alertType=""
	closable={true}
	onClose={}
/>
Menu 组件
功能
- 横向
- 纵向
- 下拉菜单
- disabled
设计
<Menu defaultIndex="1" onSelect={} mode="vertical">
	<Menu.Item index="1">
		title one
	</Menu.Item>
	<Menu.Item index="2" disabled>
		diabled link
	</Menu.Item>
	<Menu.SubMenu index="3" title="dropdown">
        <Menu.Item index="3-1">
            sub item
        </Menu.Item>
        <Menu.Item index="3-2">
            sub item
        </Menu.Item>
	</Menu.Item>
</Menu>

interface MenuProps {
    activeIndex: string;
    mode: string;
    onSelect: (selectInedx: number) => void;
    className: string;
}

interface MenuItemProps {
    index: string;
    disabled: boolean;
    className: string;
}
传递 selectedIndex 等数据
使用 context 与 useContext Hook 进行透传
限制 children 类型
使用 React.Children.map 循环 chilren prop, 对属性名进行过滤
判断 child 是否为 React 组件: React.FunctionComponentElement
子组件也许添加标识,如 displayName 让父组件好做判断`
如果不是指定类型,抛出警告,无返回
const renderChildren = () => {
  return React.Children.map(children, (child, index) => {
    const childElement = child as React.FunctionComponentElement<MenuItemProps>
    const { displayName } = childElement.type
    if (displayName === 'MenuItem') {
      return child
    } else {
      console.error('Warning: Menu only recognizes children of MenuItem type')
   	  return
    }
  })
}
下拉菜单
添加 submenu 组件,
在 Menu 组件的children中增加该类型的支持
水平模式下悬浮弹出子菜单
垂直模式下点击弹出子菜单
下拉菜单动画
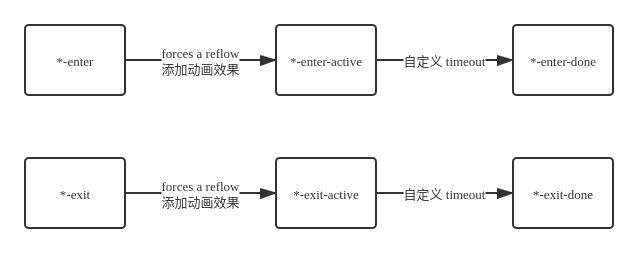
使用 react-transition-group 库的 CSSTransition 组件实现
 <CSSTransition
     in={menuOpen}
     timeout={300}
     classNames="zoom-in-top"
     appear
 >
     <ul className={subMenuClasses}>
     	{childrenComponent}
     </ul>
 </CSSTransition>
使用 animate.css 的 zoom-in 效果
.zoom-in-top {
  &-enter {
    opacity: 0;
    transform: scaleY(0);
  }


  &-enter-active {
    opacity: 1;
    transform: scaleY(1);
    transition: transform 300ms cubic-bezier(0.23, 1, 0.32, 1) 100ms, opacity 300ms cubic-bezier(0.23, 1, 0.32, 1) 100ms;
    transform-origin: center top;
  }

  &-exit {
    opacity: 1;
  }

  &-exit-active {
    opacity: 0;
    transform: scaleY(0);
    transition: transform 300ms cubic-bezier(0.23, 1, 0.32, 1) 100ms, opacity 300ms cubic-bezier(0.23, 1, 0.32, 1) 100ms;
    transform-origin: center top;
  }
}
坑点:
1 - display 与 opacity 同时设置,使得 opacity 的动画效果失效: 解决办法见 opacity 与 display 同时设置, 动画不生效?
2 - 下拉菜单消失时, 无动画效果. 原因: display: none 先生效, 同问题1; 解决办法: 使用 CSSTransition 的 unmountOnExit 特性, 并移除原来的 css display 控制
图标ICON组件
历史
- 上古时代 - 雪碧图(CSS Sprite)
- 近代 - Font icon
- 现代和未来 - SVG
SVG优势
- 完全可控 CSS 属性
- SVG 即取即用, Font icon 要下载全部字体文件
- Font Icon 还有奇怪的 Bug
技术选型
react-fontawesome: Font Awesome 5 React component using SVG with JS
yarn add @fortawesome/fontawesome-svg-core \
         @fortawesome/free-solid-svg-icons \
         @fortawesome/react-fontawesome
实现
包裹 fontawesome 组件, 扩展 theme 赋予颜色的功能
通过 theme 添加 css 类名, 通过 sass 生成对应的 类名与 color 属性值, 即可实现.
Transition 动效组件
基于 react-transition-group 的 CSSTransition 实现, 扩展了两个字段
- animation: 封装动画class
- wrapper: 给传入组件添加 div 包裹, 避免 css transition 属性与原节点冲突
组件测试
测试库选型
Jest: https://jestjs.io/ 通用测试工具
react testing library: React3.3.0后官方推荐的测试库 npm @testing-library/react
jest-dom: 为 jest matcher 新增了对于 DOM 的断言matcher
获取当前节点下的一层节点
使用 :scope 选择器 https://developer.mozilla.org/en-US/docs/Web/CSS/:scope
配合 > 直接子节点, 获取当前节点下的第一层节点
ul.querySelectorAll(':scope > li')
异步断言
tesing library/react提供wait工具函数,搭配 await 使用,将异步断言放进 waitFor 的回调参数中.
import { fireEvent, wait } from '@testing-library/react'

fireEvent.mouseLeave(dropdownElement)
await wait(() => {
	expect(expect(wrapper.queryByText('drop 1')).not.toBeVisible())
})
动态添加样式文件
使用 @testing-library/react 提供的 matcher toBeVisible 可以判断css的 display 样式是否生效
由于 Jest 沙箱不会包含css文件,需要在测试时手动创建
const createStyleTag = (): HTMLStyleElement => {
  const styleContext = `
    .b-submenu {
      display: none;
    }
    .b-submenu.b-submenu--opened {
      display: block;
    }
  `
  const style = document.createElement('style')
  style.innerHTML = styleContext
  return style
}

wrapper.container.append(createStyleTag())  // 然后在 wrapper 的 container 上加入
Storybook
CRA create-react-app 不适合组件库开发时的展示
组件完美开发工具应有特点
- 分开展示各个组件不同属性下的状态
- 能追踪组件的行为并且具有属性调试功能
- 可以为组件自动生成文档和属性列表
选型: StoreBook@5.2.8
Storybook 添加全局样式
// .storybook/config.js

import '../src/styles/index.scss';
Storybook TSX 支持
在.storybook 目录下新建 Webpack 的配置文件
// .storybook/webpack.config.js
module.exports = ({config}) => {
  config.module.rules.push({
    test: /\.tsx?$/,
    use: [
      {
        loader: require.resolve("babel-loader"),
        options: {
          presets: [require.resolve("babel-preset-react-app")]
        }
      }
    ]
  });

  config.resolve.extensions.push(".ts", ".tsx");

  return config;
}
然后修改 .storybook/config.js 文件的configure
configure(require.context('../src', true, /\.stories\.tsx$/), module); // 改目录为 src, 匹配为 tsxStoreBook 添加组件 story
使用 storiesOf API 添加页面, 在 add 处添加示例名 + 示例组件
import React from 'react'
import { storiesOf } from '@storybook/react'
import { action } from '@storybook/addon-actions'

import Button from './button'

const defaultBtn = () => (
  <Button onClick={action('clicked')}>default button</Button>
)

const btnWithSize = () => (
  <>
    <Button size="small">small button</Button>
    <Button size="large">large button</Button>
  </>
)

const btnWithType = () => (
  <>
    <Button btnType="default">default button</Button>
    <Button btnType="primary">primary button</Button>
    <Button btnType="danger">danger button</Button>
    <Button btnType="link" href="#">link button</Button>
  </>
)

storiesOf('Button Component', module)
  .add('默认 Button', defaultBtn)
  .add('Button 尺寸', btnWithSize)
  .add('Button 类型', btnWithType)
Storebook 插件系统 Addons
Decorator
全局 decorator 可以为每一个 story 页添加公共样式或代码
// .storybook/preview.js
const styles = {
  textAlign: 'center',
}

export const decorators = [
  (Story) => <div style={styles}>{Story()}</div>
]
Native Addons
在单个story中导入,使用 addDecorator API, 可以位单个story导入 decorator, 这里为 button story 导入自动生成文档的插件
import { storiesOf } from '@storybook/react'
import { withInfo } from '@storybook/addon-info'

storiesOf('Button Component', module)
  .addDecorator(withInfo)
自动生成组件描述
使用 @storybook/addon-info作为装饰器, 自动为组件生成源码+描述等
自动生成组件属性
使用 react-docgen-typescript-loader 通过配置 Webpack的 loader 自动读取组件的属性定义, 类型, 默认值等, 并生成表格
自动生成注释
使用 jsdoc 标准写注释
JavaScript 模块化
模块化历史
-
Namespace 全局挂载
-
CommonJS (NodeJS,不支持浏览器)
-
AMD(支持浏览器)
-
ES Module(大一统)
Webpack
UMD模式
通过代码兼容 commonjs, amd, es module.
不建议umd, 无法做到按需加载
es6 module
使用 Es module 可以静态分析, 做到 tree shaking
package.json 中配置 module 入口, main是 commonjs 的入口
所以组件库项目配置 package.json 如下:
// package.json

"main": "build/index.js",
"module": "build/index.js",
"types": "build/index.d.ts",
Typescript 转为 ES Module
通过 src 下的 index.tsx 统一导入组件
package.json 配置 module 字段为 Src/index.tsx
"build-ts": "tsc -p tsconfig.build.json",
Typescript 配置文件
tsconfig.build.json
{
  // 编译选项
  "compilerOptions": {
    "outDir": "build",  // 编译输出文件
    "module": "esnext",  // 采用的模块化类型
    "target": "ES5",  // 编译目标级别
    "declaration": true,  // 为类型生成 .d.ts 声明文件
    "jsx": "react",  // 让jsx|tsx文件 代替 react.createElement
    "moduleResolution": "node", // 支持从 node_module 查找绝对路径的依赖
    "allowSyntheticDefaultImports": true  // 支持 default 的导出方式
  }
  // 编译包含路径
  "include": [
    "src"
  ],
  // 编译不包含的路径
  "exclude": [
    "src/**/*.test.tsx",
    "src/**/*.stories.tsx",
  ]
}
Typescript 处理绝对路径的坑
ts 有几种 module 处理方式, 配置项为 :
moduleResolution:
- classic(默认): 查找绝对路径的依赖从当前路径向上找到根目录, 在 node_module 的库会找不到
- node: 支持从 node_module 查找绝对路径的依赖
所以要配置 moduleResolution: true
Sass 文件编译
配置npm script, 使用node-sass 编译 scss 入口文件
"build-scss": "node-sass ./src/styles/index.scss ./build/index.css",
其他
跨平台删除目录工具
跨平台删除目录的工具 rimraf: The UNIX command rm -rf for node.
npm scripts
"build": "npm run clean && npm run build-ts && npm run build-scss",
"build-ts": "tsc -p tsconfig.build.json",
"build-scss": "node-sass ./src/styles/index.scss ./build/index.css",
"clean": "rimraf ./build"
Npm Link 本地测试组件库
被link的一方, 如组件库:
npm link: 将本地的 package 创建软链接到全局的 node_modules 中
link的一方, 如使用组件库的web app:
npm link xxx: 将某个全局包 link 到自己的项目的 node_modules 中
引入组件库后出现invalid hook错误
出现在 npm link 本地调试的情况: 由于存在两个版本的react (本地的react与link过来的组件库中的react), 所以出错
解决方案一:
在组件库的node_modules link Web app所使用的 react
Npm
主要功能
- 下载别人编写的第三方包到本地使用
- 下载并安装别人编写的命令行程序到本地使用
- 将自己编写的包或者命令行程序上传到npm服务器
账户
npm whoami # 查看登录状态

npm config ls # 查看当前 npm 的仓库, 如果设了别的镜像源就登录不上去, 要改回 官方源 https://registry.npmjs.org/

npm adduser # 登录
发布
package.json 基础参数解析
- name: 包名
- version: 版本, 版本号命名请遵循: 语义化版本
版本格式:主版本号.次版本号.修订号,版本号递增规则如下:

主版本号:当你做了不兼容的 API 修改,
次版本号:当你做了向下兼容的功能性新增,
修订号:当你做了向下兼容的问题修正。
先行版本号及版本编译元数据可以加到“主版本号.次版本号.修订号”的后面,作为延伸。
- description: 包描述
- author: 作者
- license: 开源协议, 一般为 MIT
- keywords: 搜索关键字
- homepage: 项目主页
- repository: 代码仓库
- type: 类型, 如 git
- url: 仓库链接
上传相关参数
- files: 指定哪些文件会被上传到 npm
"files": [
	"dist"
],
- script
- prepublish: 发布前的钩子, 可以指定构建命令
"scripts": {
	"build": "xxx",
	"prepublish": "npm run build"
}
发布命令
npm publish
知识点
将 css class 名组合起来
classnames: https://github.com/JedWatson/classnames
批量创建 css 类名
使用 Sass提供的 @each 与 @map 方法
通过创建 名字与 变量的 map, 再通过 each 循环取出 key, value, 来批量生成类名称与对应变量的值
如批量创建icon颜色类名
$theme-colors: (
  "primary": $primary,
  "secondary": $secondary,
  "info": $info,
  "warning": $warning,
  "danger": $danger,
  "light": $light,
  "dark": $dark,
);

@each $key, $val in $theme-colors {
  .icon-#{$key} {
    color: $val;
  }
}
CSS动画
动画库
Animate.css: https://animate.style/
旋转图标
css3 属性 transform rotate
transform: rotate(angleValue)opacity 与 display 同时设置, 动画不生效?
原因: display 不是一个 animation 支持的属性, 当 display: none -> display: block 变化时, 所有 动画效果都会失效.
解决方案: 通过 js 让 display 先生效, 再让 opacity 变化
思路:
// enter
display: none; opacity: 0;
-> display: block; opactiy: 0;
-> display: block; opacity: 1;

// leave
display: block; opacity: 1;
-> display: block; opactiy: 0;
-> display: none; opacity: 0;
实现: 使用 React Transition Group
CSSTransitionGroup原理


