Cloudli - 

Command Line Utilities for Google Cloud Firestore and Amazon Elasticsearch
Upload, Backup, Restore, Diff, Validate, Search, Load Index, Reindex, and more.
Provides command line functions for administering Google Cloud Firestore and Amazon Elasticsearch.
The commands are designed to be scalable by processing in batches where appropriate and controlling concurrency with various constraints. The batch delete code from firebase-tools was used as a basis for the firestore document hierarchy traversal and batch processing. RxJS was used for the restore command to provide similar batch concurrency control for file directory traversal and processing.
Cloudli supports the following Cloud Firestore commands:
| Function | Description |
|---|---|
| Get Documents | Get document id's or full documents from firestore with various query options |
| Get Document or Collection | Gets document id's or full documents for a specific document or collection path |
| Backup | Backup documents to a local path |
| Restore | Restore documents from a local path to firestore. Alias of fire:upload
|
| Upload | Upload documents from a local path to firestore. Alias of fire:restore
|
| Delete | Backup and delete documents from firestore |
| Diff | Compare firestore documents to local document files. Display results on command line or in html. |
| Validate | Validate firestore documents using JSON Schema definitions |
| Patch | Patch firestore documents using a defined function |
Cloudli supports the following Amazon Elasticsearch commands:
| Function | Description |
|---|---|
| Create Index | Create an index from a mapping with aliases |
| Get Aliases | Get the index name for the read and write aliases |
| Load Index | Load an index from a set of documents in firestore |
| Search | Searches for text in a defined index with optional highlighting |
| Reindex | Reindex documents to a new index mapping and adjust read and write aliases |
| Create Index and Reload | Create a new index mapping, reload documents from firestore and adjust read and write aliases |
Note: Cloud Firestore and Elasticsearch commands can be used independently (with the exception of Load Index and Create Index and Reload, which index documents from firestore).
Examples
Here are a few examples of available commands. See Example Directory below for additional examples and instructions for running the examples.
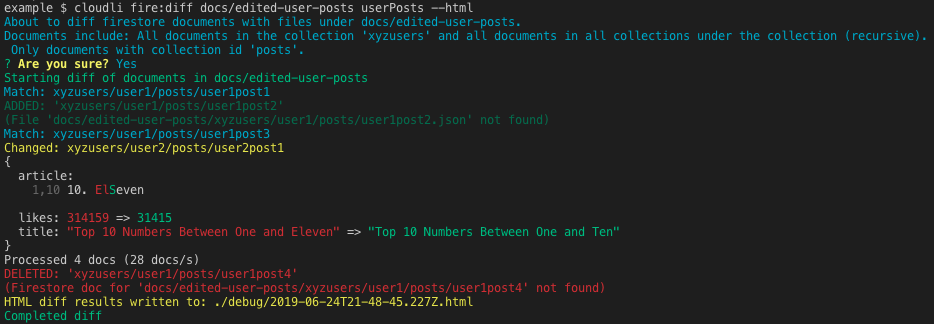
Example: fire:diff
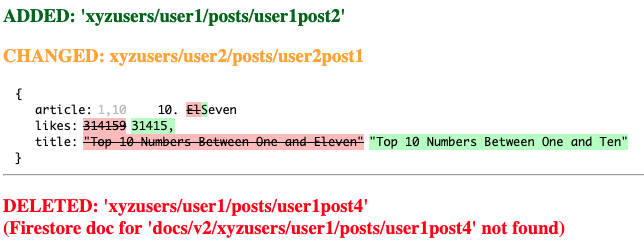
Resulting diff html
Example: fire:validate
Example: es:reindex
Example: es:search
Motivation
While working with Google Cloud FIrestore, I found myself manually updating firestore documents as code evolved. I needed to update existing documents as the implied schemas evolved. Finding the documents to update became a challenge. I also needed a way to see changes that have occurred.
When I added search using Amazon Elasticsearch along with Firebase Cloud Functions, I needed to be able to update the index mappings and reindex documents. In some cases, I wanted to discard the original indexed documents and reindex from the Firestore source documents.
The need to simplify these tasks led to the creation of this tool. It has improved my productivity and I hope others will find it useful.
Goals
Some of the goals for this tool are:
- Simplify common administrative tasks for cloud-based capabilities (initially Cloud Firestore and Amazon Elasticsearch)
- Scale by controlling resource consumption (memory, recursion, batch size, etc)
- Generalize the implementation to support other document structures, schemas, and index mappings
- Support extensible logging and debugging
Getting Started
To install cloudli:
$ yarn global install cloudli
-- or --
$ npm install -g cloudli
Example Directory
The example directory contains sample configuration, documents, index mappings, and JSON schemas that can be used to try out the commands. The example uses documents in the following structure:
─ xyzposts          // contains public "post" documents
─ xyzusers          // contains "user" documents
    ├── user1
    │   └── posts   // contains user 1 "post" documents
    └── user2
        └── posts   // contains user 1 "post" documents
Index mappings example/elasticsearch/indexMappings and JSON Schemas example/schemas are provided for user and post documents.
You can use the example with a test firestore database and/or a test Amazon elesticsearch instance. To use the examples, set up the key configuration in Configuration and then follow the example commands here.
Configuration
Cloudli requires administration account access to use Cloud Firestore and Amazon Elasticsearch commands.
To use Cloud Firestore commands, firebase configuration, including a firebase key file is required. To use elasticsearch commands, elasticsearch configuration, including a service account file is required.
To use any of the elasticsearch commands, a service account file must be supplied in the elasticsearch.serviceAccountFilename config entry.
Since these files are usually environment-specific, the configuration can be included in a local-development.json file in the config directory (or similar files for other environments). You should include /config/local* in the .gitignore file in the root of your project. An example local-development.json file is supplied in example/config:
/**
 * Example of putting sensitive, environment-specific information in a local-development config file
 *
 * Rename this to local-development (or local-environmentname) and fill in details.
 *
 * Keyfile and service account files could be stored in a ./keys folder or other protected location.
 * The .keys path should also be added to .gitignore so that the files are not added to source control.
 */
{
  // Required for firebase commands (and es:load-index and es:create-index-reload)
  "firebase": {
    "keyFilename": "path-to-your-project-firebase-adminsdk-keyfile.json",
    "databaseURL": "https://your-project-database-url.com",
    "projectId": "your-projectid"
  },

  // Required for elasticsearch commands
  "elasticsearch": {
    "serviceAccountFilename": "path-to-your-elasticsearch-service-account-file.json"
  }
}
Copy the example/config/example-local-development.json file to local-development.json and fill in the details for firestore, elasticsearch, or both. Include the firestore keyfile path in keyFilename. Include the elasticsearch service account file path in serviceAccountFilename.
The elasticsearch serviceAccountFilename file has the following format:
{
  "region": "<region>",
  "domain": "<domain>",
  "id": "<aws id>",
  "key": "<aws access key>"
}
See Amazon Elasticsearch Service Access Control and Managing Access Keys for IAM Users for additional details on Amazon Elasticsearch security configuration.
See Generate a private key file for details on creating an admin key file for Firestore.
Configuration Files
Cloudli uses config for command configuration. The default configuration file will be loaded from config/default.json.
The NODE_ENV environment variable can be changed to use different configuration files. For example, to load the configuration files for production from the file config/production.json, set the NODE_ENV as follows:
$ export NODE_ENV=production
If not specified, the dafult for NODE_ENV is development.
Note that default.json is loaded for all environments and merged with the environment-specific (and local) config files. This allows configuration settings that are not environment-specific to be defined in one file and environment-specific settings to loaded from environment-specific files.
Commands
Cloudli uses subcommands for firestore and elasticsearch commands. Firestore commands have a fire: prefix and elasticsearch commands have a es: prefix.
Usage:
$ cloudli [<subcommand> [<subcommand options> [--help]]] | --version | --help
To get cloudli help, use:
cloudli --help
To get detailed help for a specific command, use cloudli <command> --help. For example:
cloudli fire:docs --help
Logging
Cloudli logging uses pino: https://github.com/pinojs/pino
Set log level using the LEVEL environment variable:
$ export LEVEL=info
The default level is info.
Available levels are:
fatalerrorwarninfodebugtracesilent
Console Output
Output displayed on the interactive console will be displayed with colors and without timestamps by default. To have console output in pino (json) format, add the following in config:
  "logger": {
    "prettyPrint": false
  },
Note that even with prettyPrint set to true, redirected output will be in pino (json) format. This output can be piped to pino-pretty, pino-colada or pino transports.
For example, to use pino-colada:
$ cloudli fire:docs -p col1 -s | pino-colada
Debug Support
Cloudli supports debug logging using the debug package (https://github.com/visionmedia/debug).
Enable debug logging using:
$ export DEBUG=*
To filter debug modules:
-
For all cloudli modules debug:
$ export DEBUG=cloudli:* -
For specific cloudli module debug (example):
$ export DEBUG=cloudli:traverseBatch
Note: LEVEL must be set to debug or higher for debug messages to be included.
Modules with debug:
cloudli:deletecloudli:restorecloudli:traverseBatchcloudli:elasticsearch
Cloud Firestore
Cloudli supports commands for Google Cloud Firestore, including:
| Function | Description |
|---|---|
| Get Documents | Get document id's or full documents from firestore with various query options |
| Get Document or Collection | Gets document id's or full documents for a specific document or collection path |
| Backup | Backup documents to a local path |
| Restore | Restore documents from a local path to firestore. Alias of fire:upload
|
| Upload | Upload documents from a local path to firestore. Alias of fire:restore
|
| Delete | Backup and delete documents from firestore |
| Diff | Compare firestore documents to local document files. Display results on command line or in html. |
| Validate | Validate firestore documents using JSON Schema definitions |
| Patch | Patch firestore documents using a defined function |
Document Selection
Cloud firestore commands support various options for selecting documents. To support scalability,
a StructuredQuery is used internally to select documents in batches. This approach does constrain document selection. For example, there is no direct way to perform a regular expression-like filtered query of document paths against firestore. However, several options are available to address most scenarios. For example, using a recursive selection from a starting collection path combined with a defined collectionId for a sub-collection allows for selection of sub-collections across a sub-tree in the database.
To simplify the use of multiple selection options, Document Sets may be defined in the configuration file and used in commands (see below).
The options available for document selection are:
| Option | Description | Notes |
|---|---|---|
-p, --path <path> |
The base path of the documents | May be a collection or document. If not specified, will include all root collections. |
-r, --recursive |
Includes all documents under path recursively |
Cannot be used with --shallow. One of --recursive or --shallow must be specified if path is a collection. |
-s, --shallow |
Includes only documents in the collection if path is a collection or the documents in the collections directly under the document if path is a document |
Cannot be used with --recursive. One of --recursive or --shallow must be specified if path is a collection. |
-c, --collectionId <id> |
Only include documents in collections with name of id
|
|
-f, --filter <regex> |
Filter results to paths that match the supplied regular expression regex
|
This filter is applied after results are received from the query before processing a document so consider performance and load when using --filter. For best results, use --path and --collectionId to filter the query and then apply --filter. Cannot be used with --idfilter
|
-i, --idfilter <id> |
Filter results to documents with id
|
This is a special case of --filter. Cannot be used with --filter. |
-m, --min |
Limit results to include only document id and path | Useful when previewing results |
Document Sets (DocSets)
Document Sets ("DocSet") are shorthand references to sets of documents. DocSets define selection crieria for easy reference when using firestore commands. DocSets are defined in the configuration file.
Consider a document hierarchy as follows:
users
  - user1
    - posts
      - user1post1
      - user1post2
    - addresses
      - address1
      - address2
  - user2
    - posts
      - user2post1
      - user2post2
    - addresses
      - address 1
regions
  - region1
  - region2
To define a DocSet for posts for all users, the following configuration can be used:
"firestore": {
  "docSets": {
    "userPosts": {
      "path": "users",
      "collectionId": "posts",
      "recursive": true
    }
  }
}
In this example, userPosts is the name of the DocSet. This name can be used in commands. For example, to list the paths for all user post documents:
$ cloudli fire:docs userPosts
To display the full documents for all of the user posts:
$ cloudli fire:docs userPosts --verbose
Cloud Firestore Commands
The following sections provide details of the available commands for Cloud Firestore.
fire:docs
fire:docs [docSetId]
Gets firestore documents with an optional docSetId. If docSetId is not specified and no other selection options are supplied, will include all documents in the database. The specified docSetId must be defined in config (see above).
Options
See Document Selection for details on selection options.
Additional Options
| Option | Description |
|---|---|
-v, --verbose |
Includes full document content in results |
fire:get
fire:get <path>
Gets firestore documents with a path. The path may be for a collection or a document.
This command uses the firestore client APIs and does not use the batch processing of other commands like filrestore-docs. This should be used for single documents or small collections.
Options
| Option | Description |
|---|---|
-v, --verbose |
Includes full document content in results |
fire:backup
fire:backup [docSetId]
Backs up firestore documents with an optional docSetId. If docSetId is not specified and no other selection options are supplied, will include all documents in the database. The specified docSetId must be defined in config (see above).
The backup files will be placed in a subdirectory with a name based on the current timestamp. A summary of the contents of the backup will be written to a markdown file named backup-summary.md in the timestamp subdirectory.
Options
See Document Selection for details on selection options.
Additional Options
| Option | Description | Notes |
|---|---|---|
-b, --basePath <basePath> |
Specifies the base backup path | Overrides firestore.backupBasePath in config |
-y, --bypassConfirm |
Bypasses confirmation prompt | Required when non-interactive stdout |
-v, --verbose |
Displays document paths during backup |
fire:restore
fire:restore <basePath>
Restores all documents (.json files) under basePath to equivalent paths in firestore.
Options
| Option | Description | Notes |
|---|---|---|
-y, --bypassConfirm |
Bypasses confirmation prompt | Required when non-interactive stdout |
-v, --verbose |
Displays files during restore |
fire:upload
fire:upload <basePath>
The fire:upload command is an alias for fire:restore. The files under basePath don't have to be created by a fire:backup command. Uploads ("restores") all documents (.json files) under basePath to equivalent paths in firestore.
Options
| Option | Description | Notes |
|---|---|---|
-y, --bypassConfirm |
Bypasses confirmation prompt | Required when non-interactive stdout |
-v, --verbose |
Displays files during upload |
fire:delete
fire:delete [docSetId]
Deletes firestore documents after backing up the files with an optional docSetId. If docSetId is not specified and no other selection options are supplied, will include all documents in the database. The specified docSetId must be defined in config (see above).
Options
See Document Selection for details on selection options.
Additional Options
| Option | Description | Notes |
|---|---|---|
-b, --basePath <basePath> |
Specifies the base backup path | Overrides firestore.backupBasePath in config |
-y, --bypassConfirm |
Bypasses confirmation prompt | Required when non-interactive stdout |
-v, --verbose |
Displays document paths during backup and delete |
fire:diff
fire:diff <basePath> [docSetId]
Compares document files under basePath with firestore documents with an optional docSetId. If docSetId is not specified and no other selection options are supplied, will include all documents in the database. The specified docSetId must be defined in config (see above).
Displays document field changes as well as document adds and deletes. Optionally creates an html file with the differences.
Options
See Document Selection for details on selection options.
Additional Options
| Option | Description | Notes |
|---|---|---|
-y, --bypassConfirm |
Bypasses confirmation prompt | Required when non-interactive stdout |
-w, --html [htmlFilename] |
Produces (web) html summary file with diff details | Uses debug.outputPath from config for default directory. Default filename is <timestamp>.html. |
fire:validate
fire:validate [docSetId]
Validates firestore documents with an optional docSetId. If docSetId is not specified and no other selection options are supplied, will include all documents in the database. The specified docSetId must be defined in config (see above).
Documents are validated using JSON Schema files that must be defined in config. The validation is performed using Ajv.
JSON Schema Configuration
To define the JSON Schemas for firestore documents, document paths are mapped to types. The types are then mapped to JSON Schema definition files. Types are defined in the firestore.types array. Each entry in the array is an object with path and type keys. The path is a regular expression that is matched against the document path in firestore.
Schemas are applied to documents for a type based on matching the path regular expression.
{
  "firestore": {
    "types": [
      { "path": "<path selection regular expression>", "type": "typename"},
      // ... other types
    ]
  }
}
For example:
{
  "firestore": {
    "types": [
      { "path": "^users\/[^/]+$", "type": "user" },
      { "path": "^users\/[^/]+\/posts\/[^/]+$", "type": "post" }
    ]
  }
}
Types are defined in the schemas entry in config, which contains entries for each type. Each entry is an object with schemaId string and a schemaFiles array.
{
  "firestore": {
    "types": [
      { "path": "^users\/[^/]+$", "type": "user" },
      { "path": "^users\/[^/]+\/posts\/[^/]+$", "type": "post" }
    ]
  },

  "schemas": {
    "user": {
      "schemaId": "http://some/schemas/user.schema.json", // should match id in schema file
      "schemaFiles": [
        "./schemas/user.schema.json",                     // the main schema file
        "./schemas/some.ref.schema.json"                  // other referenced schemas
        "./schemas/some.other.ref.schema.json"
      ]
    },
    "post": {
      "schemaId": "http://some/schemas/post.schema.json", // should match id in schema file
      "schemaFiles": [
        "./schemas/post.schema.json"                      // the main schema file
      ]
    }
  }
}
Options
See Document Selection for details on selection options.
fire:patch
fire:patch <patches> [docSetId]
Patches firestore documents using patches after backing up the files. The patches parameter is one or more patches separated by commas. The patch modules must be in the directory ./patches, in js modules named <patchname>.js. If docSetId is not specified, includes all documents in the database. The specified docSetId must be defined in config (see above).
Patch functions will be passed an object that is a simulation of DocumentSnapshot containing id, name, ref.path, data() and returns the new document data object or null if no patch is applied. For example:
// file: ./patches/mypatch_20191218.js

/**
 * Applies a patch to a document.
 *
 * @param {object} docSnap simulation of DocumentSnapshot containing id, name, ref.path, data()
 * @returns updated data object or null if not patched
 */
function patch(docSnap) {
  if (docSnap.ref.path === 'xyzposts/publicpost1') {
    // apply a patch only for a specific document
    const original = docSnap.data()
    return {
      ...original,
      newField: 'This field was added by a patch function'
    }
  }

  // don't apply the patch
  return null
}

module.exports = patch
Apply the example patch above using:
cloudli fire:patch mypatch_20191218
This example patch only applies a patch based on a path but any criteria can be used. The patch can also be applied to all document, if desired. Also, document selection command line options may be used to identify the documents to patch. Also note that documents in the command line selection criteria will be backed up even if no patches are applied.
Options
See Document Selection for details on selection options.
Elasticsearch
Cloudli supports commands for Amazon Elasticsearch, including:
| Function | Description |
|---|---|
| Create Index | Create an index from a mapping with aliases |
| Get Aliases | Get the index name for the read and write aliases |
| Load Index | Load an index from a set of documents in firestore |
| Search | Searches for text in a defined index with optional highlighting |
| Reindex | Reindex documents to a new index mapping and adjust read and write aliases |
| Create Index and Reload | Create a new index mapping, reload documents from firestore and adjust read and write aliases |
Each of these commands can operate on one or more indices defined in the elasticsearch.indices array in config. The default index name used when no index is specified for a command can be defined using the elasticsearch.defaultIndex entry. Each index enry has the following format:
  {
    // name is required
    "name": "<index name>",

    // docSetRef is required for es:load-index and es:create-reload-index
    "docSetRef": "<DocSet config entry reference>",

    // (optional) array of collections containing documents that will be merged with documents
    // before indexing.  The documents must have the same id as the document being indexed.
    "extendCollections": ["<firestore collection path>"],

    // indexMapping is required for es:create-index, es:reindex, and es:create-reload-index
    "indexMapping": "<path to indexMapping file for creating an index>",

    // optional search configuration for es:search
    "search": {
      "sourceFields": ["<array of field names>"],
      "title": "<title template string>",
      "verboseDetails": "<verbose details template string>"
    }
  },
For example:
{
  "elasticsearch": {
    "defaultIndex": "*",
    "indices": [
      {
        "name": "xyz_users",
        "docSetRef": "firestore.docSets.users",
        "indexMapping": "./elasticsearch/indexMappings/user.json",
        "search": {
          "sourceFields": ["fullName", "userid", "background"],
          "title": "User: '${_source.fullName}' (${_id})",
          "verboseDetails": "Userid: ${_source.userid}\n${_source.background}"
        }
      },
      {
        "name": "xyz_posts",
        "docSetRef": "firestore.docSets.posts",
        "indexMapping": "./elasticsearch/indexMappings/post.json",
        "search": {
          "title": "Title: '${_source.title}' (${_id})",
          "verboseDetails": "Likes: ${_source.likes}\n${_source.article}"
        }
      },
      {
        "name": "xyz_user_posts",
        "docSetRef": "firestore.docSets.userPosts",
        "indexMapping": "./elasticsearch/indexMappings/post.json",
        "search": {
          "title": "Title: '${_source.title}' (${_id})",
          "verboseDetails": "Likes: ${_source.likes}\n${_source.article}"
        }
      }
    ]
  }
}
AWS Elasticsearch Security Configuration
To use any of the elasticsearch commands, a service account file must be supplied in the elasticsearch.serviceAccountFilename config entry. Since these files are usually environment-specific, the filename can be included in a local-development.json file in the config directory (or similar files for other environments). You should include /config/local* in the .gitignore file in the root of your project. An example local-development.json file is supplied in example/config:
/**
 * Example of putting sensitive, environment-specific information in a local-development config file
 *
 * Rename this to local-development (or local-environmentname) and fill in details.
 *
 * Keyfile and service account files could be stored in a ./keys folder or other protected location.
 * The .keys path should also be added to .gitignore so that the files are not added to source control.
 */
{
  // Required for firebase commands (and es:load-index and es:create-index-reload)
  "firebase": {
    "keyFilename": "path-to-your-project-firebase-adminsdk-keyfile.json",
    "databaseURL": "https://your-project-database-url.com",
    "projectId": "your-projectid"
  },

  // Required for elasticsearch commands
  "elasticsearch": {
    "serviceAccountFilename": "path-to-your-elasticsearch-service-account-file.json"
  }
}
The elasticsearch serviceAccountFilename file has the following format:
{
  "region": "<region>",
  "domain": "<domain>",
  "id": "<aws id>",
  "key": "<aws access key>"
}
Elasticsearch Index and Alias Structure
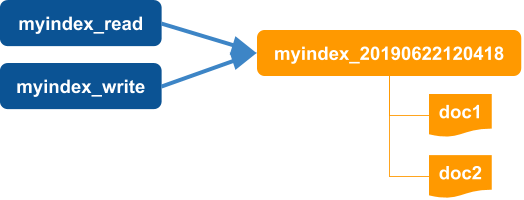
All of the elasticsearch commands rely on a specific key and alias naming convention. For each index definition, a base name is specified. The actual index created in elasticsearch will have the name <index base name>_YYYYMMDDHHmmss with the timestamp when the index is created. For example, the index named xyz_users would be created in elasticsearch with a name like xyz_users_20190622120418.
For each created index, two aliases are expected - one for read and one for write. These aliases allow code to access the indexes without being tied to the timestamp name of the index and supports zero-downtime reindexing. The aliases are expected to have the names <index base name>_read and <index base name>_write. For example, the index named xyz_users must have read and write aliases named xyz_users_read and xyz_users_write, respectively.
Index base name: base

Actual index: base_20190622120418

Read alias: base_read -> base_20190622120418

Write aliad: base_write -> base_20190622120418
For more information on AWS Elasticsearch, see:
Elasticsearch Commands
The following sections provide details of the available commands for AWS Elasticsearch.
es:create-index
es:create-index [index]
Creates elasticsearch index definition with the name <index>_YYYYMMDDHHmmss. Also adds read alias (<index>_read) and write alias (<index>_write) for the new index.
If index is not specified, the index named in the elasticsearch.defaultIndex config entry will be used. If there is no elasticsearch.defaultIndex then all defined indexes will be used.
Requires an index configuration entry in elasticsearch.indices for each index. The entry must contain an indexMapping file path. The indexMapping file must be json file that conforms to the body format of the elasticsearch Create Index API.
Options
| Option | Description | Notes |
|---|---|---|
-s, --skipExisting |
Skips creating an index if the read and write aliases already exist |
es:get-aliases
es:get-aliases [index]
Gets the index aliases for the elasticsearch index.
If index is not specified, the index named in the elasticsearch.defaultIndex config entry will be used. If there is no elasticsearch.defaultIndex then all defined indexes will be used.
Requires an index configuration entry in elasticsearch.indices for each index.
es:load-index
es:load-index [index]
Loads elasticsearch index from firestore using the docSet defined in the index configuration.
If index is not specified, the index named in the elasticsearch.defaultIndex config entry will be used. If there is no elasticsearch.defaultIndex then all defined indexes will be used.
WARNING!: This will overwrite any documents with matching id's in the selected indexes.
Requires an index configuration entry in elasticsearch.indices for each index with a docSetRef entry that contains the dot-separated path to the DocSet definition in config. In the following example config, the index named xyz_users has a docSetRef of "firestore.docSets.users" that refers to the users DocSet definition. See Document Sets for more information.
The index configuration may contain an optional extendCollections value that is an array of firestore collection paths. If provided, the load-index process will merge the document with
the same id as the primary document being indexed before indexing, for each collection path specified in the extendCollections aray.
{
  // ...
  "elasticsearch": {
    "defaultIndex": "*",
    "indices": [
      {
        "name": "xyz_users",
        "docSetRef": "firestore.docSets.users"
      }
    ]
  },
  "firestore": {
    "docSets": {
      "users": {
        "path": "xyzusers",
        "shallow": true
      }
    }
  }
}
Options
| Option | Description | Notes |
|---|---|---|
-y, --bypassConfirm |
Bypasses confirmation prompt | Required when non-interactive stdout |
-v, --verbose |
Displays index and document paths during indexing |
es:search
es:search <text> [index]
Searches elasticsearch for text in index.
If index is not specified, the index named in the elasticsearch.defaultIndex config entry will be used. If there is no elasticsearch.defaultIndex then all defined indexes will be used.
Requires an index configuration entry in elasticsearch.indices for each index.
Options
| Option | Description | Notes |
|---|---|---|
-v, --verbose |
Displays additional document information (_source by default) and highlights | See below for configuration options |
Search Configuration
By default, the search results will only show the matched document id. If --verbose is specified, the default results will show the document contents (_source) and the matching highlights.
Using configuration options, it is possible to limit the fields returned for the documents and to define formats for the document title and verbose contents. To use one or more of these options, add a search entry in an index definition (in elasticsearch.indices). For example:
  "elasticsearch": {
    "indices": [
      {
        "name": "xyz_users",
        "docSetRef": "firestore.docSets.users",
        "indexMapping": "./elasticsearch/indexMappings/user.json",

        // Optional search configuration for index 'xyz_users'
        "search": {

          // only include the fields fullName, userid, background in search results
          "sourceFields": ["fullName", "userid", "background"],

          // Define the title format (default is "id: ${_id}")
          "title": "User: '${_source.fullName}' (${_id})",

          // Define the verbose document contents (default is "${_source}")
          "verboseDetails": "Userid: ${_source.userid}\n${_source.background}"
        }
      }
    ]
  }
}
All of the entries in search are optional -- sourceFields, title, and verboseDetails.
The sourceFields option supplies an array of field names from the indexed document. If this is not supplied, all fields will be included. sourceFields may contain nested fields - for example, author.fullName.
Title is always displayed for results. The default title is "id: ${_id}". Verbose details are only displayed if the --verbose option is supplied. Note that highlights will also be displayed following the verbose details.
The title and verboseDetails template strings may contain substitution variables in the form ${varname}. Available substitution variables include:
| Variable Name | Description |
|---|---|
| _id | The id of the indexed document |
| _index | The full name of the index (will de different from the alias names) |
| _score | The search score for the match |
| _source | The full search result for the document. Will include all fields unless sourceFields are included in the search configuration. |
_source.field
|
A specific field from the returned document result. Must be one of the returned fields. May include nested fields - or example, _source.author.fullName. |
If any of the substitution variables is an object, it will be "pretty printed."
es:reindex
es:reindex [index]
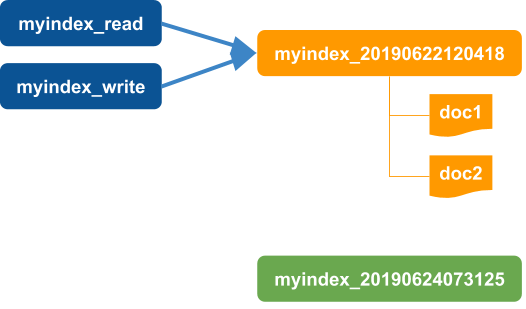
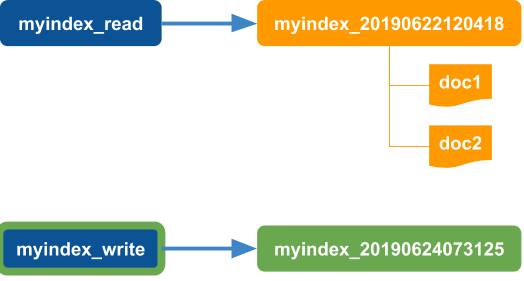
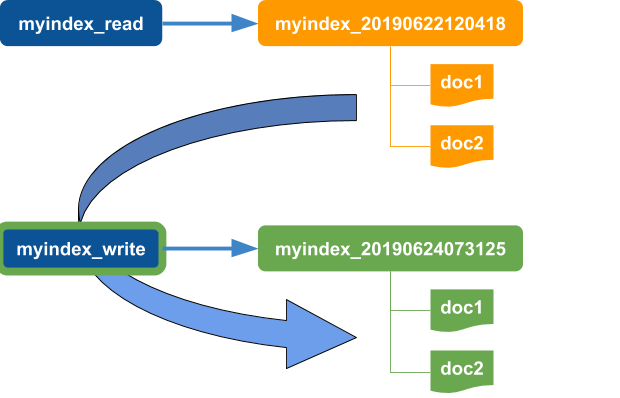
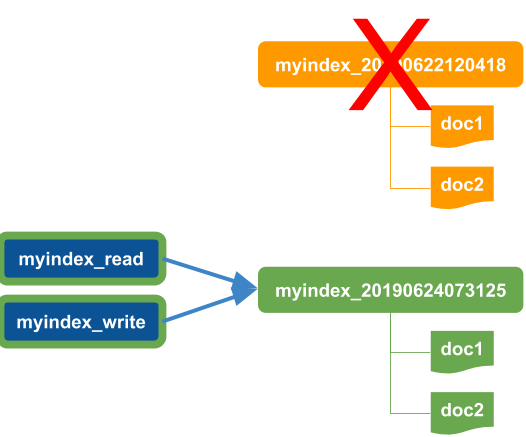
Creates a new index using the defined mapping and reindexes all of the previously indexed documents for index using the elasticsearch reindex API. Use this command to reindex all documents in elasticsearch using a new index mapping. If the documents are reindexed successfully, the read and write aliases for each index will be asigned to the new index and the old index will be deleted.
es:reindex uses the following process:
-
Starts with read and write aliases pointing to an index
-
Create a new timestamp-based index
-
Move the write alias to point to the new index.
Note that reads still occur using the read alias that points to the old index. Application reads that occur before the reindex action completes will not see any newly indexed documents.
-
Reindex all documents from the old index to the new index.
-
Move the read alias to point to the new index and delete the old index.
WARNING! This will delete the old index and all of the original indexed documents once all of the documents are reindexed successfully.
If index is not specified, the index named in the elasticsearch.defaultIndex config entry will be used. If there is no elasticsearch.defaultIndex then all defined indexes will be used.
Requires an index configuration entry in elasticsearch.indices for each index.
Options
| Option | Description | Notes |
|---|---|---|
-y, --bypassConfirm |
Bypasses confirmation prompt | Required when non-interactive stdout |
-v, --verbose |
Displays additional information during processing |
es:create-reload-index
es:create-reload-index [index]
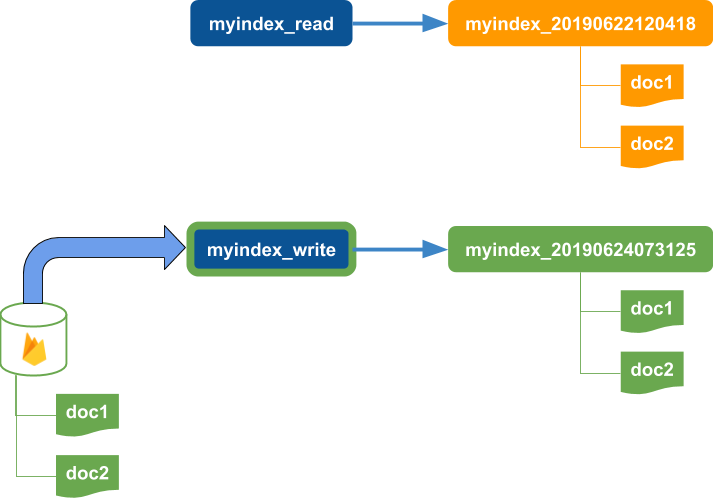
Creates a new index using the defined mapping and loads documents from firestore for the index. Use this command if you want all documents to be reindexed from the firestore source using a defined index mapping. If the documents are loaded successfully, the read and write aliases for each index will be asigned to the new index and the old index will be deleted.
es:create-reload-index uses the following process:
-
Starts with read and write aliases pointing to an index
-
Create a new timestamp-based index
-
Move the write alias to point to the new index.
Note that reads still occur using the read alias that points to the old index. Application reads that occur before the load action completes will not see any newly indexed documents.
-
Load all documents from firestore using the defined docSet for the index to the new index.
-
Move the read alias to point to the new index and delete the old index.
WARNING! This will delete the old index and all of the original indexed documents once all of the documents are loaded successfully from the firestore DocSets.
If index is not specified, the index named in the elasticsearch.defaultIndex config entry will be used. If there is no elasticsearch.defaultIndex then all defined indexes will be used.
Requires an index configuration entry in elasticsearch.indices for each index with a docSetRef entry that contains the dot-separated path to the DocSet definition in config. In the following example config, the index named xyz_users has a docSetRef of "firestore.docSets.users" that refers to the users DocSet definition. See Document Sets for more information.
{
  // ...
  "elasticsearch": {
    "defaultIndex": "*",
    "indices": [
      {
        "name": "xyz_users",
        "docSetRef": "firestore.docSets.users"
      }
    ]
  },
  "firestore": {
    "docSets": {
      "users": {
        "path": "xyzusers",
        "shallow": true
      }
    }
  }
}
Options
| Option | Description | Notes |
|---|---|---|
-y, --bypassConfirm |
Bypasses confirmation prompt | Required when non-interactive stdout |
-v, --verbose |
Displays index and document paths during indexing |


