Cuttlebelle


The react static site generator with editing in mind
🔥 Why yet another static site generator?
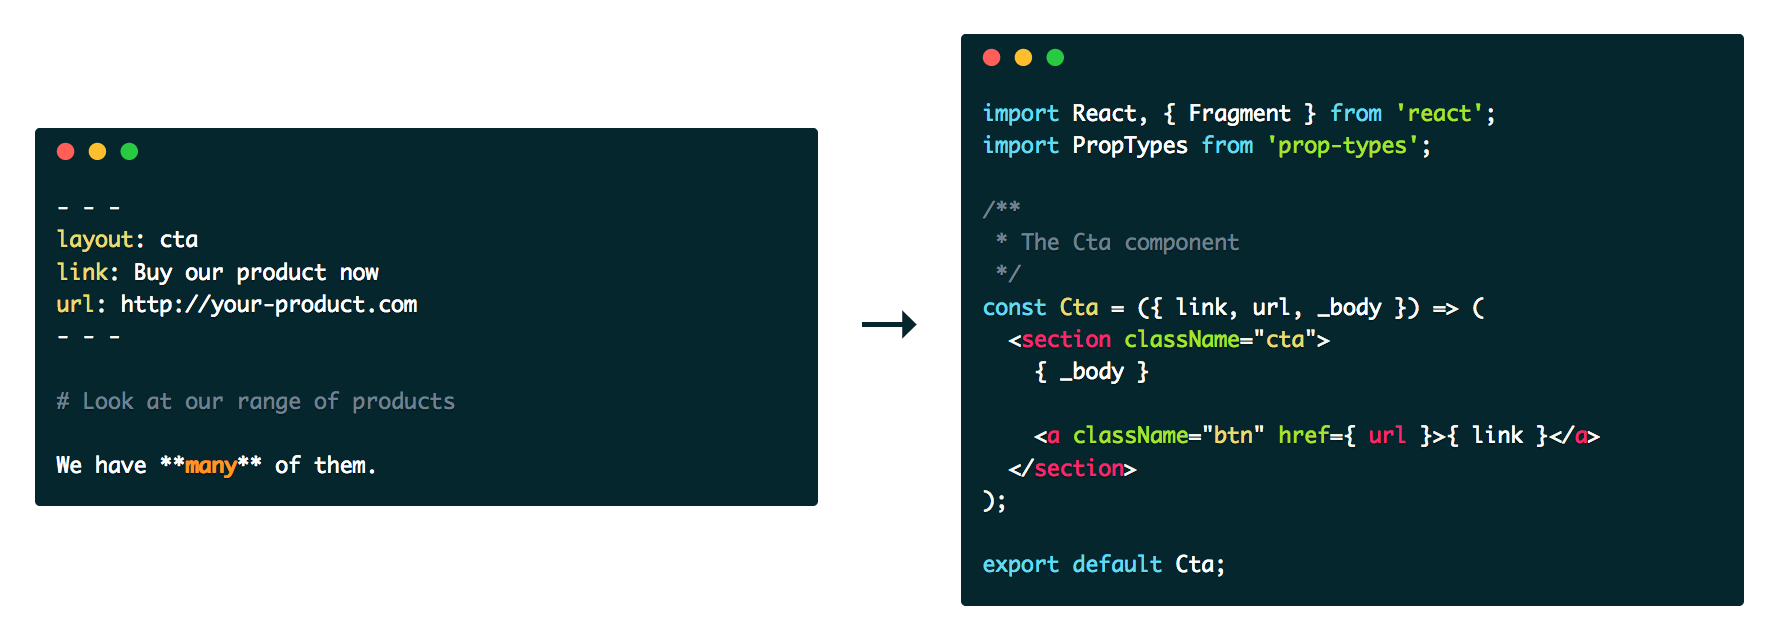
All static site generators I have used restrict you to use one layout per page. Todays webdesign needs have outgrown this and we often find ourself either adding code into our content pages (markdown files, liquid templates) or content into our code. That makes updating and maintaining a page hard, especially for a non-technical content author.
I needed a generator that can separate content from code as cleanly as possible while still staying a static site generator and as dynamic as possible.
React comes with the component paradigm and was exactly what I’m looking for. JSX enables a very easy templating like way to write components while still keeping the power of javascript. No more templating languages that only do half of what you need. Use javascript to write your layouts.
Contents
Requirements
To use Cuttlebelle you need at least node >= 12.
Install
npm install cuttlebelle -gThen run cuttlebelle in your working folder.
cuttlebelle command to your system.
If you for some reason want to install it locally, consider adding a npm script to your package.json to make
running cuttlebelle easier:
{
	"name": "your name",
	"version": "1.0.0",
	"description": "Your description",
	"main": "index.js",
	"scripts": {
+		"build": "cuttlebelle",
+		"watch": "cuttlebelle -w",
		"test": "echo \"Error: no test specified\" && exit 1"
	},
	"devDependencies": {
		"cuttlebelle": "^1.0.0"
	}
	"keywords": [],
	"author": "",
	"license": "ISC"
}
Then run npm run build to run cuttlebelle.
Getting started
After installing cuttlebelle, create a folders called content and code and start populating them.
Each folder with an index.yml file will become an index.html in cuttlebelles generated pages.
| Your content folder | Output | |
|---|---|---|
.
├── index
│   ├── index.yml
│   ├── partial1.md
│   └── partial2.md
├── page1
│   ├── index.yml
│   └── subpage1
│       ├── index.yml
│       ├── partial1.md
│       └── partial2.md
├── page2
│   ├── index.yml
│   ├── partial1.md
│   └── partial2.md
└── shared
    ├── component1.md
└── component2.md |
→ |
.
├── index.html
├── page1
│   ├── index.html
│   └── subpage1
│       └── index.html
└── page2
└── index.html |
Consider this example to see how pages are constructed with partials and layouts:
An index.yaml page
| index.yml | page layout | |
|---|---|---|
layout: page
title: Homepage
main:
  - header.md
- body.md |
+ |
import React from "react";

export default ({ title, main }) => (
  <html>
  <head>
    <title>{ title }</title>
  </head>
  <body>
    <main>
      { main }
    </main>
  </body>
  </html>
); |
A header.md partial
| partial header.md | header layout | |
|---|---|---|
---
layout: header
headline: First post
sub: Clear content separation
--- |
+ |
import React from "react";

export default ({ headline, sub }) => (
  <header>
    <h1 className="header__headline">{ headline }</h1>
    {
      sub
        && <p className="header__sub">{ sub }</p>
    }
  </header>
); |
A body.md partial
| partial body.md | body layout | |
|---|---|---|
---
layout: body
headline: First post
---

**Hello world** |
+ |
import React from "react";

export default ({ _body, headline }) => (
  <article>
    <h2>{ headline }</h2>
    <div className="body-text">{ _body }</div>
  </article>
); |
Will give us this HTML
| resulting static HTML file |
|---|
<!DOCTYPE html>
<html>
<head>
  <title>Homepage</title>
</head>

<body>
  <main>
    <header>
      <h1 class="header__headline">First post</h1>
      <p class="header__sub">Clear content separation</p>
    </header>
    <article>
      <h2>First post</h2>
      <div class="body-text"><strong>Hello world</strong></div>
    </article>
  </main>
</body>

</html> |
Usage
CLI

cuttlebelleThis will generate all pages into the site folder (unless specified otherwise).
Init
For when you’re just starting out on a new project use the init option. It will generate the folder structure for you and add some files for you to get
started quickly.
cuttlebelle initWatch
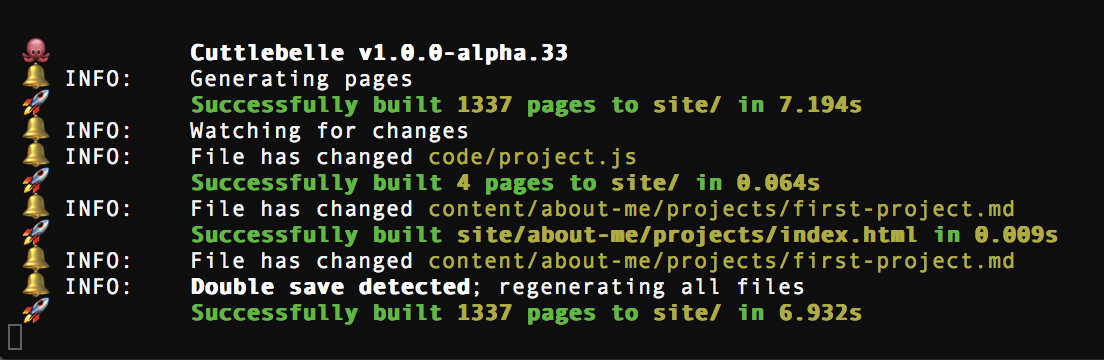
You can also run the highly optimized watch while adding content or developing your layouts.
cuttlebelle watch
This command will first build your pages and then watch for changes in any of them.
It will dutifully only build the absolute minimum of pages once it detects a change somewhere. It is so eager to only build those pages that it thinks are
relevant that it misses sometimes. In cases where you add content from the _pages prop in one of your layouts for instance. I have added a new and somewhat
genius trick to catch cases like that.
Introducing the double save TM
If you feel like the watch may have missed a page and you don’t want to leave your editor to complain about it to the watch, just save your file twice quickly like a double click. The watch will detect the double saveTM and generate all pages for you again.
watchTimeout setting.
Watch flags
No generator flag
Sometimes you may only want to start a watch and not rebuild all pages. For that use the no-generate option:
cuttlebelle watch --no-generateSilent flag
The watch notifies you each time it encounters an error so you don’t have to watch the watch. You can disable that behavior via the silent option.
cuttlebelle watch --silentDocs
Cuttlebelle comes with a nifty feature that will auto-document your layouts if you use the right propTypes and comments. Read more about how in the self documenting section.
cuttlebelle docsVersion
To display the version of your cuttlebelle install all you have to do is run the version flag:
cuttlebelle --versionHelp
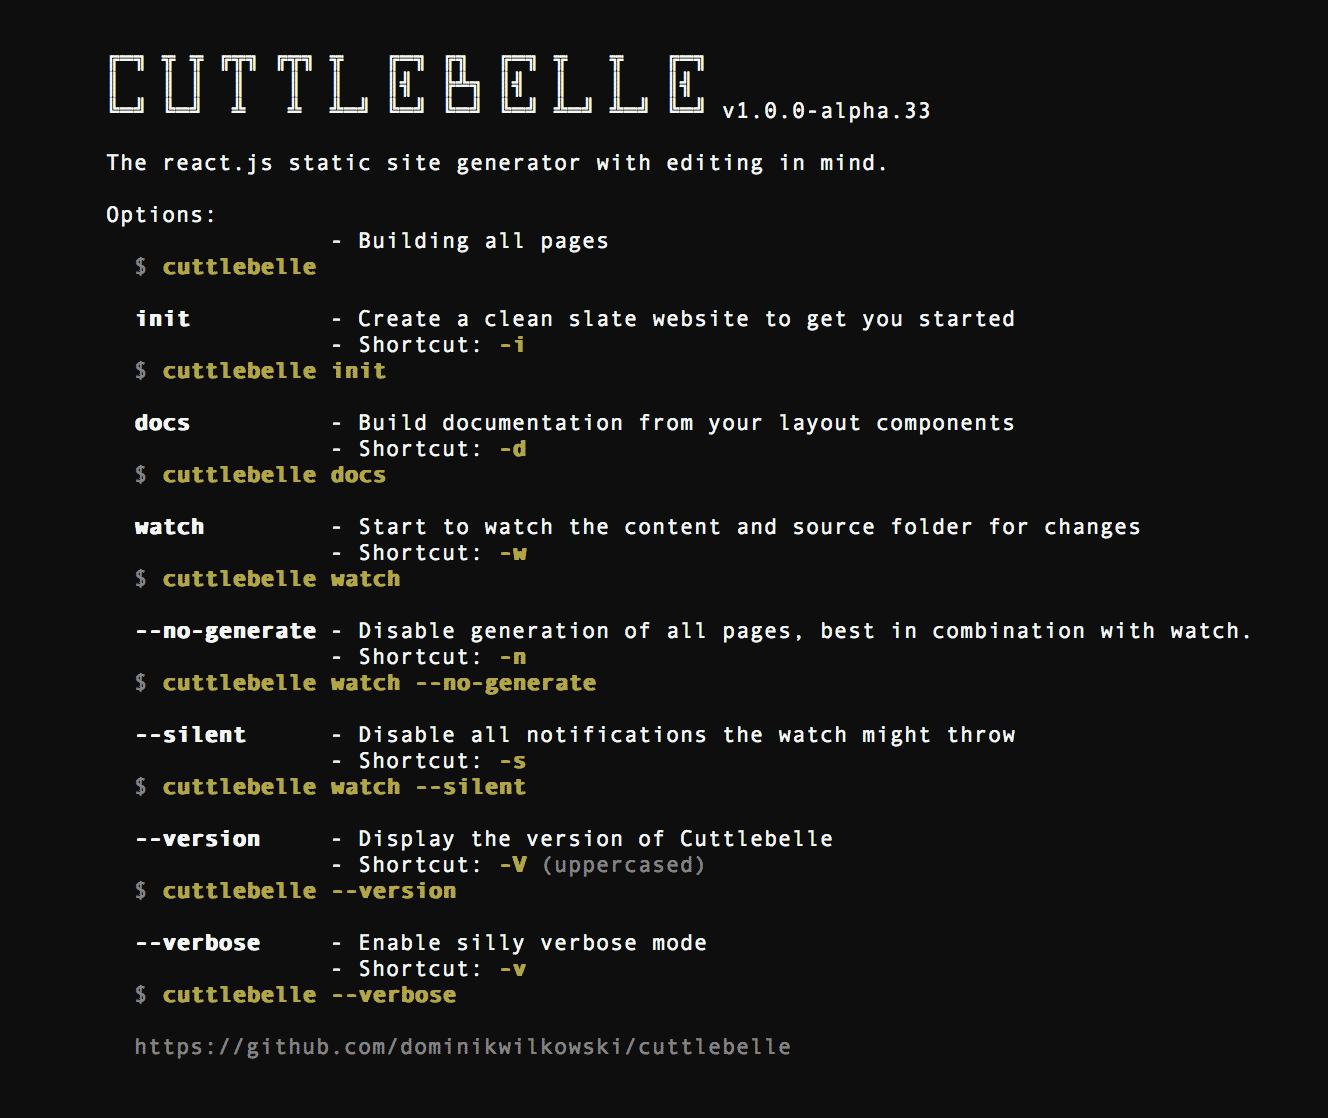
Of course there is also a help option. Just run it with the help flag:
cuttlebelle helpYour content
The default folder structure divides content into the content/ folder and the layout and component react files into the code/ folder.
.
├── content/           # The content folder
│   ├── page1/         # Each folder represents a page and will be converted to `page1/index.html`
│   │                  # 💡 As long as it contains an `index.yml` file.
│   │
│   ├── index/         # The index folder is treated as the homepage and converted to `/index.html`
│   │
│   └── page2/         # You can nest pages by nesting them in the folder structure
│       │
│       └── subpage1/  # As long as this folder has an `index.yml` file
│                      # it will be converted to `page2/subpage1/index.html`
│
├── assets/            # The assets folder, every file you add here will be moved to your output.
└── code/              # The `code` folder is where your layout lives
( package.json file via the cuttlebelle customizations.)
Now let’s look into one folder:
.
└── content
    ├── page1
    │   ├── index.yml      # This folder includes an `index.yml` file so it will be converted into
    │   │                  # a page in the output of cuttlebelle.
    │   ├── partial1.md    # The partials are all in markdown format and can have any name.
    │   └── partial2.md    # You can reference partials from your index.yml or another partial.
    │
    └── shared             # A folder won’t be generated if it doesn’t have an `index.yml` file
        ├── component1.md  # You can use such folders to share partials between pages
        └── component2.md  # This is just a suggestion. Partials can live anywhere.
Your index.yml
A typical index.yml file could look like this:
layout: page          # The layout of an `index.yml` defaults to `page` if it’s not set
title: Homepage       # It’s always a good idea to give your page a title
main:                 # Defining an array in yaml
  - feature-image.md  # This is a partial (because it ends with ".md") and points to a markdown
                      # file that exists
  - cta.md
  - contact-cards.md
  - /shared/footer.md # This is also a partial but because it starts with a slash "/" the
                      # location where this partial sits is relative to your content folder
                      # and not the page folder you’re in.
header: header.md     # You can define a partial to a variable or to an array as seen above
content: Hello world  # Or you can put any type of string into your yaml if you prefer.
( { _pages } to all partials.)
Your partials
And a typical partial.md file could look like this:
---                                 # Each markdown file can have frontmatter
layout: cards                       # The power of cuttlebelle is each partial has it’s own layout
                                    # The layout of partials defaults to `partial` if it’s not set
headline: Partial headline          # You can add any number of variables
cards:                              # Even arrays
  - id: ID1                         # Or objects
    title: Card1
    content: content for first card
  - id: ID2
    title: Card2
    content: content for second card
---

Content
<!-- The content of the markdown file is exposed as { _body } to the props -->
(
Your assets
All files included inside the assets/ folder are moved to site/assets/. This is where you should keep your CSS, SVGs and images.
Just create a prop inside your index.yml pages to include them into your pages:
content/index/index.yml:
layout: layout/homepage
title: Homepage
stylesheet: homepage
main:
  - /shared/header.md
  - homepage.md
  - /shared/footer.md
aside:
  - nav.md
  - callout.md
code/layout/homepage.js
import React from "react";

export default ({ title, stylesheet, title, main, aside }) => (
	<html>
	<head>
		<title>{ title }</title>
		{ stylesheet != undefined
			? ( <link rel="stylesheet" href={ `/assets/css/${ stylesheet }.css` } /> )
			: null
		}
	</head>
	<body>
		<main>
			<h1>{ title }</h1>
			<div>{ main }</div>
		</main>
		<aside>
			{ aside }
		</aside>
	</body>
	</html>
);
/assets/homepage.css
main {
	background: rebeccapurple;
}

aside {
	background: hotpink;
}Your layout
The layout are all react components. You have to assign a layout to each page and partial. Each component will have a bunch of props exposed to it.
A page layout
A typical component for a page might look like this:
import React from "react";

export default ({ title, partials }) => (
	<html>
	<head>
		<title>{ title }</title>
	</head>
	<body>
		<main>
			<h1>{ title }</h1>
			<div>{ partials }</div>
		</main>
	</body>
	</html>
);
A partial layout
A typical component for a partial might look like this:
import React from "react";

export default ({ _body, title }) => (
	<article>
		<h2>{ title }</h2>
		<div>{ _body }</div>
	</article>
);
( props._pages[ props._ID ].)
Props
A file will receive the following props:
| prop name | description | Example |
|---|---|---|
_ID |
The ID of the current page | props._ID |
_self |
The relative path to the content file; can be md or yaml file | props._self |
_isDocs |
A boolean value, true in docs context only |
props._isDocs |
_parents |
An array of all parent pages IDs | props._parents |
_body |
The body of your markdown file (empty for index.yml files) |
props._body |
_pages |
An object of all pages and their props; with ID as key | props._pages.map() |
_nav |
A nested object of your site structure | Object.keys( props._nav ).map() |
_globalProp |
A prop that can be set globally from the package.json
|
props._globalProp |
_storeSet |
You can set data to persist between react components by setting them with this helper | props._storeSet({ variable: "value" }) |
_store |
To get that data just call this prop function | props._store() |
_relativeURL |
A helper function to make an absolute URL relative | props._relativeURL( URL, yourLocation ) |
_parseMD |
A helper function to parse markdown into HTML | props._parseMD('Your **markdown**!') |
_parseYaml |
A helper function to parse yaml into an object | props._parseYaml('test:\n - one\n - two') |
_parseReact |
A helper function to parse a react component into a string | props._parseReact( <Component prop="hi"/> ) |
Plus all other variables declared inside the file either as frontmatter or in the yaml files.
Async data fetching
If you require data from an API or some other async operations you can use the static getInitialProps method in your component:
import React, { Component } from 'react';

class GetData extends Component {
	static async getInitialProps( props ) {
		const data = await FetchMyDataFromSomewhere( props._ID );
		return { data };
	}

	render() {
		return (
			<div>
				My Data: { this.props.data }
			</div>
		);
	}
}

export default GetData;
getInitialProps will be executed before we render the HTML and whatever you return from it will be passed into your react component as a prop.
The function will have access to all props of that partial as well.
(
Customizations
Cuttlebelle can be customized via your own package.json file.
( npm init if you don’t have package.json.)
See below all configuration with default values:
{
	"name": "your name",
	"version": "1.0.0",
	"description": "Your description",
	"main": "index.js",
	"scripts": {
		"test": "echo \"Error: no test specified\" && exit 1"
	},
+	"cuttlebelle": {
+		"folder": {
+			"content": "/content/",
+			"code": "/code/",
+			"site": "/site/",
+			"docs": "/docs/",
+			"assets": "/assets/",
+			"index": "index",
+			"homepage": "index"
+		},
+		"layouts": {
+			"page": "page",
+			"partial": "partial"
+		},
+		"site": {
+			"root": "/",
+			"doctype": "<!DOCTYPE html>",
+			"redirectReact": true,
+			"markdownRenderer": "",
+			"watchTimeout": 400,
+			"browserSync": {},
+			"globalProp": {},
+		},
+		"docs": {
+			"root": "files/",
+			"index": ".template/docs/layout/index.js",
+			"category": ".template/docs/layout/category.js",
+			"IDProp": "page2",
+			"navProp": {},
+			"pagesProp": {}
+		}
+	},
	"keywords": [],
	"author": "",
	"license": "ISC"
}
A breakdown:
"cuttlebelle": {                  // The cuttlebelle object
  "folder": {                     // Where we can adjust folder/file names
    "content": "content/",        // Where does your content live?
    "code": "code/",              // Where do your react layouts live?
    "assets": "assets/",          // Where do your assets live?
    "site": "site/",              // Where do you want to generate your static site to?
    "docs": "docs",               // Where do you want to generate the docs to?
    "index": "index",             // What is the name of the file we look for to generate pages?
    "homepage": "index"           // What should the index folder be named?
  },
  "layouts": {                    // Your layout settings
    "page": "page",               // What is the default layout for pages?
    "partial": "partial"          // What is the default layout for partials?
  },
  "site": {                       // General settings
    "root": "/",                  // What should cuttlebelle append to links?
    "doctype": "<!DOCTYPE html>", // What doctype string do you want to add?
    "redirectReact": true,        // You can disable redirecting `import` calls to the locally
                                  // installed react instance of cuttlebelle rather than your
                                  // local folder.
    "markdownRenderer": "",       // A path to a file that `module.exports` an Marked.Renderer()
                                  // object. Learn more about it here:
                                  // https://github.com/chjj/marked#renderer
                                  // The only addition is the `preparse` key that will be run
                                  // before we go into the markdown parsing
    "watchTimeout": 400,          // This is the time in milliseconds the watch waits
                                  // to detect a double saves action
    "browserSync": {},            // You can overwrite the browserSync options here
                                  // https://www.browsersync.io/docs/options
    "globalProp": {}              // A global prop that can be set here accessible for all pages
  },
  "docs": {                                          // Docs settings
    "root": "files/",                                // What is the root folder called where all
                                                     // categories are generated in
    "index": ".template/docs/layout/index.js",       // The path to the index layout file
    "category": ".template/docs/layout/category.js", // The path to the category layout file
                                                     // All following settings are the default props
                                                     // each component is given for the example

                                                     // The following props are important so we
                                                     // can generate the docs example:
    "IDProp": "page2",                               // The _ID prop
    "selfProp": "body.md",                           // The _self prop
    "navProp": {                                     // The _nav prop
      "index": {
        "page1": "page1",
        "page2": {
          "page2/nested": "page2/nested"
        },
        "page3": "page3"
      }
    },
    "pagesProp": {                                   // The _pages prop
      "page1": {
        "_url": "/page1",
        "title": "Page 1"
      },
      "page2": {
        "_url": "/page2",
        "title": "Page 2"
      },
      "page2/nested": {
        "_url": "/page2/nested",
        "title": "Nested in page 2"
      },
      "page3": {
        "_url": "/page3",
        "title": "Page 3"
      },
      "index": {
        "_url": "/",
        "title": "Homepage"
      }
    }
  }
}Self-documenting
Because you now can separate the content flow from the development flow you will still need to communicate what partials and layouts the content authors have to their disposal and how they might use it.
Cuttlebelle has a built in feature that will generate documentation for your components automatically as long as you use
PropTypes and a comment above them that reflects the yaml.
Cards.propTypes = {
  /**
   * level: "2"
   */
  level: PropTypes.oneOf([ '1', '2', '3', '4', '5', '6' ]).isRequired,

  /**
   * hero: true
   */
  hero: PropTypes.bool,

  /**
   * cards:
   *   - title: Card 1
   *     content: Content for card 1
   *     href: http://link/to
   *   - title: Card 2
   *     content: Content for card 2
   *     href: http://link/to
   *   - title: Card 3
   *     content: Content for card 3
   *     href: http://link/to
   *   - title: Card 4
   *     content: Content for card 4
   *     href: http://link/to
   */
  cards: PropTypes.arrayOf(
    PropTypes.shape({
      title: PropTypes.string.isRequired,
      content: PropTypes.string.isRequired,
      href: PropTypes.string,
    })
  ).isRequired,
};
You can also hide a component from the docs by adding the @disable-docs to the main comment before declaring your component:
import PropTypes from 'prop-types';
import React from "react";

/**
 * Hiding this component from the docs
 *
 * @disable-docs
 */
const Hidden = ({ _body, title }) => (
  <article className={`globalheader`}>
    <h1>{ title }</h1>
    { _body }
  </article>
);

Hidden.propTypes = {
  /**
   * title: Welcome
   */
  title: PropTypes.string.isRequired,

  /**
   * _body: (text)(7)
   */
  _body: PropTypes.node.isRequired,
};

export default Hidden;
Once all your components have those comments cuttlebelle can generate the docs for you. All you have to do it run:
cuttlebelle docsThe docs will be generated by default in the docs/ folder of your project.
Supported PropTypes
- PropTypes.array
- PropTypes.bool
- PropTypes.number
- PropTypes.object
- PropTypes.string
- PropTypes.node
- PropTypes.element
- PropTypes.oneOfType
- PropTypes.arrayOf
- PropTypes.objectOf
- PropTypes.shape
- PropTypes.any
PropTypes that can’t be passed with YAML
- PropTypes.func
- PropTypes.symbol
- PropTypes.instanceOf
Build
We use Yarn on this project to ensure deterministic builds across node versions
To contribute to this still young project you need to install it’s dependencies and run a watch to transpile the files.
yarn install
yarn run watch
(
Tests
Cuttlebelle is being automatically tested on the below systems and node versions.
https://travis-ci.org/cuttlebelle/cuttlebelle.svg?branch=master
| OS | Node version | Node version | Node version |
|---|---|---|---|
Linux |
~8 |
~10 |
~12 |
OSX |
~8 |
~10 |
~12 |
I got an end-to-end test script that compares fixtures to what cuttlebelle generates. In each of those folders I test for specific things and make sure the checksum of the generated files match the fixtures. In addition to that I created as many unit tests as I can via Jest. Flow types are also checked where they are specified.
-
yarn run testto run all tests -
yarn run test:end-to-endwill run the end-to-end test only -
yarn run test:unit-testwill run the unit test only -
yarn run test:flowwill run the flow type test -
yarn run test:detailwill give you coverage infos for the unit tests -
yarn run test:watchwill spin up the jest watch
Release History
See CHANGELOG.
License
Copyright (c) Dominik Wilkowski. Licensed under GNU-GPLv3.