quaggaJS
- Changelog (2017-06-07)
- Browser Support
- Installing
- Getting Started
- API
- Configuration
- Tips & Tricks
- Sponsors
What is QuaggaJS?
QuaggaJS is a barcode-scanner entirely written in JavaScript supporting real-
time localization and decoding of various types of barcodes such as EAN,
CODE 128, CODE 39, EAN 8, UPC-A, UPC-C, I2of5,
2of5, CODE 93 and CODABAR. The library is also capable of using
getUserMedia to get direct access to the user's camera stream. Although the
code relies on heavy image-processing even recent smartphones are capable of
locating and decoding barcodes in real-time.
Try some examples and check out the blog post (How barcode-localization works in QuaggaJS) if you want to dive deeper into this topic.
Yet another barcode library?
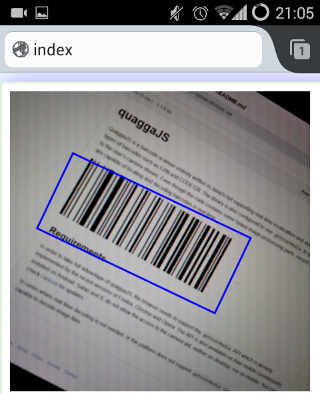
This is not yet another port of the great zxing library, but more of an extension to it. This implementation features a barcode locator which is capable of finding a barcode-like pattern in an image resulting in an estimated bounding box including the rotation. Simply speaking, this reader is invariant to scale and rotation, whereas other libraries require the barcode to be aligned with the viewport.
Browser Support
Quagga makes use of many modern Web-APIs which are not implemented by all browsers yet. There are two modes in which Quagga operates: 1. analyzing static images and 2. using a camera to decode the images from a live-stream. The latter requires the presence of the MediaDevices API. You can track the compatibility of the used Web-APIs for each mode:
Static Images
The following APIs need to be implemented in your browser:
Live Stream
In addition to the APIs mentioned above:
Important: Accessing getUserMedia requires a secure origin in most
browsers, meaning that http:// can only be used on localhost. All other
hostnames need to be served via https://. You can find more information in the
Chrome M47 WebRTC Release Notes.
Feature-detection of getUserMedia
Every browser seems to differently implement the mediaDevices.getUserMedia
API. Therefore it's highly recommended to include
webrtc-adapter in your project.
Here's how you can test your browser's capabilities:
if navigatormediaDevices && typeof navigatormediaDevicesgetUserMedia === 'function' // safely access `navigator.mediaDevices.getUserMedia`The above condition evaluates to:
| Browser | result |
|---|---|
| Edge | true |
| Chrome | true |
| Firefox | true |
| IE 11 | false |
| Safari iOS | false |
Installing
QuaggaJS can be installed using npm, bower, or by including it with the script tag.
NPM
> npm install quaggaAnd then import it as dependency in your project:
; // ES6const Quagga = default; // Common JS (important: default)Currently, the full functionality is only available through the browser. When using QuaggaJS within node, only file-based decoding is available. See the example for node_examples.
Bower
You can also install QuaggaJS through bower:
> bower install quaggaScript-Tag Anno 1998
You can simply include dist/quagga.min.js in your project and you are ready
to go. The script exposes the library on the global namespace under Quagga.
Getting Started
For starters, have a look at the examples to get an idea where to go from here.
Building
You can build the library yourself by simply cloning the repo and typing:
> npm install> npm run buildThis npm script builds a non optimized version quagga.js and a minified
version quagga.min.js and places both files in the dist folder.
Additionally, a quagga.map source-map is placed alongside these files. This
file is only valid for the non-uglified version quagga.js because the
minified version is altered after compression and does not align with the map
file any more.
Node
The code in the dist folder is only targeted to the browser and won't work in
node due to the dependency on the DOM. For the use in node, the build command
also creates a quagga.js file in the lib folder.
API
You can check out the examples to get an idea of how to use QuaggaJS. Basically the library exposes the following API:
Quagga.init(config, callback)
This method initializes the library for a given configuration config (see
below) and invokes the callback(err) when Quagga has finished its
bootstrapping phase. The initialization process also requests for camera
access if real-time detection is configured. In case of an error, the err
parameter is set and contains information about the cause. A potential cause
may be the inputStream.type is set to LiveStream, but the browser does
not support this API, or simply if the user denies the permission to use the
camera.
If you do not specify a target, QuaggaJS would look for an element that matches
the CSS selector #interactive.viewport (for backwards compatibility).
target can be a string (CSS selector matching one of your DOM node) or a DOM
node.
Quagga;Quagga.start()
When the library is initialized, the start() method starts the video-stream
and begins locating and decoding the images.
Quagga.stop()
If the decoder is currently running, after calling stop() the decoder does not
process any more images. Additionally, if a camera-stream was requested upon
initialization, this operation also disconnects the camera.
Quagga.onProcessed(callback)
This method registers a callback(data) function that is called for each frame
after the processing is done. The data object contains detailed information
about the success/failure of the operation. The output varies, depending whether
the detection and/or decoding were successful or not.
Quagga.onDetected(callback)
Registers a callback(data) function which is triggered whenever a barcode-
pattern has been located and decoded successfully. The passed data object
contains information about the decoding process including the detected code
which can be obtained by calling data.codeResult.code.
Quagga.decodeSingle(config, callback)
In contrast to the calls described above, this method does not rely on
getUserMedia and operates on a single image instead. The provided callback
is the same as in onDetected and contains the result data object.
Quagga.offProcessed(handler)
In case the onProcessed event is no longer relevant, offProcessed removes
the given handler from the event-queue.
Quagga.offDetected(handler)
In case the onDetected event is no longer relevant, offDetected removes
the given handler from the event-queue.
The result object
The callbacks passed into onProcessed, onDetected and decodeSingle
receive a data object upon execution. The data object contains the following
information. Depending on the success, some fields may be undefined or just
empty.
"codeResult": "code": "FANAVF1461710" // the decoded code as a string "format": "code_128" // or code_39, codabar, ean_13, ean_8, upc_a, upc_e "start": 355 "end": 26 "codeset": 100 "startInfo": "error": 10000000000000002 "code": 104 "start": 21 "end": 41 "decodedCodes": "code": 104 "start": 21 "end": 41 // stripped for brevity "error": 08888888888888893 "code": 106 "start": 328 "end": 350 "endInfo": "error": 08888888888888893 "code": 106 "start": 328 "end": 350 "direction": -1 "line": "x": 2597278706156836 "y": 3605616435369468 "x": 4019220519377024 "y": 7087524989906444 "angle": -06565217179979483 "pattern": 0 0 0 0 0 0 0 0 0 0 0 0 0 0 0 0 0 0 0 0 0 1 1 /* ... */ 1 "box": 774074243622672 4109288668804402 0050203235235130705 31053619724086366 36015706727788256 3305711026051813 4375142884049146 13344977990009465 "boxes": 774074243622672 4109288668804402 0050203235235130705 31053619724086366 36015706727788256 3305711026051813 4375142884049146 13344977990009465 24890769330706507 4152041489551161 1989532321622869 35262160512937635 339546160777576 2403979259789976 3895006219223542 30298046980473737 Configuration
The configuration that ships with QuaggaJS covers the default use-cases and can be fine-tuned for specific requirements.
The configuration is managed by the config object defining the following
high-level properties:
numOfWorkers: 4 locate: true inputStream: ... frequency: 10 decoder:... locator: ... debug: falsenumOfWorkers
QuaggaJS supports web-workers out of the box and runs with 4 workers in its
default configuration. The number should align with the number of cores
available in your targeted devices.
In case you don't know the number upfront, or if the variety of devices is
too big, you can either use navigator.hardwareConcurrency (see
here) where available
or make use of core-estimator.
locate
One of the main features of QuaggaJS is its ability to locate a barcode in a
given image. The locate property controls whether this feature is turned on
(default) or off.
Why would someone turn this feature off? Localizing a barcode is a computationally expensive operation and might not work properly on some devices. Another reason would be the lack of auto-focus producing blurry images which makes the localization feature very unstable.
However, even if none of the above apply, there is one more case where it might
be useful to disable locate: If the orientation, and/or the approximate
position of the barcode is known, or if you want to guide the user through a
rectangular outline. This can increase performance and robustness at the same
time.
inputStream
The inputStream property defines the sources of images/videos within QuaggaJS.
name: "Live" type: "LiveStream" constraints: width: 640 height: 480 facingMode: "environment" deviceId: "7832475934759384534" area: // defines rectangle of the detection/localization area top: "0%" // top offset right: "0%" // right offset left: "0%" // left offset bottom: "0%" // bottom offset singleChannel: false // true: only the red color-channel is readFirst, the type property can be set to three different values:
ImageStream, VideoStream, or LiveStream (default) and should be selected
depending on the use-case. Most probably, the default value is sufficient.
Second, the constraint key defines the physical dimensions of the input image
and additional properties, such as facingMode which sets the source of the
user's camera in case of multiple attached devices. Additionally, if required,
the deviceId can be set if the selection of the camera is given to the user.
This can be easily achieved via
MediaDevices.enumerateDevices()
Thirdly, the area prop restricts the decoding area of the image. The values
are given in percentage, similar to the CSS style property when using
position: absolute. This area is also useful in cases the locate property
is set to false, defining the rectangle for the user.
The last key singleChannel is only relevant in cases someone wants to debug
erroneous behavior of the decoder. If set to true the input image's red
color-channel is read instead of calculating the gray-scale values of the
source's RGB. This is useful in combination with the ResultCollector where
the gray-scale representations of the wrongly identified images are saved.
frequency
This top-level property controls the scan-frequency of the video-stream. It's optional and defines the maximum number of scans per second. This renders useful for cases where the scan-session is long-running and resources such as CPU power are of concern.
decoder
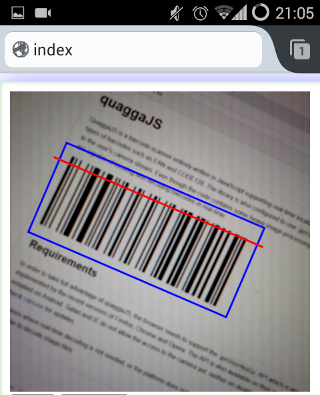
QuaggaJS usually runs in a two-stage manner (locate is set to true) where,
after the barcode is located, the decoding process starts. Decoding is the
process of converting the bars into its true meaning. Most of the configuration
options within the decoder are for debugging/visualization purposes only.
readers: 'code_128_reader' debug: drawBoundingBox: false showFrequency: false drawScanline: false showPattern: false multiple: falseThe most important property is readers which takes an array of types of
barcodes which should be decoded during the session. Possible values are:
- code_128_reader (default)
- ean_reader
- ean_8_reader
- code_39_reader
- code_39_vin_reader
- codabar_reader
- upc_reader
- upc_e_reader
- i2of5_reader
- 2of5_reader
- code_93_reader
Why are not all types activated by default? Simply because one should explicitly define the set of barcodes for their use-case. More decoders means more possible clashes, or false-positives. One should take care of the order the readers are given, since some might return a value even though it is not the correct type (EAN-13 vs. UPC-A).
The multiple property tells the decoder if it should continue decoding after
finding a valid barcode. If multiple is set to true, the results will be
returned as an array of result objects. Each object in the array will have a
box, and may have a codeResult depending on the success of decoding the
individual box.
The remaining properties drawBoundingBox, showFrequency, drawScanline and
showPattern are mostly of interest during debugging and visualization.
Enabling extended EAN
The default setting for ean_reader is not capable of reading extensions such
as EAN-2 or
EAN-5. In order to activate those
supplements you have to provide them in the configuration as followed:
decoder: readers: format: "ean_reader" config: supplements: 'ean_5_reader' 'ean_2_reader' Beware that the order of the supplements matters in such that the reader stops
decoding when the first supplement was found. So if you are interested in EAN-2
and EAN-5 extensions, use the order depicted above.
It's important to mention that, if supplements are supplied, regular EAN-13
codes cannot be read any more with the same reader. If you want to read EAN-13
with and without extensions you have to add another ean_reader reader to the
configuration.
locator
The locator config is only relevant if the locate flag is set to true.
It controls the behavior of the localization-process and needs to be adjusted
for each specific use-case. The default settings are simply a combination of
values which worked best during development.
Only two properties are relevant for the use in Quagga (halfSample and
patchSize) whereas the rest is only needed for development and debugging.
halfSample: true patchSize: "medium" // x-small, small, medium, large, x-large debug: showCanvas: false showPatches: false showFoundPatches: false showSkeleton: false showLabels: false showPatchLabels: false showRemainingPatchLabels: false boxFromPatches: showTransformed: false showTransformedBox: false showBB: false The halfSample flag tells the locator-process whether it should operate on an
image scaled down (half width/height, quarter pixel-count ) or not. Turning
halfSample on reduces the processing-time significantly and also helps
finding a barcode pattern due to implicit smoothing.
It should be turned off in cases where the barcode is really small and the full
resolution is needed to find the position. It's recommended to keep it turned
on and use a higher resolution video-image if needed.
The second property patchSize defines the density of the search-grid. The
property accepts strings of the value x-small, small, medium, large and
x-large. The patchSize is proportional to the size of the scanned barcodes.
If you have really large barcodes which can be read close-up, then the use of
large or x-large is recommended. In cases where the barcode is further away
from the camera lens (lack of auto-focus, or small barcodes) then it's advised
to set the size to small or even x-small. For the latter it's also
recommended to crank up the resolution in order to find a barcode.
Examples
The following example takes an image src as input and prints the result on the
console. The decoder is configured to detect Code128 barcodes and enables the
locating-mechanism for more robust results.
Quagga;Using node
The following example illustrates the use of QuaggaJS within a node
environment. It's almost identical to the browser version with the difference
that node does not support web-workers out of the box. Therefore the config
property numOfWorkers must be explicitly set to 0.
var Quagga = default; Quagga;Tips & Tricks
A growing collection of tips & tricks to improve the various aspects of Quagga.
Barcodes too small?
Barcodes too far away from the camera, or a lens too close to the object result in poor recognition rates and Quagga might respond with a lot of false-positives.
Starting in Chrome 59 you can now make use of capabilities and directly
control the zoom of the camera. Head over to the
web-cam demo
and check out the Zoom feature.
You can read more about those capabilities in
Let's light a torch and explore MediaStreamTrack's capabilities
Video too dark?
Dark environments usually result in noisy images and therefore mess with the recognition logic.
Since Chrome 59 you can turn on/off the Torch of our device and vastly improve the quality of the images. Head over to the web-cam demo and check out the Torch feature.
To find out more about this feature read on.
Tests
Unit Tests can be run with Karma and written using Mocha, Chai and SinonJS. Coverage reports are automatically generated in the coverage/ folder.
> npm install> npm run testImage Debugging
In case you want to take a deeper dive into the inner workings of Quagga, get to
know the debugging capabilities of the current implementation. The various
flags exposed through the config object give you the abilily to visualize
almost every step in the processing. Because of the introduction of the
web-workers, and their restriction not to have access to the DOM, the
configuration must be explicitly set to config.numOfWorkers = 0 in order to
work.
ResultCollector
Quagga is not perfect by any means and may produce false positives from time
to time. In order to find out which images produced those false positives,
the built-in ResultCollector will support you and me helping squashing
bugs in the implementation.
Creating a ResultCollector
You can easily create a new ResultCollector by calling its create
method with a configuration.
var resultCollector = QuaggaResultCollector;Using a ResultCollector
After creating a ResultCollector you have to attach it to Quagga by
calling Quagga.registerResultCollector(resultCollector).
Reading results
After a test/recording session, you can now print the collected results which
do not fit into a certain schema. Calling getResults on the
resultCollector returns an Array containing objects with:
codeResult: {} // same as in onDetected event frame: "data:image/png;base64,iVBOR..." // dataURL of the gray-scaled imageThe frame property is an internal representation of the image and
therefore only available in gray-scale. The dataURL representation allows
easy saving/rendering of the image.
Comparing results
Now, having the frames available on disk, you can load each single image by
calling decodeSingle with the same configuration as used during recording
. In order to reproduce the exact same result, you have to make sure to turn
on the singleChannel flag in the configuration when using decodeSingle.
Sponsors
Changelog
2017-06-07
- Improvements
- added
mutedandplaysinlineto<video/>to make it work for Safari 11 Beta (even iOS)
- added
- Fixes
2017-06-06
- Features
- Support for Standard 2of5 barcodes (See #194)
- Support for Code 93 barcodes (See #194)
- Exposing
Quagga.CameraAccess.getActiveTrack()to get access to the currently usedMediaStreamTrack- Example can be viewed here: example/live_w_locator.js and a demo
Take a look at the release-notes ( 0.12.0)
2017-01-08
- Improvements
- Exposing
CameraAccessmodule to get access to methods likeenumerateVideoDevicesandgetActiveStreamLabel(seeexample/live_w_locator) - Update to webpack 2.2 (API is still unstable)
- Exposing
2016-10-03
- Fixes
- Fixed
facingModeissue with Chrome >= 53 (see #128)
- Fixed
2016-08-15
- Features
- Proper handling of EXIF orientation when using
Quagga.decodeSingle(see #121)
- Proper handling of EXIF orientation when using
2016-04-24
- Features
- EAN-13 extended codes can now be decoded (See #71)
Take a look at the release-notes ( 0.11.0)
2016-04-19
- Improvements
- Reducing false-positives for Code 128 barcodes ( addresses #104)
2016-03-31
Take a look at the release-notes ( 0.10.0)
2016-02-18
- Internal Changes
- Restructuring into meaningful folders
- Removing debug-code in production build
2016-02-15
Take a look at the release-notes ( 0.9.0)
2015-11-22
- Fixes
- Fixed inconsistencies for Code 128 decoding (See #76)
2015-11-15
- Fixes
- Fixed inconsistency in Code 39 decoding
- added inline-source-map to quagga.js file
2015-10-13
Take a look at the release-notes (0.8.0)
- Improvements
- Replaced RequireJS with webpack
2015-09-15
Take a look at the release-notes (0.7.0)
- Features
- Added basic support for running QuaggaJS inside node (see example)
2015-08-29
- Improvements
- Added support for Internet Explorer (only Edge+ supports
getUserMedia)
- Added support for Internet Explorer (only Edge+ supports
2015-08-13
- Improvements
- Added
offProcessedandoffDetectedmethods for detaching event- listeners from the event-queue.
- Added
2015-07-29
- Features
- Added basic support for ITF barcodes (
i2of5_reader)
- Added basic support for ITF barcodes (
2015-07-08
- Improvements
- Parameter tweaking to reduce false-positives significantly (for the entire EAN and UPC family)
- Fixing bug in parity check for UPC-E codes
- Fixing bug in alignment for EAN-8 codes
2015-07-06
- Improvements
- Added
errparameter to Quagga.init() callback function
- Added
2015-06-21
- Features
- Added
singleChannelconfiguration toinputStream(in config) - Added
ResultCollectorfunctionality (see ResultCollector)
- Added
2015-06-13
- Improvements
- Added
formatproperty tocodeResult(in result)
- Added
2015-06-13
- Improvements
- Added fixes for
Code39Reader(trailing whitespace was missing)
- Added fixes for
2015-06-09
- Features
- Introduced the
areaproperty - Ability to define a rectangle where localization/decoding should be applied
- Introduced the
2015-05-20
- Improvements
- Making EAN and UPC readers even more restrictive
- Added example using requirejs
2015-05-18
- Improvements
- Making EAN and UPC readers more restrictive
- Added integration-tests for all barcode-readers
2015-05-09
- Improvements
- Odd image dimensions no longer cause problems
2015-04-30
- Features
- Added support for UPC-A and UPC-E barcodes
- Added support for EAN-8 barcodes
- Improvements
- Added extended configuration to the live-video example
- Releasing resources when calling
Quagga.stop()
2015-04-25
- Improvements
- Added extended configuration to the file-input example
- Configurable
patchSizefor better adjustment to small/medium/large barcodes
2015-04-16
- Features
- Added support for Codabar barcodes
2015-03-16
- Improvements
- now includes minified version (23.3KB gzipped)
- No need for configuration of script-name any more
2015-03-12
- Improvements
- removed dependency on async.js
2015-03-04
- Features
- Added support for Code 39 barcodes
2015-01-21
- Features
- Added support for web-worker (using 4 workers as default, can be changed
through
config.numOfWorkers) - Due to the way how web-workers are created, the name of the script file
(
config.scriptName) should be kept in sync with your actual filename - Removed canvas-overlay for decoding (boxes & scanline) which can now be easily implemented using the existing API (see example)
- Added support for web-worker (using 4 workers as default, can be changed
through
- API Changes
In the course of implementing web-workers some breaking changes were
introduced to the API.
- The
Quagga.initfunction no longer receives the callback as part of the config but rather as a second argument:Quagga.init(config, cb) - The callback to
Quagga.onDetectednow receives an object containing much more information in addition to the decoded code.(see data) - Added
Quagga.onProcessed(callback)which provides a way to get information for each image processed. The callback receives the samedataobject asQuagga.onDetecteddoes. Depending on the success of the process thedataobject might not contain anyresultCodeand/orboxproperties.
- The