
quantum-circuit is open source quantum circuit simulator implemented in javascript. Smoothly runs 20+ qubit simulations in browser or at server (node.js). You can use it in your javascript program to run quantum simulations.
Circuit can be imported from OpenQASM, Quil and IONQ. You can export circuits to OpenQASM, pyQuil, Quil, Qiskit, Cirq, TensorFlow Quantum, QSharp, and CudaQ, so it can be used for conversion between quantum programming languages. Circuit drawing can be exported to SVG vector image.
Quantum Programming Studio is web based quantum programming IDE and simulator built on top of this package. Circuit can be executed on real quantum computer directly from the UI.
-
qconvert Online quantum programming language converter
Simply include quantum-circuit.min.js into your html page (available via unpkg CDN https://unpkg.com/quantum-circuit)
<!doctype html>
<html>
    <head>
        <title>Quantum Circuit Simulator Example</title>
    </head>

    <body>
        <script type="text/javascript" src="https://unpkg.com/quantum-circuit"></script>

        <script type="text/javascript">
            // Your code here
        </script>
    </body>
</html>Add quantum-circuit npm module to your node.js project:
npm install --save quantum-circuitAnd then import it into your program:
var QuantumCircuit = require("quantum-circuit");

// Your code hereSee /example/nodejs directory.
You need to install ijavascript kernel for Jupyter notebook
You can install quantum-circuit npm module globally and invoke jupyter notebook from any directory:
npm install -g quantum-circuit
Or inside new directory do:
npm init
npm install --save quantum-circuit
jupyter notebook
See /example/jupyter directory.
Create instance of QuantumCircuit class, optionally passing number of qubits (wires) to constructor:
var circuit = new QuantumCircuit(3);Note: number of qubits is optional argument - circuit will expand automatically if you add gates to non-existing wires
Call appendGate method passing gate name and qubit (wire) index:
circuit.appendGate(gateName, wire, options);For example, to add Hadamard gate to a first qubit (wire 0) type:
circuit.appendGate("h", 0);For parametrized gates, provide options object with params:
circuit.appendGate("ry", 0, { "params": { "theta":"pi/2" } });For more control on gate placement use addGate and specify a column as well:
Call addGate method passing gate name, column index and qubit (wire) index:
circuit.addGate(gateName, column, wire);For example, to add Hadamard to a second column (column 1) at first qubit (wire 0) type:
circuit.addGate("h", 1, 0);Result is:
         Column 0    Column 1

                     |-----|
Wire 0 --------------|  H  |---
                     |-----|
Note: if column is negative integer then gate will be added to the end of the wire
Call appendGate method passing gate name and array of qubit indexes (wires):
circuit.appendGate(gateName, arrayOfWires);Example:
circuit.appendGate("cx", [0, 1]);For parametrized gates, provide options object with params:
circuit.appendGate("cry", [0, 1], { "params": { "theta":"pi/2" } });For more control on gate placement use addGate and specify a column as well:
Call addGate method passing gate name, column index and array of connected qubits (wires):
circuit.addGate(gateName, column, arrayOfWires);For example, to add CNOT to a second column (column 1) controlled by second qubit (wire 1) at third qubit as target (wire 2) do:
circuit.addGate("cx", 1, [1, 2]);
         Column 0    Column 1

Wire 0 ------------------------


Wire 1 -----------------o------
                        |
                     |-----|
Wire 2 --------------| CX  |---
                     |-----|
Note: if column is negative integer then gate will be added to the end
var QuantumCircuit = require("quantum-circuit");

//
// 8-bit quantum random number generator
//

var quantumRandom = function() {

    var circuit = new QuantumCircuit();

    for(var i = 0; i < 8; i++) {
        //
        // add Hadamard gate to the end (-1) of i-th wire
        //
        circuit.appendGate("h", i);

        //
        // add measurement gate to i-th qubit which will store result
        // into classical register "c", into i-th classical bit
        //
        circuit.addMeasure(i, "c", i);
    }

    // run circuit
    circuit.run();

    // return value of register "c"
    return circuit.getCregValue("c");
};

// Usage - print random number to terminal
console.log(quantumRandom());| Name | pyQuil | Cirq | Q# | IONQ | Qubits | Params | Description |
|---|---|---|---|---|---|---|---|
| id | I | I | I | 1 | Single qubit identity gate | ||
| x | X | X | X | x | 1 | Pauli X (PI rotation over X-axis) aka "NOT" gate | |
| y | Y | Y | Y | y | 1 | Pauli Y (PI rotation over Y-axis) | |
| z | Z | Z | Z | z | 1 | Pauli Z (PI rotation over Z-axis) | |
| h | H | H | H | h | 1 | Hadamard gate | |
| srn | def srn | X**(1/2) | v | 1 | Square root of NOT | ||
| srndg | def srndg | X**(-1/2) | vi | 1 | Inverse square root of NOT | ||
| r2 | S | S | S | 1 | PI/2 rotation over Z-axis aka "Phase PI/2" | ||
| r4 | T | T | T | 1 | PI/4 rotation over Z-axis aka "Phase PI/4" | ||
| r8 | PHASE(pi/8) | u1(pi/8) | 1 | PI/8 rotation over Z-axis aka "Phase PI/8" | |||
| rx | RX | rx | Rx | rx | 1 | theta | Rotation around the X-axis by given angle |
| ry | RY | ry | Ry | ry | 1 | theta | Rotation around the Y-axis by given angle |
| rz | RZ | rz | Rz | rz | 1 | phi | Rotation around the Z-axis by given angle |
| u1 | PHASE | def u1 | 1 | lambda | Single-qubit rotation about the Z axis | ||
| u2 | def u2 | def u2 | 1 | phi, lambda | Single-qubit rotation about the X+Z axis | ||
| u3 | def u3 | def u3 | 1 | theta, phi, lambda | Generic single-qubit rotation gate with 3 Euler angles | ||
| s | S | S | S | s | 1 | PI/2 rotation over Z-axis (synonym for r2) |
|
| t | T | T | T | t | 1 | PI/4 rotation over Z-axis (synonym for r4) |
|
| sdg | PHASE(-pi/2) | u1(-pi/2) | si | 1 | (-PI/2) rotation over Z-axis | ||
| tdg | PHASE(-pi/4) | u1(-pi/4) | ti | 1 | (-PI/4) rotation over Z-axis | ||
| gpi | def gpi | gpi | gpi | 1 | phi | GPi gate | |
| gpi2 | def gpi2 | gpi2 | gpi2 | 1 | phi | GPi2 gate | |
| vz | def vz | vz | vz | 1 | theta | VirtualZ gate | |
| cx | CNOT | CNOT | CNOT | cnot | 2 | Controlled NOT (CNOT) gate | |
| cy | def cy | Y | Controlled Y | 2 | Controlled Y gate (controlled rotation over Y-axis by PI) | ||
| cz | CZ | CZ | Controlled Z | 2 | Controlled Z gate (controlled rotation over Z-axis by PI) | ||
| ch | def ch | H | Controlled H | 2 | Controlled Hadamard gate | ||
| csrn | def csrn | X**(1/2) | 2 | Controlled square root of NOT | |||
| swap | SWAP | SWAP | SWAP | swap | 2 | Swaps the state of two qubits. | |
| srswap | def srswap | SWAP**(1/2) | 2 | Square root of swap | |||
| iswap | ISWAP | ISWAP | 2 | Swaps the state of two qubits, applying a -i phase to q1 when it is in the 1 state and a -i phase to q2 when it is in the 0 state | |||
| xx | def xx | xx | xx | 2 | theta | XX gate | |
| yy | def yy | YY | yy | 2 | theta | YY gate | |
| zz | def zz | zz | 2 | theta | Parametric 2-qubit rotation about ZZ | ||
| xy | XY | def xy | 2 | phi | XY gate | ||
| ms | def ms | ms | ms | 2 | phi0, phi1 | Mølmer-Sørensen gate | |
| cr2 | CPHASE(pi/2) | cu1(pi/2) | 2 | Controlled PI/2 rotation over Z-axis | |||
| cr4 | CPHASE(pi/4) | cu1(pi/4) | 2 | Controlled PI/4 rotation over Z-axis | |||
| cr8 | CPHASE(pi/8) | cu1(pi/8) | 2 | Controlled PI/8 rotation over Z-axis | |||
| crx | def crx | rx(theta) | Controlled Rx | 2 | theta | Controlled rotation around the X-axis by given angle | |
| cry | def cry | ry(theta) | Controlled Ry | 2 | theta | Controlled rotation around the Y-axis by given angle | |
| crz | def crz | rz(phi) | Controlled Rz | 2 | phi | Controlled rotation around the Z-axis by given angle | |
| cu1 | CPHASE | def cu1 | 2 | lambda | Controlled rotation about the Z axis | ||
| cu2 | def cu2 | def cu2 | 2 | phi, lambda | Controlled rotation about the X+Z axis | ||
| cu3 | def cu3 | def cu3 | 2 | theta, phi, lambda | Controlled rotation gate with 3 Euler angles | ||
| cs | CPHASE(pi/2) | cu1(pi/2) | 2 | Controlled PI/2 rotation over Z-axis (synonym for cr2) |
|||
| ct | CPHASE(pi/4) | cu1(pi/4) | 2 | Controlled PI/4 rotation over Z-axis (synonym for cr4) |
|||
| csdg | CPHASE(-pi/2) | cu1(-pi/2) | 2 | Controlled (-PI/2) rotation over Z-axis | |||
| ctdg | CPHASE(-pi/4) | cu1(-pi/4) | 2 | Controlled (-PI/4) rotation over Z-axis | |||
| ccx | CCNOT | CCX | CCNOT | 3 | Toffoli aka "CCNOT" gate | ||
| cswap | CSWAP | CSWAP | Controlled SWAP | 3 | Controlled swap aka "Fredkin" gate | ||
| csrswap | def csrswap | SWAP**(1/2) | 3 | Controlled square root of swap | |||
| reset | RESET | reset | Reset | 1 | Resets qubit | ||
| measure | MEASURE | measure | M | 1 | Measures qubit and stores outcome (0 or 1) into classical register |
For more details see gate reference
Simply call run method.
circuit.run();By default, initial state of each qubit is |0>. You can pass initial values as array of bool (true or false) or integers (0 or 1). This will set first two qubits to |1> and evaluate circuit:
circuit.run([1, 1]);Method probabilities() will return array of probabilities (real numbers between 0 and 1) for each qubit:
console.log(circuit.probabilities());Method probability(wire) will return probability (real number between 0 and 1) for given qubit:
console.log(circuit.probability(0));Method measureAll() returns array of chances (as integers 0 or 1) for each qubit:
Example:
console.log(circuit.measureAll());Method measure(wire) returns chance (as integer 0 or 1) for given qubit:
Example:
console.log(circuit.measure(0));You can store measurement into classical register. For example, to measure first qubit (wire 0) and store result into classical register named c as fourth bit (bit 3):
circuit.measure(0, "c", 3);You can add measure gate to circuit and then measurement will be done automatically and result will be stored into classical register:
circuit.addGate("measure", -1, 0, { creg: { name: "c", bit: 3 } });Short form of writing this is addMeasure(wire, creg, cbit):
circuit.addMeasure(0, "c", 3);Note:
-
Measurement gate will reset qubit to measured value only if there are gates with classical control (gates controlled by classical registers). Otherwise, measurement gate will leave qubit as is - measured value will be written to classical register and qubit will remain unchanged. This "nondestructive" behavior is handy when experimenting. However, it will automatically switches to "destructive" mode when needed (when classical control is present)
-
If specified classical register doesn't exists - it will be created automatically.
Create register
Classical registers are created automatically if you add measurement gate to the circuit but you can also manually create registers by calling createCreg(name, len).
Example: create classical 5-bit register named ans:
circuit.createCreg("ans", 5);Read register
To get register value as integer, call getCregValue(name).
Example:
var value = circuit.getCregValue("ans");Read all registers as dictionary
var regs = circuit.getCregs();
console.log(regs);
Read all registers as tab delimited CSV string
var tsv = circuit.cregsAsString();
console.log(tsv);
Read single bit
Example: get bit 3 from register named ans:
console.log(circuit.getCregBit("ans", 3));Returns integer: 0 or 1
Set single bit
Example: set bit 3 to 1 in register named ans:
circuit.setCregBit("ans", 3, 1);Each quatum gate in the circuit (except "measure" gate) can be controlled by classical register - gate will be executed only if classical register contains specified value. Pass options object as fourth argument to addGate method:
Example:
circuit.addGate("x", -1, 0, {
    condition: {
        creg: "ans",
        value: 7
    }
});
In this example, "x" gate will execute on qubit 0 only if value of register named "ans" equals 7.
You can reset qubit to value |0> or |1> with resetQubit method:
circuit.resetQubit(3, 0);In this example, qubit 3 will be set to 0|>.
Note that all entangled qubits will be changed as well
You can get state as string with method stateAsString(onlyPossible):
var s = circuit.stateAsString(false);If you want only possible values (only values with probability > 0) then pass true:
var s = circuit.stateAsString(true);Or, you can print state to javascript console with method print(onlyPossible):
circuit.print(false);If you want to print only possible values (only values with probability > 0) then pass true:
var s = circuit.print(true);You can export circuit to javascript object (format internally used by QuantumCircuit) by calling save method:
var obj = circuit.save();

// now do something with obj, save to file or whatever...
And load previously saved circuit by calling load method:
var obj = // ...load object from file or from another circuit or whatever

circuit.load(obj);You can "compile" any circuit and use it as a gate in another circuit like this:
// export circuit to variable
var obj = someCircuit.save();

// register it as a gate in another circuit
anotherCircuit.registerGate("my_gate", obj);

// use it as a gate in another circuit
// assuming original circuit has three qubits then gate must spread to 3 qubits, in this example: 2, 3, 4)
anotherCircuit.addGate("my_gate", 0, [2, 3, 4]);If your circuit contains user defined gates (created from another circuit), you can decompose it into equivalent circuit containing only basic gates.
If you pass true as argument to function save, you'll get decomposed circuit.
Example:
var obj = circuit.save(true);
// now obj contains decomposed circuit. You can load it:
circuit.load(obj);Circuit can be imported from OpenQASM with following limitations:
-
importdirective is ignored (but gates defined inqelib1.incare supported) TODO -
barrieris ignored. TODO
To import circuit from OpenQASM use importQASM(input, errorCallback) method:
Example:
circuit.importQASM("OPENQASM 2.0;\nimport \"qelib1.inc\";\nqreg q[2];\nh q[0];\ncx q[0],q[1];\n", function(errors) {
    console.log(errors);
});-
inputis string containing QASM source code. -
errorCallback(optional) callback will be called after parsing with one argument: array containing errors or empty array on success. If no callback is provided, function will throw error if input contains errors.
Circuit can be imported from Quil:
To import circuit from QUIL use importQuil(quil, errorCallback, options, qubitNames, renamedGates, lineOffset) method:
Example:
circuit.importQuil("H 0\nCNOT 0 1\n", function(errors) {
    console.log(errors);
});-
quilis string containing QUIL source code. -
errorCallback(optional) callback will be called after parsing with one argument: array containing errors or empty array on success. If no callback is provided, function will throw error if input contains errors. -
options(optional) function will be called after parsing with array containing syntax errors. -
qubitNames(optional) names to be given to the qubits. -
renamedGates(optional) custom names given to basic commands -
lineOffset(optional) no. of spaces before a new line
Circuit can be imported from Qobj:
To import circuit from OpenQASM use importQobj(qobj, errorCallback) method:
Example:
circuit.importQobj({"qobj_id":"qobj_WlLkcGHxihyqWGrKEZ","type":"QASM","schema_version":"1.0","experiments":[{"header":{"memory_slots":0,"n_qubits":2,"qreg_sizes":[["q",2]],"qubit_labels":[["q",0],["q",1]],"creg_sizes":[],"clbit_labels":[],"name":"circuit0","description":"text_exp"},"config":{"n_qubits":2,"memory_slots":0},"instructions":[{"name":"x","qubits":[0,1]}]}],"header":{"description":"test_circ"},"config":{"shots":1,"memory_slots":0}}, function(errors) {
    console.log(errors);
});-
qobjis Qobj JSON ("type": "QASM"). -
errorCallback(optional) callback will be called after parsing with one argument: array containing errors or empty array on success. If no callback is provided, function will throw error if input contains errors.
Circuit can be imported from IONQ json:
To import circuit from IONQ json use importIonq(data, errorCallback) method:
Example:
var ionqCircuit = {
  "qubits": 2,
  "circuit": [
    {
      "gate": "h",
      "target": 0
    },
    {
      "gate": "cnot",
      "target": 1,
      "control": 0
    }
  ]
};

circuit.importIonq(ionqCircuit, function(errors) {
    console.log(errors);
});-
datais IONQ JSON object. -
errorCallback(optional) callback will be called after parsing with one argument: array containing errors or empty array on success. If no callback is provided, function will throw error if input contains errors.
Circuit can be exported to JavaScript with exportJavaScript(comment, decompose, null, asJupyter) method:
Example:
var js = circuit.exportJavaScript("Comment to insert at the beginning.\nCan be multi-line comment like this one.", false);-
comment- comment to insert at the beginning of the file. -
decompose- if set totrueand circuit contains user defined gates then it will be decomposed to basic gates and then exported. If set tofalsethen user defined gates will exported as subroutines. -
asJupyter- when this argument istruejupyter notebook (set to useijavascriptkernel) will be returned.
Circuit can be exported to Qiskit with following limitation:
-
User defined gates are not generated. Instead, circuit is decomposed to basic gates and exported. Effect is the same but code is less readable. TODO
-
Gates not directly supported by Qiskit are exported as-is - their definition is not generated. TODO
To export circuit to Qiskit use exportToQiskit(options, exportAsGateName, circuitReplacement, insideSubmodule) method :
Example:
var qiskit = circuit.exportToQiskit({comment:"Comment to insert at the beginning.\nCan be multi-line comment as this one."}, false, null, null);-
options- consists of parameters for circuit export as follows:-
comment- comment to insert at the beginning of the file. -
decompose- if set totrueand circuit contains user defined gates then it will be decomposed to basic gates and then exported. If set tofalsethen user defined gates will exported as subroutines. -
versionStr- Qiskit version. Can be"0.7". Exports to latest supported version when empty string is provided. Remember - it is a string. -
providerName- name of the Qiskit backend simulator provider. -
backendName- name of the Qiskit backend simulator. -
asJupyter- when this argument istruejupyter notebook will be returned. -
shots- no. of trials. -
hybrid- whentrueexports user defined cost function along with circuit for hybrid Quantum-Classical Algorithms
-
-
insideSubmodule- used internally (whentrueadds extra indent for alignment) -
exportAsGateName- used internally (name of the custom gate containing the Qiskit circuit) -
circuitReplacement- used internally (whentrueexports only gates in the circuit)
Circuit can be exported to OpenQASM with following limitation:
- at the moment, gates not directly supported by QASM and qelib1.inc are exported as-is - their definition is not generated. TODO
To export circuit to OpenQASM use exportToQASM(options, exportAsGateName, circuitReplacement, insideSubmodule) method:
Example:
var qasm = circuit.exportToQASM({comment:"Comment to insert at the beginning.\nCan be multi-line comment as this one."}, false);-
options- consists of parameters for circuit export as follows:-
comment- comment to insert at the beginning of the file. -
decompose- if set totrueand circuit contains user defined gates then it will be decomposed to basic gates and then exported. If set tofalsethen user defined gates will exported as subroutines. -
compatibilityMode- if set totrueexports the circuit in compatible mode
-
-
insideSubmodule- whentrueadds extra indent for alignment -
exportAsGateName- name of the custom gate containing the Qiskit circuit. -
circuitReplacement- whentrueexports only gates in the circuit
Circuit can be exported to pyQuil
To export circuit to pyQuil use exportToPyquil(options, exportAsGateName) method:
Example:
var qasm = circuit.exportToPyquil({comment:"Comment to insert at the beginning.\nCan be multi-line comment as this one."}, false);-
options- consists of parameters for circuit export as follows:-
comment- comment to insert at the beginning of the file. -
decompose- if set totrueand circuit contains user defined gates then it will be decomposed to basic gates and then exported. If set tofalsethen user defined gates will exported as subroutines. -
versionStr- pyQuil version. Can be"1.9","2.0"or"2.1". Exports to latest supported version when empty string is provided. Remember - it is a string. -
lattice- You can optionally pass then name of the lattice. -
asQVM- If this argument istrue(and iflatticeis specified) then produced code will run on QVM mimicking running on QPU. Otherwise, produced code will run on QPU. -
asJupyter- when this argument istruejupyter notebook will be returned. -
shots- no. of trials. -
hybrid- whentrueexports user defined cost function along with circuit for hybrid Quantum-Classical Algorithms
-
-
exportAsGateName- name of the custom gate containing the Pyquil circuit.
Circuit can be exported to Quil
To export circuit to Quil use exportToQuil(options, exportAsGateName) method:
Example:
var quil = circuit.exportToQuil({comment:"Comment to insert at the beginning.\nCan be multi-line comment as this one."}, false);-
options- consists of parameters for circuit export as follows:-
comment- comment to insert at the beginning of the file. -
decompose- if set totrueand circuit contains user defined gates then it will be decomposed to basic gates and then exported. If set tofalsethen user defined gates will exported as subroutines. -
versionStr- pyQuil version. Can be"1.9","2.0"or"2.1". Exports to latest supported version when empty string is provided. Remember - it is a string.
-
-
exportAsGateName- name of the custom gate containing the Pyquil circuit.
Circuit can be exported to Cirq with following limitation:
-
Gates not directly supported by Cirq are exported as-is - their definition is not generated. TODO
-
Classical control is ignored (comment with warning is generated). TODO
To export circuit to Cirq use exportToCirq(options, exportAsGateName) method:
Example:
var cirq = circuit.exportToCirq({comment:"Comment to insert at the beginning.\nCan be multi-line comment as this one."}, false);-
options- consists of parameters for circuit export as follows:-
comment- comment to insert at the beginning of the file. -
decompose- if set totrueand circuit contains user defined gates then it will be decomposed to basic gates and then exported. If set tofalsethen user defined gates will exported as subroutines. -
versionStr- Cirq version. Can be"0.5"or empty string. Exports to latest supported version when empty string is provided. Remember - it is a string. -
asJupyter- when this argument istruejupyter notebook will be returned. -
shots- no. of trials. -
exportTfq- if set totruethe export function will export circuit to Tensorflow Quantum.
-
-
exportAsGateName- name of the custom gate containing the Cirq circuit.
Circuit can be exported to QuEST
To export circuit to QuEST use exportQuEST(newOptions, exportAsGateName, definedFunc) method:
Example:
var quest = circuit.exportToQuEST("Comment to insert at the beginning.\nCan be multi-line comment as this one.", false);-
options- consists of parameters for circuit export as follows:-
comment- comment to insert at the beginning of the file. -
decompose- if set totrueand circuit contains user defined gates then it will be decomposed to basic gates and then exported. If set tofalsethen user defined gates will exported as subroutines.
-
-
exportAsGateName- name of the custom gate containing the Cirq circuit. -
definedFunc- list of gates that must be present in the defined function
Circuit can be exported to Q#.
To export circuit to Q# use exportQSharp(options, exportAsGateName) method:
Example:
var qsharp = circuit.exportQSharp("Comment to insert at the beginning.\nCan be multi-line comment as this one.", false, null, null, false, null);-
options- consists of parameters for circuit export as follows:-
comment- comment to insert at the beginning of the file. -
decompose- if set totrueand circuit contains user defined gates then it will be decomposed to basic gates and then exported. If set tofalsethen user defined gates will exported as subroutines. -
versionStr- QSharp version. Can be"0.1"or empty string. Exports to latest supported version when empty string is provided. Remember - it is a string. -
asJupyter- when this argument istruejupyter notebook (set to use qsharp kernel) will be returned. -
circuitName- Name of the circuit that is being exported to QSharp. By default set to"Circuit" -
indentDepth- The no. of tabs to be put before a Python line of code.
-
-
exportAsGateName- name of the custom gate containing the QSharp circuit.
Circuit can be exported to Qobj:
To export circuit to Qiskit use exportToQobj(options, circuitReplacement) method :
Example:
var qobj = circuit.exportToQobj({circuitName:"new_circuit"}, false);-
options- consists of parameters for circuit export as follows:-
circuitName- name of the circuit that is being exported to Qobj -
experimentName- name of the experiment that describes the number of memory slots, qubits, qubit names, classical bit names etc. -
numShots- no. of trials.
-
-
circuitReplacement- whentrueexports only gates in the circuit
Circuit can be exported to Tensorflow Quantum:
To export circuit to TFQ use exportToTFQ(options, exportAsGateName) method :
Example:
var tfq = circuit.exportToTFQ({comment:"Comment to insert at the beginning.\nCan be multi-line comment as this one."}, false);-
options- consists of parameters for circuit export as follows:-
comment- comment to insert at the beginning of the file. -
decompose- if set totrueand circuit contains user defined gates then it will be decomposed to basic gates and then exported. If set tofalsethen user defined gates will exported as subroutines. -
versionStr- TFQ version. Exports to latest supported version when empty string is provided. Remember - it is a string. -
asJupyter- when this argument istruejupyter notebook will be returned. -
shots- no. of trials.
-
-
exportAsGateName- name of the custom gate containing the TFQ circuit.
Circuit can be exported to Braket:
To export circuit to Braket use exportToBraket(options, exportAsGateName) method :
Example:
var braket = circuit.exportToBraket({comment:"Comment to insert at the beginning.\nCan be multi-line comment as this one."}, false);-
options- consists of parameters for circuit export as follows:-
comment- comment to insert at the beginning of the file. -
decompose- if set totrueand circuit contains user defined gates then it will be decomposed to basic gates and then exported. If set tofalsethen user defined gates will exported as subroutines. -
versionStr- Braket version. Exports to latest supported version when empty string is provided. Remember - it is a string. -
asJupyter- when this argument istruejupyter notebook will be returned. -
shots- no. of trials. -
indentDepth- The no. of tabs to be put before a Python line of code. -
hybrid- whentrueexports user defined cost function along with circuit for hybrid Quantum-Classical Algorithms
-
-
exportAsGateName- name of the custom gate containing the Braket circuit.
Circuit can be exported to pyAQASM:
To export circuit to pyAQASM use exportToPyAQASM(options, exportAsGateName) method :
Example:
var pyAqasm = circuit.exportToPyAQASM({comment:"Comment to insert at the beginning.\nCan be multi-line comment as this one."}, false);-
options- consists of parameters for circuit export as follows:-
comment- comment to insert at the beginning of the file. -
decompose- if set totrueand circuit contains user defined gates then it will be decomposed to basic gates and then exported. If set tofalsethen user defined gates will exported as subroutines. -
asJupyter- when this argument istruejupyter notebook will be returned. -
shots- no. of trials. -
hybrid- whentrueexports user defined cost function along with circuit for hybrid Quantum-Classical Algorithms
-
-
exportAsGateName- name of the custom gate containing the pyAQASM circuit.
Circuit can be exported to AQASM:
To export circuit to AQASM use exportToAQASM(options, isExportPyAQASM, exportAsGateName, indentDepth) method :
Example:
var aqasm = circuit.exportToAQASM({comment:"Comment to insert at the beginning.\nCan be multi-line comment as this one."}, false);-
options- consists of parameters for circuit export as follows:-
comment- comment to insert at the beginning of the file. -
decompose- if set totrueand circuit contains user defined gates then it will be decomposed to basic gates and then exported. If set tofalsethen user defined gates will exported as subroutines. -
asJupyter- when this argument istruejupyter notebook will be returned. -
shots- no. of trials. -
hybrid- whentrueexports user defined cost function along with circuit for hybrid Quantum-Classical Algorithms
-
-
isExportPyAQASM- iftrue, this function will be used to export to pyAQASM instead of AQASM. -
exportAsGateName- name of the custom gate containing the AQASM circuit. -
indentDepth- The no. of tabs to be put before a Python line of code.
Circuit can be exported to CudaQ
To export circuit to CudaQ use exportToCudaQ(options, exportAsGateName, circuitReplacement, insideSubmodule) method :
Example:
var cudaq = circuit.exportToCudaQ({comment:"Comment to insert at the beginning.\nCan be multi-line comment as this one."}, false, null, null);-
options- consists of parameters for circuit export as follows:-
comment- comment to insert at the beginning of the file. -
decompose- if set totrueand circuit contains user defined gates then it will be decomposed to basic gates and then exported. If set tofalsethen user defined gates will exported as subroutines. -
backendName- name of the CudaQ backend. -
asJupyter- when this argument istruejupyter notebook will be returned. -
shots- number of shots (if code is sampling). -
hybrid- whentrueexports user defined cost function along with circuit for hybrid Quantum-Classical Algorithms
-
-
insideSubmodule- used internally (whentrueadds extra indent for alignment) -
exportAsGateName- used internally (name of the custom gate containing the CudaQ circuit) -
circuitReplacement- used internally (whentrueexports only gates in the circuit)
Vector .svg image of circuit can be created with exportSVG(embedded) function with following limitations:
- Gate symbols are non-standard. TODO (BTW, do we have standard?)
Example 1
Show circuit in browser:
// Assuming we have <div id="drawing"></div> somewhere in HTML
var container = document.getElementById("drawing");

// SVG is returned as string
var svg = circuit.exportSVG(true);

// add SVG into container
container.innerHTML = svg;
Example 2
Generate standalone SVG image at server with node.js:
// export as standalone SVG
var svg = circuit.exportSVG(false);

// do something with svg string (e.g. save to file)
...

// Or, export as embedded SVG for use in browser
svg = circuit.exportSVG(true);

// do something with svg string (e.g. serve via HTTP)
...Circuit can be exported to popular open-source drag-and-drop quantum circuit simulator Quirk with following limitations:
-
Quirk doesn't support more than 16 qubits.
-
Quirk can possibly incorrectly interpret circuit if we have multiple controlled gates in the same column.
-
Quirk doesn't support non-sequentially positioned multi-qubit user-defined gates (for example gate on wires [3, 0, 1]) so it's best to export decomposed circuit.
Example:
var quirkData = circuit.exportQuirk(true);

var quirkURL = "http://algassert.com/quirk#circuit=" + JSON.stringify(quirkData);

// Now do something with quirkURL. Assuming this code runs in browser and we have <a id="quirk"></a> somewhere, you can:
var quirkLink = document.getElementById("quirk");
quirkLink.setAttr("href", quirkLink);Memory usage: up to 2 * (2^numQubits) * sizeOfComplexNumber
-
Naive implementation stores entire state vector in an array of size
2^numQubits. We are storing state in a "map", and only amplitudes with non-zero probabilities are stored. So, in worst case, size of state map is2^n, but it's less most of the time because we don't store zeroes. -
Naive implementation creates transformation matrix and multiplies it with state vector. We are not creating and not storing entire transformation matrix in memory. Instead, elements of transformation matrix are calculated one by one and state is multiplied and stored in new state map on the fly. This way, memory usage is minimal (in worst case we have two
2^nstate vectors at a time). -
Algorithm is parallelizable so it could use GPU, but GPU support is not implemented yet (work in progress).
Performance is measured on MacBook Pro MJLT2 mid-2015 (Core i7 2.5 GHz, 16GB RAM)
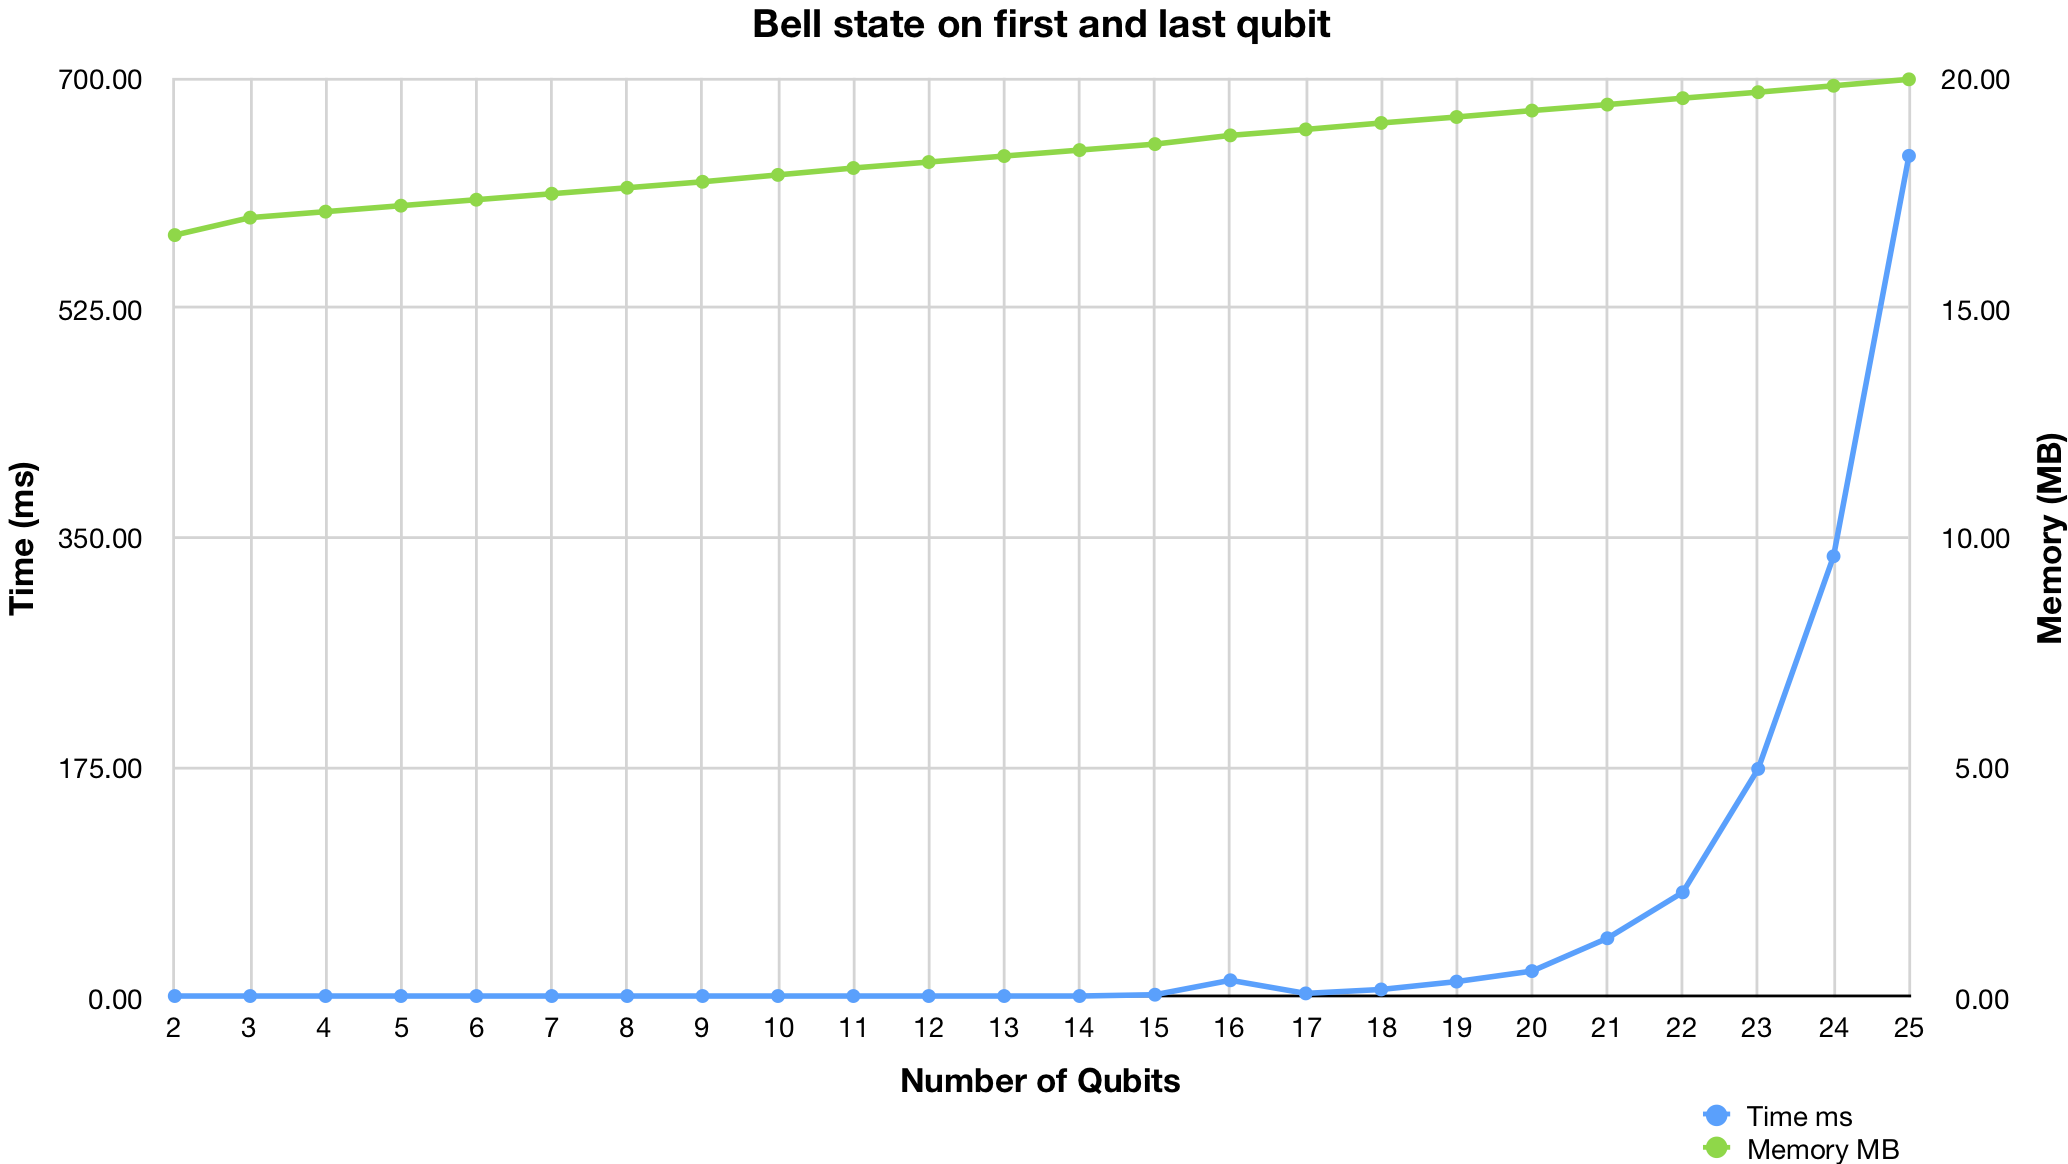
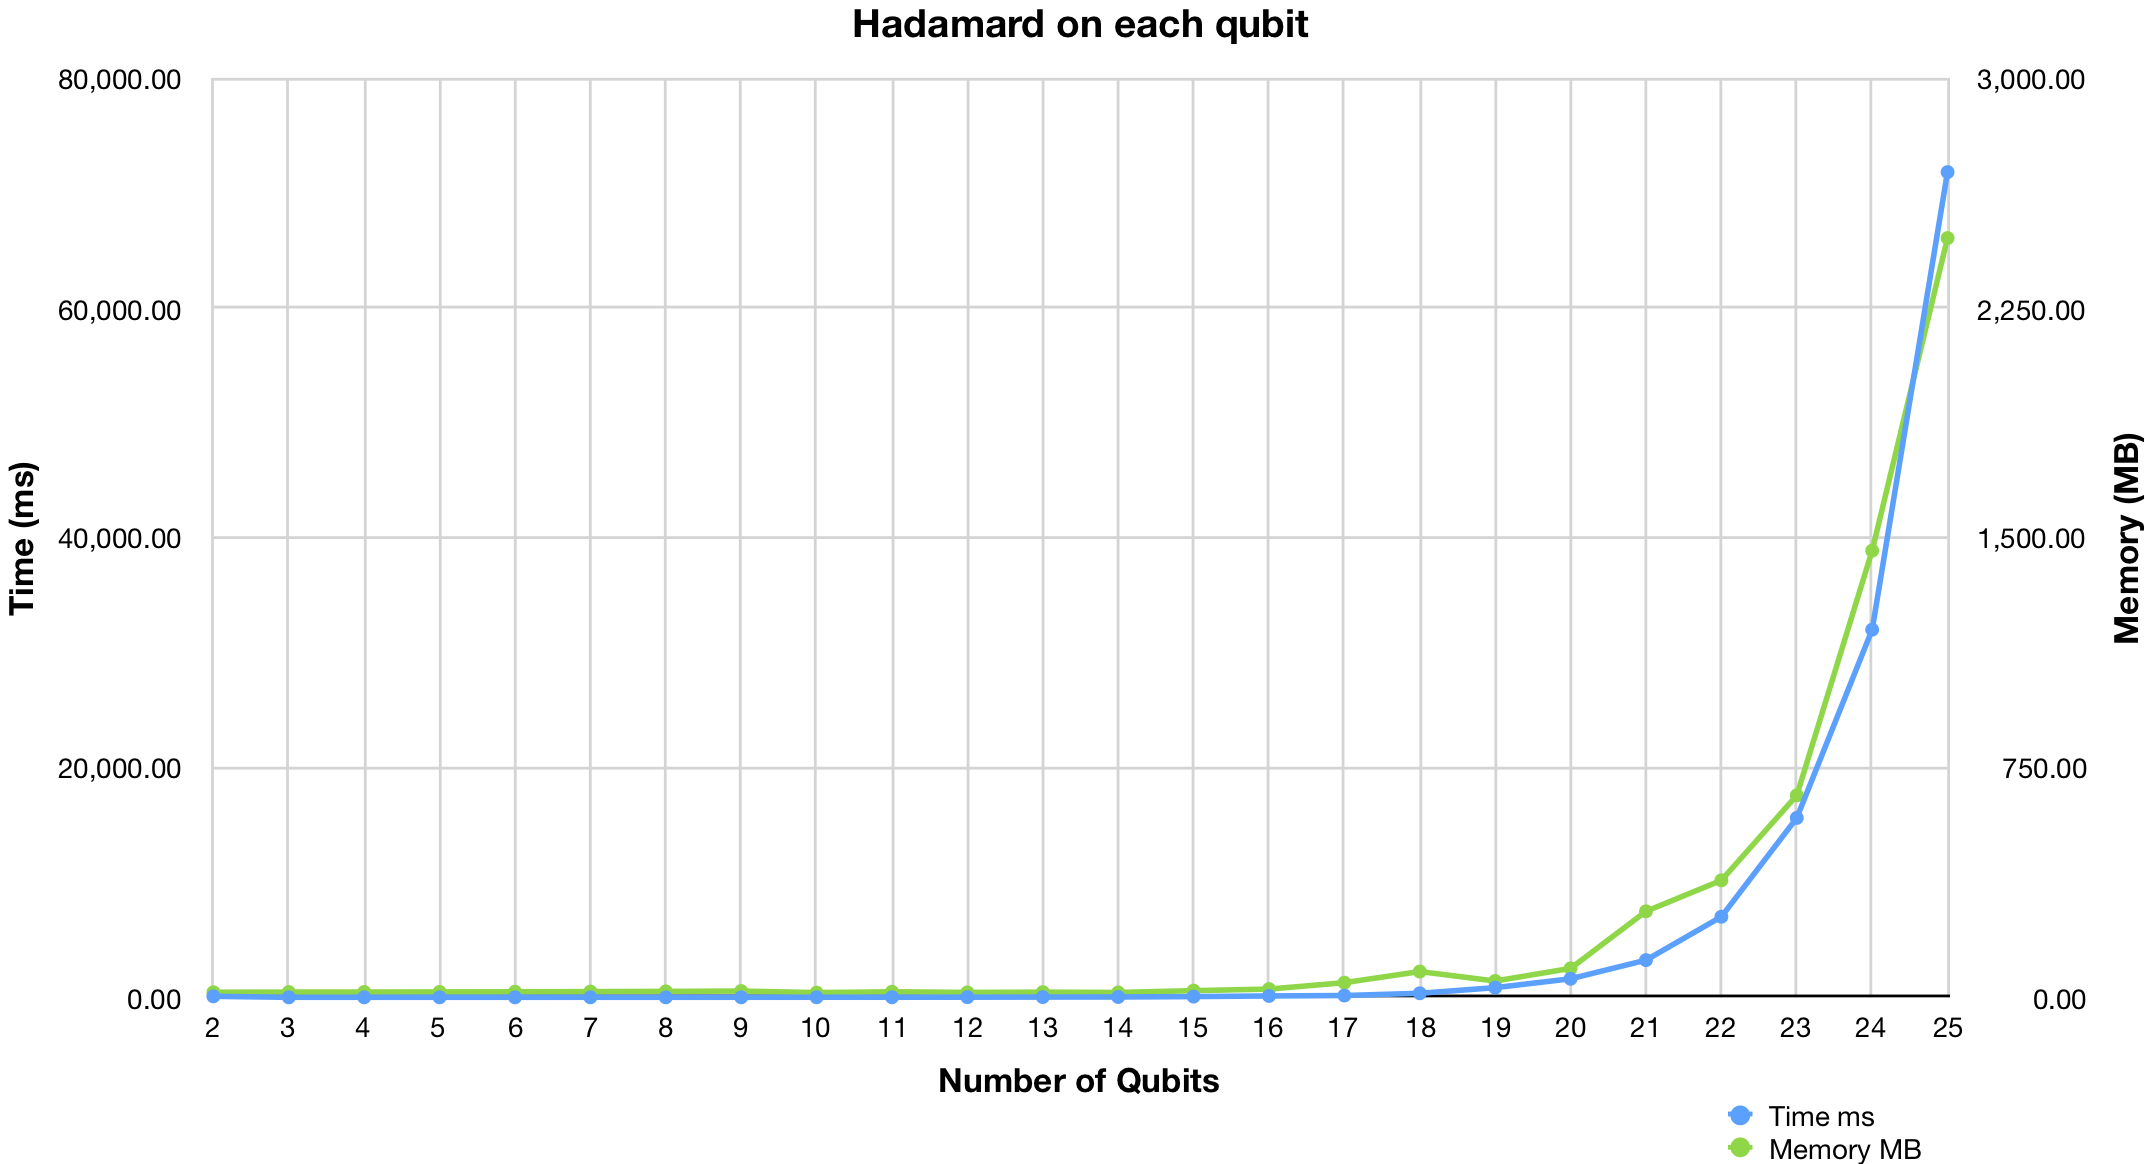
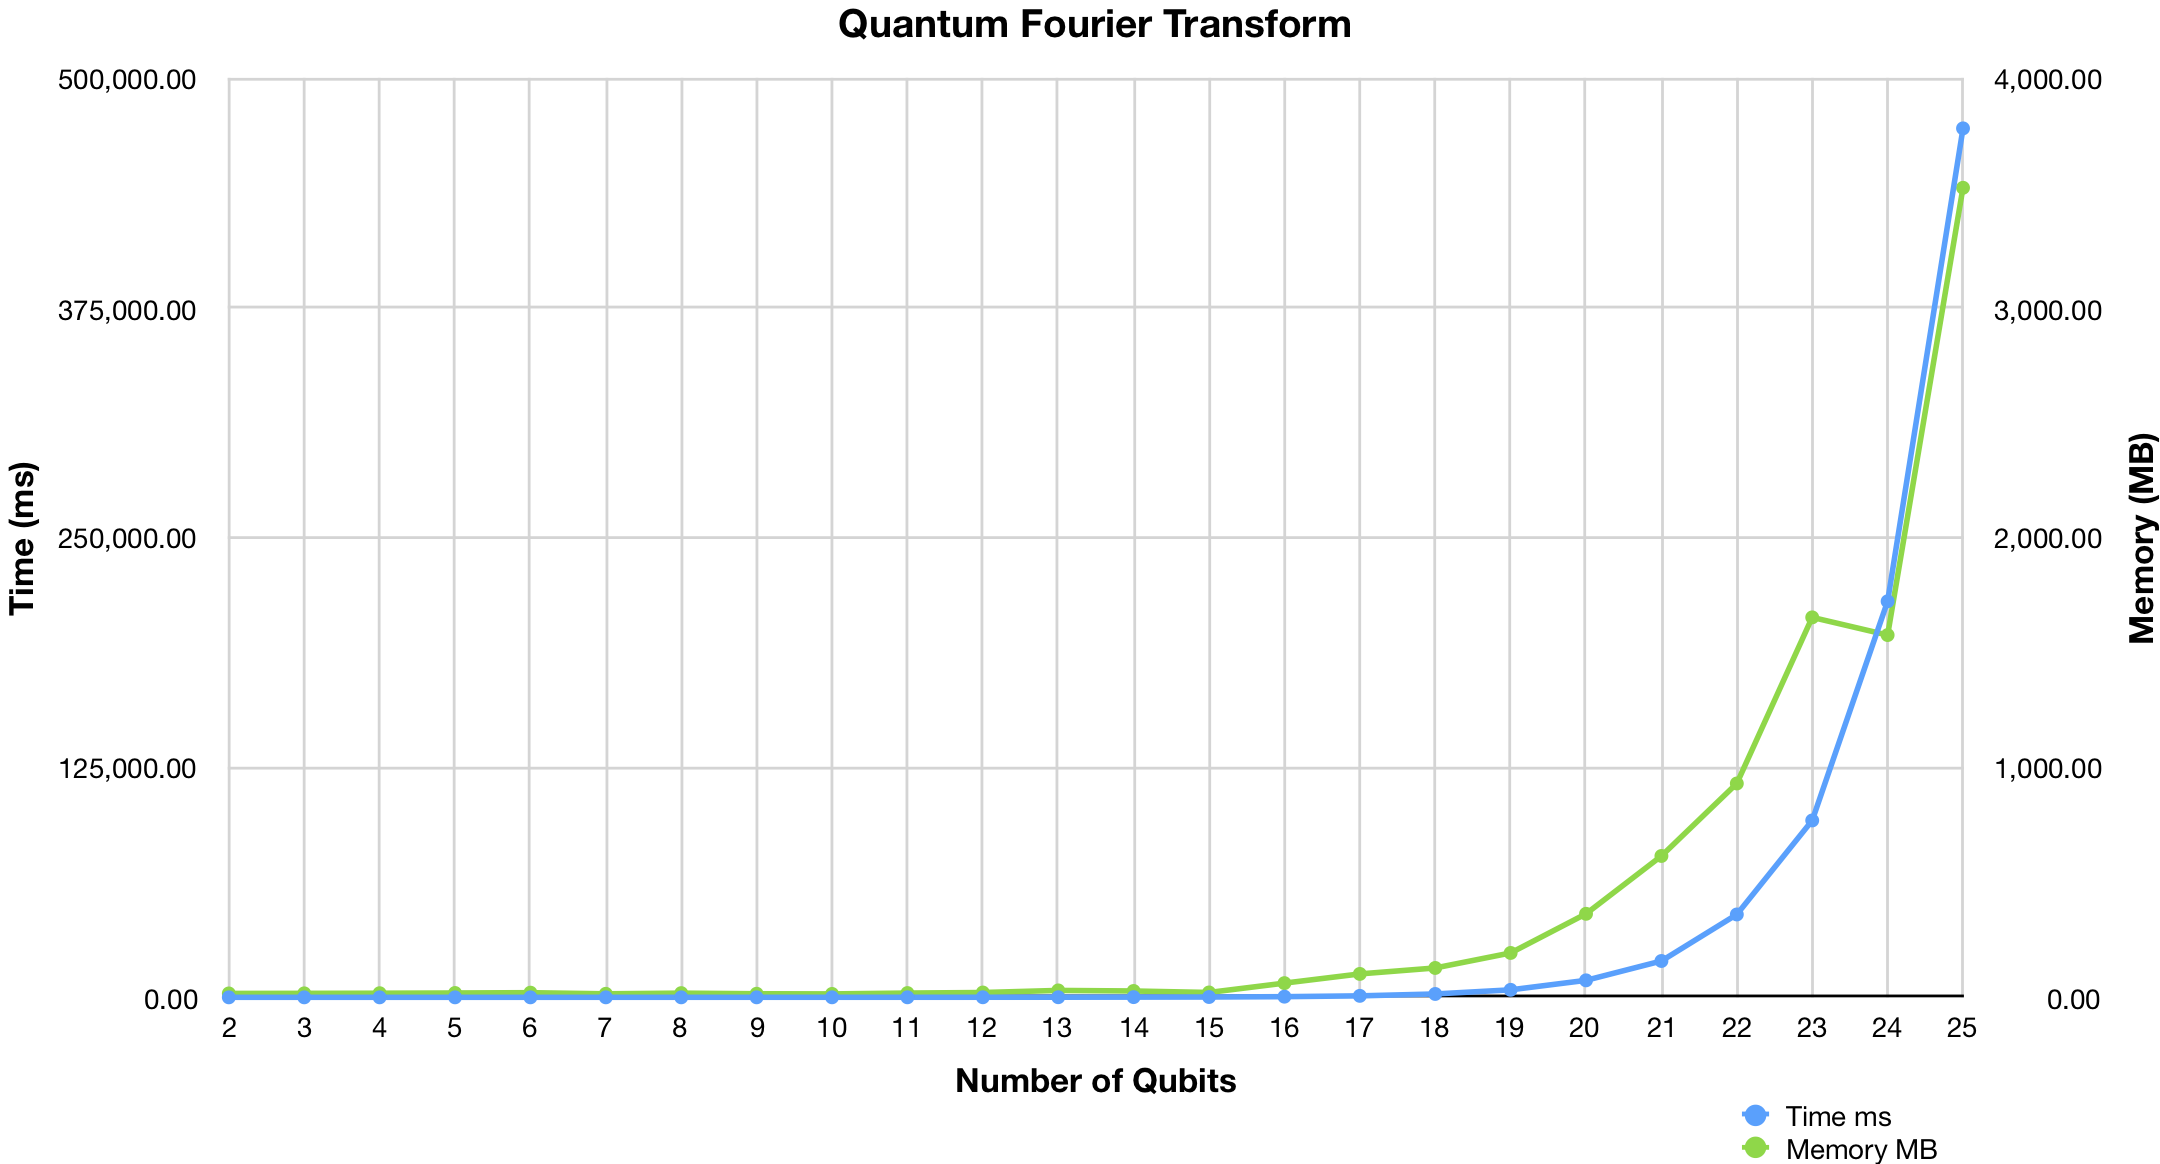
You can find scripts in /benchmark directory.
Single qubit identity gate
Qubits: 1
Matrix:
[

    [1,0],
    [0,1]
]
Example:
circuit.appendGate("id", 0);Pauli X (PI rotation over X-axis) aka "NOT" gate
Qubits: 1
Matrix:
[

    [0,1],
    [1,0]
]
Example:
circuit.appendGate("x", 0);Pauli Y (PI rotation over Y-axis)
Qubits: 1
Matrix:
[

    [0,"-i"],
    ["i",0]
]
Example:
circuit.appendGate("y", 0);Pauli Z (PI rotation over Z-axis)
Qubits: 1
Matrix:
[

    [1,0],
    [0,-1]
]
Example:
circuit.appendGate("z", 0);Hadamard gate
Qubits: 1
Matrix:
[

    ["1 / sqrt(2)","1 / sqrt(2)"],
    ["1 / sqrt(2)","-1 / sqrt(2)"]
]
Example:
circuit.appendGate("h", 0);Square root of NOT
Qubits: 1
Matrix:
[

    ["0.5+0.5i","0.5-0.5i"],
    ["0.5-0.5i","0.5+0.5i"]
]
Example:
circuit.appendGate("srn", 0);Inverse square root of NOT
Qubits: 1
Matrix:
[

    ["0.5-0.5i","0.5+0.5i"],
    ["0.5+0.5i","0.5-0.5i"]
]
Example:
circuit.appendGate("srndg", 0);PI/2 rotation over Z-axis aka "Phase PI/2"
Qubits: 1
Matrix:
[

    [1,0],
    [0,"exp(i * pi / 2)"]
]
Example:
circuit.appendGate("r2", 0);PI/4 rotation over Z-axis aka "Phase PI/4"
Qubits: 1
Matrix:
[

    [1,0],
    [0,"exp(i * pi / 4)"]
]
Example:
circuit.appendGate("r4", 0);PI/8 rotation over Z-axis aka "Phase PI/8"
Qubits: 1
Matrix:
[

    [1,0],
    [0,"exp(i * pi / 8)"]
]
Example:
circuit.appendGate("r8", 0);Rotation around the X-axis by given angle
Qubits: 1
Parameters:
- theta
Matrix:
[

    ["cos(theta / 2)","-i * sin(theta / 2)"],
    ["-i * sin(theta / 2)","cos(theta / 2)"]
]
Example:
circuit.appendGate("rx", 0, {
    params: {
        theta: "pi/2"
    }
});Rotation around the Y-axis by given angle
Qubits: 1
Parameters:
- theta
Matrix:
[

    ["cos(theta / 2)","-1 * sin(theta / 2)"],
    ["sin(theta / 2)","cos(theta / 2)"]
]
Example:
circuit.appendGate("ry", 0, {
    params: {
        theta: "pi/2"
    }
});Rotation around the Z-axis by given angle
Qubits: 1
Parameters:
- phi
Matrix:
[

    ["cos(phi / 2) - i * sin(phi / 2)",0],
    [0,"cos(phi / 2) + i * sin(phi / 2)"]
]
Example:
circuit.appendGate("rz", 0, {
    params: {
        phi: "pi/2"
    }
});Single-qubit rotation about the Z axis
Qubits: 1
Parameters:
- lambda
Matrix:
[

    [1,0],
    [0,"exp(i * lambda)"]
]
Example:
circuit.appendGate("u1", 0, {
    params: {
        lambda: "pi/2"
    }
});Single-qubit rotation about the X+Z axis
Qubits: 1
Parameters:
- phi
- lambda
Matrix:
[

    ["1 / sqrt(2)","-exp(i * lambda) * 1 / sqrt(2)"],
    ["exp(i * phi) * 1 / sqrt(2)","exp(i * lambda + i * phi) * 1 / sqrt(2)"]
]
Example:
circuit.appendGate("u2", 0, {
    params: {
        phi: "pi/2",
        lambda: "pi/2"
    }
});Generic single-qubit rotation gate with 3 Euler angles
Qubits: 1
Parameters:
- theta
- phi
- lambda
Matrix:
[

    ["cos(theta/2)","-exp(i * lambda) * sin(theta / 2)"],
    ["exp(i * phi) * sin(theta / 2)","exp(i * lambda + i * phi) * cos(theta / 2)"]
]
Example:
circuit.appendGate("u3", 0, {
    params: {
        theta: "pi/2",
        phi: "pi/2",
        lambda: "pi/2"
    }
});PI/2 rotation over Z-axis (synonym for r2)
Qubits: 1
Matrix:
[

    [1,0],
    [0,"i"]
]
Example:
circuit.appendGate("s", 0);PI/4 rotation over Z-axis (synonym for r4)
Qubits: 1
Matrix:
[

    [1,0],
    [0,"exp(i * pi / 4)"]
]
Example:
circuit.appendGate("t", 0);(-PI/2) rotation over Z-axis
Qubits: 1
Matrix:
[

    [1,0],
    [0,"-i"]
]
Example:
circuit.appendGate("sdg", 0);(-PI/4) rotation over Z-axis
Qubits: 1
Matrix:
[

    [1,0],
    [0,"exp(-i * pi / 4)"]
]
Example:
circuit.appendGate("tdg", 0);GPi gate
Qubits: 1
Parameters:
- phi
Matrix:
[

    [0,"exp(-i*phi)"],
    ["exp(i*phi)",0]
]
Example:
circuit.appendGate("gpi", 0, {
    params: {
        phi: "pi/2"
    }
});GPi2 gate
Qubits: 1
Parameters:
- phi
Matrix:
[

    ["1/sqrt(2)","(-i*exp(-i*phi))/sqrt(2)"],
    ["(-i*exp(i*phi))/sqrt(2)","1/sqrt(2)"]
]
Example:
circuit.appendGate("gpi2", 0, {
    params: {
        phi: "pi/2"
    }
});VirtualZ gate
Qubits: 1
Parameters:
- theta
Matrix:
[

    ["exp(-i*theta/2)",0],
    [0,"exp(i*theta/2)"]
]
Example:
circuit.appendGate("vz", 0, {
    params: {
        theta: "pi/2"
    }
});Controlled NOT (CNOT) gate
Qubits: 2
Matrix:
[

    [1,0,0,0],
    [0,1,0,0],
    [0,0,0,1],
    [0,0,1,0]
]
Example:
circuit.appendGate("cx", [0, 1]);Controlled Y gate (controlled rotation over Y-axis by PI)
Qubits: 2
Matrix:
[

    [1,0,0,0],
    [0,1,0,0],
    [0,0,0,"-i"],
    [0,0,"i",0]
]
Example:
circuit.appendGate("cy", [0, 1]);Controlled Z gate (controlled rotation over Z-axis by PI)
Qubits: 2
Matrix:
[

    [1,0,0,0],
    [0,1,0,0],
    [0,0,1,0],
    [0,0,0,-1]
]
Example:
circuit.appendGate("cz", [0, 1]);Controlled Hadamard gate
Qubits: 2
Matrix:
[

    [1,0,0,0],
    [0,1,0,0],
    [0,0,"1 / sqrt(2)","1 / sqrt(2)"],
    [0,0,"1 / sqrt(2)","-1 / sqrt(2)"]
]
Example:
circuit.appendGate("ch", [0, 1]);Controlled square root of NOT
Qubits: 2
Matrix:
[

    [1,0,0,0],
    [0,1,0,0],
    [0,0,"0.5+0.5i","0.5-0.5i"],
    [0,0,"0.5-0.5i","0.5+0.5i"]
]
Example:
circuit.appendGate("csrn", [0, 1]);Swaps the state of two qubits.
Qubits: 2
Matrix:
[

    [1,0,0,0],
    [0,0,1,0],
    [0,1,0,0],
    [0,0,0,1]
]
Example:
circuit.appendGate("swap", [0, 1]);Square root of swap
Qubits: 2
Matrix:
[

    [1,0,0,0],
    [0,"0.5 * (1 + i)","0.5 * (1 - i)",0],
    [0,"0.5 * (1 - i)","0.5 * (1 + i)",0],
    [0,0,0,1]
]
Example:
circuit.appendGate("srswap", [0, 1]);Swaps the state of two qubits, applying a -i phase to q1 when it is in the 1 state and a -i phase to q2 when it is in the 0 state
Qubits: 2
Matrix:
[

    [1,0,0,0],
    [0,0,"0+i",0],
    [0,"0+i",0,0],
    [0,0,0,1]
]
Example:
circuit.appendGate("iswap", [0, 1]);XX gate
Qubits: 2
Parameters:
- theta
Matrix:
[

    ["cos(theta)",0,0,"-i*sin(theta)"],
    [0,"cos(theta)","-i*sin(theta)",0],
    [0,"-i*sin(theta)","cos(theta)",0],
    ["-i*sin(theta)",0,0,"cos(theta)"]
]
Example:
circuit.appendGate("xx", [0, 1], {
    params: {
        theta: "pi/2"
    }
});YY gate
Qubits: 2
Parameters:
- theta
Matrix:
[

    ["cos(theta)",0,0,"i*sin(theta)"],
    [0,"cos(theta)","-i*sin(theta)",0],
    [0,"-i*sin(theta)","cos(theta)",0],
    ["i*sin(theta)",0,0,"cos(theta)"]
]
Example:
circuit.appendGate("yy", [0, 1], {
    params: {
        theta: "pi/2"
    }
});Parametric 2-qubit rotation about ZZ
Qubits: 2
Parameters:
- theta
Matrix:
[

    ["exp(-i * theta / 2)",0,0,0],
    [0,"exp(i * theta / 2)",0,0],
    [0,0,"exp(i * theta / 2)",0],
    [0,0,0,"exp(-i * theta / 2)"]
]
Example:
circuit.appendGate("zz", [0, 1], {
    params: {
        theta: "pi/2"
    }
});XY gate
Qubits: 2
Parameters:
- phi
Matrix:
[

    [1,0,0,0],
    [0,"cos(phi / 2)","i * sin(phi / 2)",0],
    [0,"i * sin(phi / 2)","cos(phi / 2)",0],
    [0,0,0,1]
]
Example:
circuit.appendGate("xy", [0, 1], {
    params: {
        phi: "pi/2"
    }
});Mølmer-Sørensen gate
Qubits: 2
Parameters:
- phi0
- phi1
Matrix:
[

    ["1/sqrt(2)",0,0,"(-i*exp(-i*(phi0+phi1)))/sqrt(2)"],
    [0,"1/sqrt(2)","(-i*exp(-i*(phi0-phi1)))/sqrt(2)",0],
    [0,"(-i*exp(i*(phi0-phi1)))/sqrt(2)","1/sqrt(2)",0],
    ["(-i*exp(i*(phi0+phi1)))/sqrt(2)",0,0,"1/sqrt(2)"]
]
Example:
circuit.appendGate("ms", [0, 1], {
    params: {
        phi0: "pi/2",
        phi1: "pi/2"
    }
});Controlled PI/2 rotation over Z-axis
Qubits: 2
Matrix:
[

    [1,0,0,0],
    [0,1,0,0],
    [0,0,1,0],
    [0,0,0,"exp(i * pi / 2)"]
]
Example:
circuit.appendGate("cr2", [0, 1]);Controlled PI/4 rotation over Z-axis
Qubits: 2
Matrix:
[

    [1,0,0,0],
    [0,1,0,0],
    [0,0,1,0],
    [0,0,0,"exp(i * pi / 4)"]
]
Example:
circuit.appendGate("cr4", [0, 1]);Controlled PI/8 rotation over Z-axis
Qubits: 2
Matrix:
[

    [1,0,0,0],
    [0,1,0,0],
    [0,0,1,0],
    [0,0,0,"exp(i * pi / 8)"]
]
Example:
circuit.appendGate("cr8", [0, 1]);Controlled rotation around the X-axis by given angle
Qubits: 2
Parameters:
- theta
Matrix:
[

    [1,0,0,0],
    [0,1,0,0],
    [0,0,"cos(theta / 2)","-i * sin(theta / 2)"],
    [0,0,"-i * sin(theta / 2)","cos(theta / 2)"]
]
Example:
circuit.appendGate("crx", [0, 1], {
    params: {
        theta: "pi/2"
    }
});Controlled rotation around the Y-axis by given angle
Qubits: 2
Parameters:
- theta
Matrix:
[

    [1,0,0,0],
    [0,1,0,0],
    [0,0,"cos(theta / 2)","-1 * sin(theta / 2)"],
    [0,0,"sin(theta / 2)","cos(theta / 2)"]
]
Example:
circuit.appendGate("cry", [0, 1], {
    params: {
        theta: "pi/2"
    }
});Controlled rotation around the Z-axis by given angle
Qubits: 2
Parameters:
- phi
Matrix:
[

    [1,0,0,0],
    [0,1,0,0],
    [0,0,"cos(phi / 2) - i * sin(phi / 2)",0],
    [0,0,0,"cos(phi / 2) + i * sin(phi / 2)"]
]
Example:
circuit.appendGate("crz", [0, 1], {
    params: {
        phi: "pi/2"
    }
});Controlled rotation about the Z axis
Qubits: 2
Parameters:
- lambda
Matrix:
[

    [1,0,0,0],
    [0,1,0,0],
    [0,0,1,0],
    [0,0,0,"exp(i * lambda)"]
]
Example:
circuit.appendGate("cu1", [0, 1], {
    params: {
        lambda: "pi/2"
    }
});Controlled rotation about the X+Z axis
Qubits: 2
Parameters:
- phi
- lambda
Matrix:
[

    [1,0,0,0],
    [0,1,0,0],
    [0,0,"1 / sqrt(2)","-exp(i * lambda) * 1 / sqrt(2)"],
    [0,0,"exp(i * phi) * 1 / sqrt(2)","exp(i * lambda + i * phi) * 1 / sqrt(2)"]
]
Example:
circuit.appendGate("cu2", [0, 1], {
    params: {
        phi: "pi/2",
        lambda: "pi/2"
    }
});Controlled rotation gate with 3 Euler angles
Qubits: 2
Parameters:
- theta
- phi
- lambda
Matrix:
[

    [1,0,0,0],
    [0,1,0,0],
    [0,0,"cos(theta/2)","-exp(i * lambda) * sin(theta / 2)"],
    [0,0,"exp(i * phi) * sin(theta / 2)","exp(i * lambda + i * phi) * cos(theta / 2)"]
]
Example:
circuit.appendGate("cu3", [0, 1], {
    params: {
        theta: "pi/2",
        phi: "pi/2",
        lambda: "pi/2"
    }
});Controlled PI/2 rotation over Z-axis (synonym for cr2)
Qubits: 2
Matrix:
[

    [1,0,0,0],
    [0,1,0,0],
    [0,0,1,0],
    [0,0,0,"i"]
]
Example:
circuit.appendGate("cs", [0, 1]);Controlled PI/4 rotation over Z-axis (synonym for cr4)
Qubits: 2
Matrix:
[

    [1,0,0,0],
    [0,1,0,0],
    [0,0,1,0],
    [0,0,0,"exp(i * pi / 4)"]
]
Example:
circuit.appendGate("ct", [0, 1]);Controlled (-PI/2) rotation over Z-axis
Qubits: 2
Matrix:
[

    [1,0,0,0],
    [0,1,0,0],
    [0,0,1,0],
    [0,0,0,"-i"]
]
Example:
circuit.appendGate("csdg", [0, 1]);Controlled (-PI/4) rotation over Z-axis
Qubits: 2
Matrix:
[

    [1,0,0,0],
    [0,1,0,0],
    [0,0,1,0],
    [0,0,0,"exp(-i * pi / 4)"]
]
Example:
circuit.appendGate("ctdg", [0, 1]);Toffoli aka "CCNOT" gate
Qubits: 3
Matrix:
[

    [1,0,0,0,0,0,0,0],
    [0,1,0,0,0,0,0,0],
    [0,0,1,0,0,0,0,0],
    [0,0,0,1,0,0,0,0],
    [0,0,0,0,1,0,0,0],
    [0,0,0,0,0,1,0,0],
    [0,0,0,0,0,0,0,1],
    [0,0,0,0,0,0,1,0]
]
Example:
circuit.appendGate("ccx", [0, 1, 2]);Controlled swap aka "Fredkin" gate
Qubits: 3
Matrix:
[

    [1,0,0,0,0,0,0,0],
    [0,1,0,0,0,0,0,0],
    [0,0,1,0,0,0,0,0],
    [0,0,0,1,0,0,0,0],
    [0,0,0,0,1,0,0,0],
    [0,0,0,0,0,0,1,0],
    [0,0,0,0,0,1,0,0],
    [0,0,0,0,0,0,0,1]
]
Example:
circuit.appendGate("cswap", [0, 1, 2]);Controlled square root of swap
Qubits: 3
Matrix:
[

    [1,0,0,0,0,0,0,0],
    [0,1,0,0,0,0,0,0],
    [0,0,1,0,0,0,0,0],
    [0,0,0,1,0,0,0,0],
    [0,0,0,0,1,0,0,0],
    [0,0,0,0,0,"0.5 * (1 + i)","0.5 * (1 - i)",0],
    [0,0,0,0,0,"0.5 * (1 - i)","0.5 * (1 + i)",0],
    [0,0,0,0,0,0,0,1]
]
Example:
circuit.appendGate("csrswap", [0, 1, 2]);Resets qubit
Qubits: 1
Example:
circuit.appendGate("reset", 0);Measures qubit and stores outcome (0 or 1) into classical register
Qubits: 1
Example:
circuit.appendGate("measure", 0, {
    creg: {
        name: "c",
        bit: 3
    }
});
Or:
circuit.addMeasure(0, "c", 3);To be written...