


Powerful Tabby plugin that implements Model Context Protocol (MCP) server, enabling AI-powered terminal control and automation.

Watch the full video demonstration of Tabby-MCP in action:
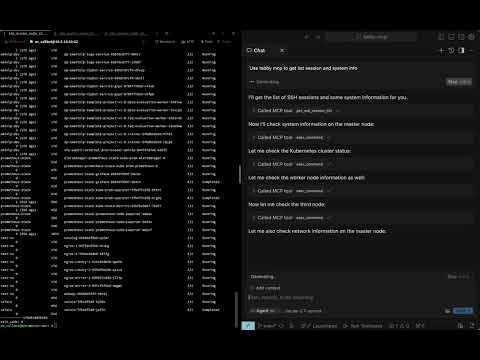
- 🤖 AI Connection: Seamlessly connect AI assistants to your terminal
- 🔌 MCP Server: Built-in Model Context Protocol server implementation
- 🖥️ Terminal Control: Allow AI to execute commands and read terminal output
- 🔍 Session Management: View and manage SSH sessions
- 🚫 Command Abort: Safely abort running commands
- 📋 Buffer Access: Retrieve terminal buffer content with flexible options
You can build and install the plugin using Docker with the following command:
git clone https://github.com/thuanpham582002/tabby-mcp-server.git
cd tabby-mcp-server
# Build the Docker image
docker build -t tabby-mcp . && docker run -v $(pwd)/build:/output tabby-mcp
bash scripts/copy_to_plugin_folder.sh
This command builds a Docker image tagged as 'tabby-mcp' and runs a container from this image, mounting your local 'build' directory to '/output' in the container. The script scripts/copy_to_plugin_folder.sh will copy the built files to the Tabby plugin folder.
Note: Our CI/CD workflows on GitHub also use this Docker-based build process to ensure consistency between local development and production releases.
- Install the plugin
- Configure your Tabby environment
- Connect to MCP server from any of the supported clients listed at https://modelcontextprotocol.io/clients
Configure the MCP server through the Tabby settings:
{
  "mcp": {
    "port": 3001,
    "host": "http://localhost:3001", // note: in development
    "enableLogging": false,
    "startOnBoot": true
  }
}When connecting to the Tabby MCP server from an AI client (like Claude, GPT, etc.), use the following configuration:
{
  "mcpServers": {
    "Tabby MCP": {
      "url": "http://localhost:3001/sse"
    }
  }
}
You may need to adjust the url parameter if you've configured a different host or port in your server settings.
| Tool | Description | Parameters |
|---|---|---|
getSshSessionList |
Get list of SSH sessions | None |
execCommand |
Execute a command in terminal |
command, tabId
|
getTerminalBuffer |
Get terminal content |
tabId, startLine, endLine
|
abortCommand |
Abort a running command | None |
Contributions are welcome! Here's how you can help:
- Fork the repository
- Create a feature branch (
git checkout -b feature/amazing-feature) - Commit your changes (
git commit -m 'Add amazing feature') - Push to the branch (
git push origin feature/amazing-feature) - Open a Pull Request
See the contributing guidelines for more details.
Our project uses GitHub Actions for CI/CD with Docker-based builds:
- Pull Requests: Automatically built and tested using Docker to ensure compatibility
- Main Branch: Builds with Docker, publishes to npm, and creates GitHub releases
- Benefits: Consistent environment across development, testing, and production
To set up the CI/CD pipeline in your fork:
-
Configure the required secrets in your repository settings:
-
NPM_TOKEN: Your npm access token for publishing -
GITHUB_TOKEN: Automatically provided by GitHub Actions
-
-
The workflows will automatically run on push and pull request events.
This project is licensed under the MIT License - see the LICENSE file for details.
Made with ❤️ by Pham Tien Thuan