PicGo BumpVersion
A full git commit -> changelog -> release workflow & convention.
It's now only available for Node.js projects. Thanks standard-version for the inspiration.
Installation
npm install -D  @picgo/bump-version

#or

yarn add -D  @picgo/bump-version
Also, add the following data at the top level in your package.json to properly config bump-version (replace old config if you have already configured commitizen or cz-customizable before):
"husky": {
  "hooks": {
    "commit-msg": "commitlint -E HUSKY_GIT_PARAMS"
  }
},
"config": {
  "commitizen": {
    "path": "./node_modules/cz-customizable"
  },
  "cz-customizable": {
    "config": "./node_modules/@picgo/bump-version/.cz-config.js"
  }
},
"commitlint": {
  "extends": ["./node_modules/@picgo/bump-version/commitlint-picgo"]
}
And then add the following (inside the braces) to the scripts field of your package.json:
"scripts": {
  "cz": "git-cz",
  "release": "bump-version"
}
Then you can use npm run cz for committing standard message and use npm run release to bump version & auto generate changelog in your project!
If you are using yarn, then it will be more simple just like:
# to commit
yarn cz

# to bump version
yarn release
So the workflow is the following:
-
git addsomething changed -
npm run czto commit -
npm run releaseto release or deploy
Usage
If you installed bump-version in a project, then you can just write down the
bump-versioncommand in yourpackage.json'sscriptsfield. Then justnpm run you-command.
Commit
npm run cz

# or

yarn cz
This leads to an interactive submit message interface:
? Select the type of change that you're committing: (Use arrow keys)
❯ Feature:  when adding new features
  Fix:      when fixing bugs
  WIP:      when working in progress
  Refactor: when changing the code without adding features or fixing bugs
  Chore:    when changing the build process or auxiliary tools and libraries such as documentation generation
  Style:    when improving the format/structure of the code
  Upgrade:  when upgrading dependencies
You can use this interface to quickly generate commit information that is compliant with the PicGo convention.
Bump version
npm run release

# or

yarn run cz
Usage
bump-version
Example
bump-version -t major
Options
-a, --preid-alpha Prerelease id: alpha. Exp. 1.0.0.alpha-0
-b, --preid-beta Prerelease id: beta. Exp. 1.0.0.beta-0
-d, --dry Run bump version without change anything & output the log in console
-f, --file Read and write the CHANGELOG file, relative to package.json's path
Default: CHANGELOG.md
-p, --path A filepath of where your package.json is located
Default: ./
-h, --help Display help message
-t, --type Release type. [major, minor, patch, premajor, preminor, prepatch, prerelease]
Default: patch
--push Auto push commits to origin master
Default: false
--no-tag Tag won't be created
Default: tag will be created
--no-changelog Changelog won't be created
Default: changelog will be created
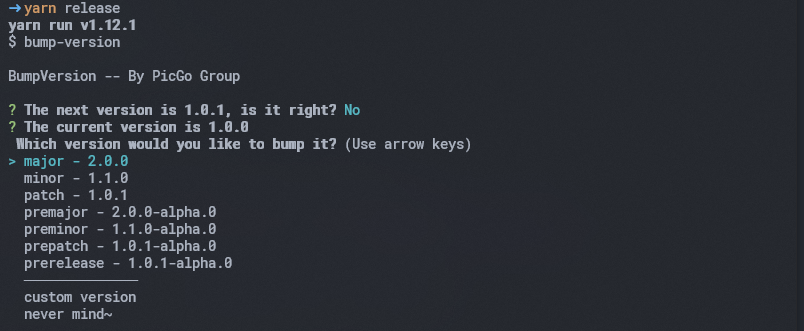
Don't know which version should be the next? Never mind:
If you reject the default next version, then you can choose which version you want or customize one.
if you just want to see what the changelog will be created and nothing will be changed:
npm run release --dryBadges
Let more people know that you are using PicGo bump-version for elegant workflow!
[](https://github.com/PicGo/bump-version)PicGo Convention
PicGo's commit message guidelines.
Git Commit Message
-
Use the present tense ("add feature" not "added feature")
-
Use the imperative mood ("move cursor to..." not "moves cursor to...")
-
Do not repeat the word in type ("Fix: xxx bugs when..." not "Fix: fix xxx bugs when...")
-
Limit the first line to 72 characters or less
-
Start the commit message with an applicable
emoji&type:-
✨ Feature:sparkles: Featurewhen adding new features -
🐛 Fix:bug: Fixwhen fixing bugs -
🚧 WIP:construction: WIPwhen working in progress -
🔨 Refactor:hammer: Refactorwhen changing the code without adding features or fixing bugs -
📦 Chore:package: Chorewhen changing the build process or auxiliary tools and libraries such as documentation generation -
🎨 Style:art: Stylewhen improving the format/structure of the code -
⬆️ Upgrade:arrow_up: Upgradewhen upgrading dependencies -
⚡ Perf:zap: Perfwhen improving performance -
📝 Docs:pencil: Docswhen wrting docs -
✅ Test:white_check_mark: Testwhen adding or updating tests -
🔙 Revert:back: Revertwhen reverting some commits -
📌 Init:pushpin: Initwhen initializing a project -
🎉 Release:tada: Releasewhen releasing (will be automatically committed bybump-version)
-
Commit Message Format
A commit message consists of a header, body(optional) and footer(optional). The header has a emoji, type, scope(optional) and subject:
<emoji> <type>([scope]): <subject>
<BLANK LINE>
[body]
<BLANK LINE>
[footer]
Examples
1. Normal
:sparkles: Feature(core): add error notification

:bug: Fix(core): xxx error should be thrown
and they will be rendered into the following changelog:
# x.x.0 (20xx-xx-xx)

## :sparkles: Features

- add error notification

## :bug: Bug Fixes

- xxx error should be thrown
2. BREAKING CHANGE
Note: BREAKING CHANGE can only be in the type of Feature or Fix.
BREAKING CHANGE: change api for error notification
:sparkles: Feature(core): add error notification

BREAKING CHANGE: change api for error notification
and they will be rendered into the following changelog:
# x.x.0 (20xx-xx-xx)

## :sparkles: Features

- add error notification

## BREAKING CHANGES

- change api for error notification
Git Branch Management
Important: Always use rebase or squash or cherry-pick instead of merge
Available branches:
-
masterfor the release -
devfor the development -
docsorgh-pagesfor the documentation [optional] -
prfor the pull request [optional] -
hot-fixfor fixing the bug in master [optional] -
feat-*for developing a new feature -
fix-*for fixing a bug in dev branch
License
Copyright (c) 2019 Molunerfinn


