An opinionated interface for writing, running, and saving BackstopJS tests
Goal
Bivariate's goal is to allow for an approachable Visual Regression Testing suite that can be organized to accommodate small and large projects without overwhelming complexity.
This goal is achieved by enforcing an opinionated grouping structure, providing a method to easily write tests via manageable object files, as well as allowing for all of BackstopJS's commands to be run from an interface.
Installation
Bivariate runs in Node.
-
Install NodeJS
-
Install the Latest version of Bivariate via NPM.
It is recommended to install Bivariate globally, but it can run locally if required:global install (recommended):
npm install bivariate -glocal install:
npm install bivariate -
Ensure you have version 59 or greater of Chrome installed. Bivariate utilizes headless Chrome which started shipping in Chrome v59
-
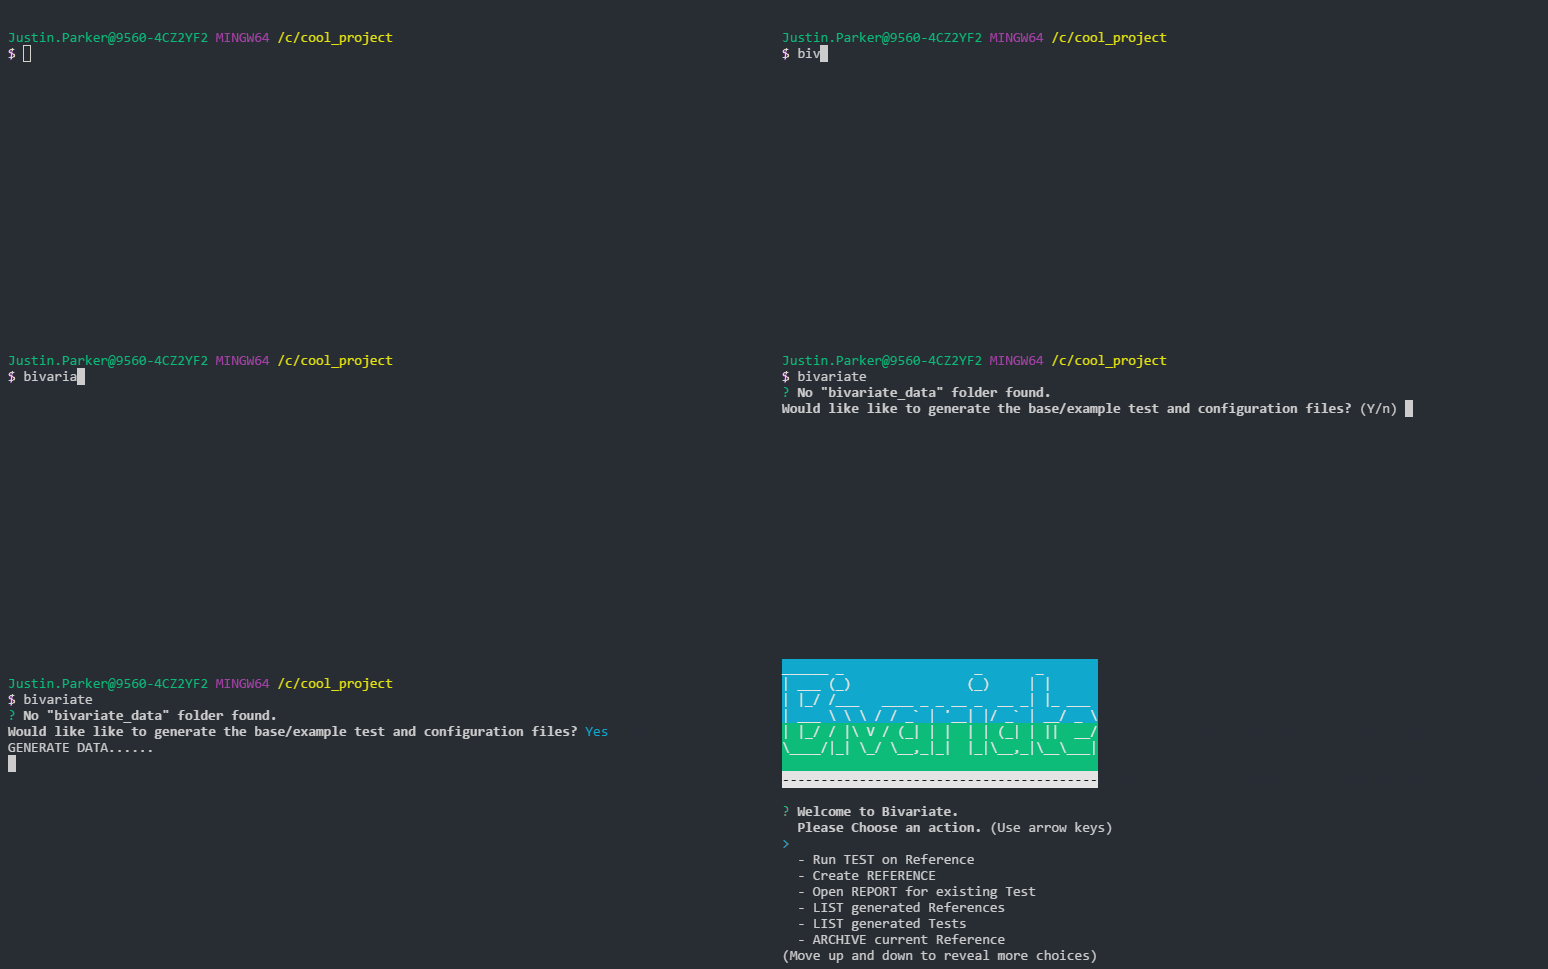
From your project directory, run Bivariate:
if installed globally:
bivariateif only installed locally:
npx bivariate -
Generate
bivariate_data:
If Bivariate doesn't detect any existing Bivarte tests it will ask you would like to generate the starting configuration files.
Folder Structure
All tests, scripts, and configuration files are stored in the bivariate_data parent folder.
bivariate_data
|
+---- test_scripts holds user defined configuration and tests used to instruct BackstopJS
|
+---- engine_scripts holds user defined Puppeteer scripts for interacting with the Chrome DOM before saving a screen shot
|
+---- bitmaps_reference_archive holds archived references that can be restored and tested against
test_scripts
Out of the box, BackstopJS gets all of its config and test data from a single JSON file, which isn't very maintainable over time. Luckily, Bivariate takes advantage of Node's module system to break this all apart and just return what is needed (a simple array of objects).
Configuration files
All configuration files are prefixed with a double underscore: __
__config-baseURLs.js
holds the base URLs for all References and Tests to be run.
...
  // do not use a trailing slash in the base URLs
  theURLS.baseURL = "http://your-base-url";
  theURLS.baseRefURL = "http://your-base-reference-url";
...
__config-common.js
set of common config values (rendering engine, ports, etc.) that shouldn't need to be adjusted in most cases.
__config-viewports.js
configure any number of viewports to test against (this can include any number of defined screen resolutions).
Individual Tests
All individual tests are prefixed with a single underscore: _
Use the example tests as a template to create your own. Tests are easy to setup and for the most part only require you to fill out the value for a few variables:
- label
- route
- selectors
_example-test--home.js :
// -------------------
// - test definition -
// -------------------

// * tests should be saved as: '_test-name.js'
//   if you have a lot of tests you can store
//   related tests in named subdirectories
//   for better organization

var label = "Example Test - Home Page"
var route = "/index.html"
var readySelector = ""
var hideSelectors = []
var removeSelectors = []
var selectors = [ "document", "h1", ".hero", ".nav", ".body-content" ]
let hoverSelector = null
let hoverSelectors = []
let clickSelector = null
let clickSelectors = []
let postInteractionWait = 100
let scrollToSelector = null
let delay = 300
var onBeforeScript = 'onBefore-Example.js'
var onReadyScript = 'onReady-Example.js'
let viewports = []

// ---------
// - label -
// ---------
// [required]
// used on reports and screen shot file names (should be unique between tests)

// ---------
// - route -
// ---------
// [required]
// the route for this test (start with a "/")

// -----------------
// - readySelector -
// -----------------
// Selector to look for before continuing

// -----------------
// - hideSelectors -
// -----------------
// hide elements from view by changing its "visibility" to "hidden"

// -------------------
// - removeSelectors -
// -------------------
// remove elements from the DOM before screen capture

// -------------
// - selectors - (array or strings)
// -------------
// selectors for elements to be "captured" (CSS selector syntax)

// -----------------
// - hoverSelector -
// -----------------
// Move the pointer over the specified DOM element prior to screen shot.

// ------------------
// - hoverSelectors - (array)
// ------------------
// *Puppeteer only* takes array of selectors -- simulates multiple
// sequential hover interactions.

// -----------------
// - clickSelector -
// -----------------
// Click the specified DOM element prior to screen shot.

// ------------------
// - clickSelectors - (array)
// ------------------
// *Puppeteer only* takes array of selectors -- simulates
// multiple sequential click interactions.

// -----------------------
// - postInteractionWait -
// -----------------------
// Wait for a selector after interacting with hoverSelector or clickSelector
// (optionally accepts wait time in ms. Idea for use with a click or hover
// element transition. available with default onReadyScript)

// --------------------
// - scrollToSelector -
// --------------------
// Scrolls the specified DOM element into view prior to screen shot
// (available with default onReadyScript)

// ---------
// - delay -
// ---------
// Wait for x milliseconds

// ------------------
// - onBeforeScript -
// ------------------
// Runs before each scenario
// use for setting cookies or other env state
// (.js suffix is optional / looks for file in "engine_scripts" dir)

// -----------------
// - onReadyScript -
// -----------------
// Runs after onReady event on all scenarios
// use for simulating interactions
// (.js suffix is optional / looks for file in "engine_scripts" dir)

// -------------
// - viewports -
// -------------
// overwrite array of viewports
// example:
// let viewports = [
//    {
//        name: "huge-vertical-space",
//        width: 1920,
//        height: 4500
//    }
// ]


// -------------------------------------------------------------------
// - advanced options can be overwritten in the options object below -
// -------------------------------------------------------------------
module.exports = function(baseURLs) {
	var url = (baseURLs.baseURL + route)
	var referenceUrl = baseURLs.baseRefURL === null ? null : (baseURLs.baseRefURL + route)
	var options = {
		"label": label,									// [required] Tag saved with your reference images
		"url": url,										// [required] Tag saved with your reference images
		"referenceUrl": referenceUrl,					// Specify a different state or environment when creating reference.
		"readySelector": readySelector,					// Wait until this selector exists before continuing.
		"hideSelectors": hideSelectors,					// Array of selectors set to visibility: hidden
		"removeSelectors": removeSelectors,				// Array of selectors set to display: none
		"selectors": selectors,							// Array of selectors to capture. Defaults to document if omitted. Use "viewport" to capture the viewport size.
		"selectorExpansion": true,						// If you want BackstopJS to find and take screenshots of all matching selector instances then set to true.
		"readyEvent": null,								// Wait until this string has been logged to the console.
		"hoverSelector": hoverSelector,					// Move the pointer over the specified DOM element prior to screen shot.
		"hoverSelectors": hoverSelectors,				// *Puppeteer only* takes array of selectors -- simulates multiple sequential hover interactions.
		"clickSelector": clickSelector,					// Click the specified DOM element prior to screen shot.
		"clickSelectors": clickSelectors,				// *Puppeteer only* takes array of selectors -- simulates multiple sequential click interactions.
		"postInteractionWait": postInteractionWait,		// Wait for a selector after interacting with hoverSelector or clickSelector (optionally accepts wait time in ms. Idea for use with a click or hover element transition. available with default onReadyScript)
		"scrollToSelector": scrollToSelector,			// Scrolls the specified DOM element into view prior to screen shot (available with default onReadyScript)
		"delay": delay,									// Wait for x milliseconds
		"misMatchThreshold": 0.1,						// Percentage of different pixels allowed to pass test
		"onBeforeScript": onBeforeScript,				// Used to set up browser state e.g. cookies.
		"onReadyScript": onReadyScript,					// After the above conditions are met -- use this script to modify UI state prior to screen shots e.g. hovers, clicks etc.
		"requireSameDimensions": false,					// If set to true -- any change in selector size will trigger a test failure.
		"viewports": viewports							// An array of screen size objects your DOM will be tested against. This configuration will override the viewports property assigned at the config root.
	}

	if (baseURLs.baseRefURL === null) {
		delete options.referenceUrl
	}

	return options
}
Test Groups
Bivariate presents and runs tests using a grouping concept. A test group is a collection of tests that are run together. A test group is a .js file that does not start with any underscores.
Use the provide file example-test-group.js as a template for your own. Note that all that is required is to fill in the Scenarios section to include which tests you want run.
example-test-group.js :
// ----------------
// -- Test Group --
// ----------------

let mixIn = require("./../libs/mout-mixin/mixIn");
let testGroup = __filename.slice(__dirname.length + 1, -3);
let configCommon = require('./__config-common')(testGroup);
let baseURLs = require("./__config-baseURLs");


module.exports = mixIn(
    {
        // ---------------
        // -- Scenarios --
        // ---------------
        "scenarios": [
            require('./_example-site--home')(baseURLs),
            require('./_example-site--paints')(baseURLs)
        ],
    },
        configCommon
);
engine_scripts
engine scripts are used to interact with your web pages using the before and on ready events. Each test you create has an optional parameter of onBeforeScript & onReadyScript. These can simply point to script files in the 'engine_scripts' directory. The two example scripts found in the engine_scripts directory should be self explanatory (onBefore-Example.js & onReady-Example.js). In addition you can refer to the Puppeteer Docs for more advanced examples.
bitmaps_reference_archive
The bitmaps_reference_archive folder holds archived references which can be created, archived, and restored using the Bivariate app.
App
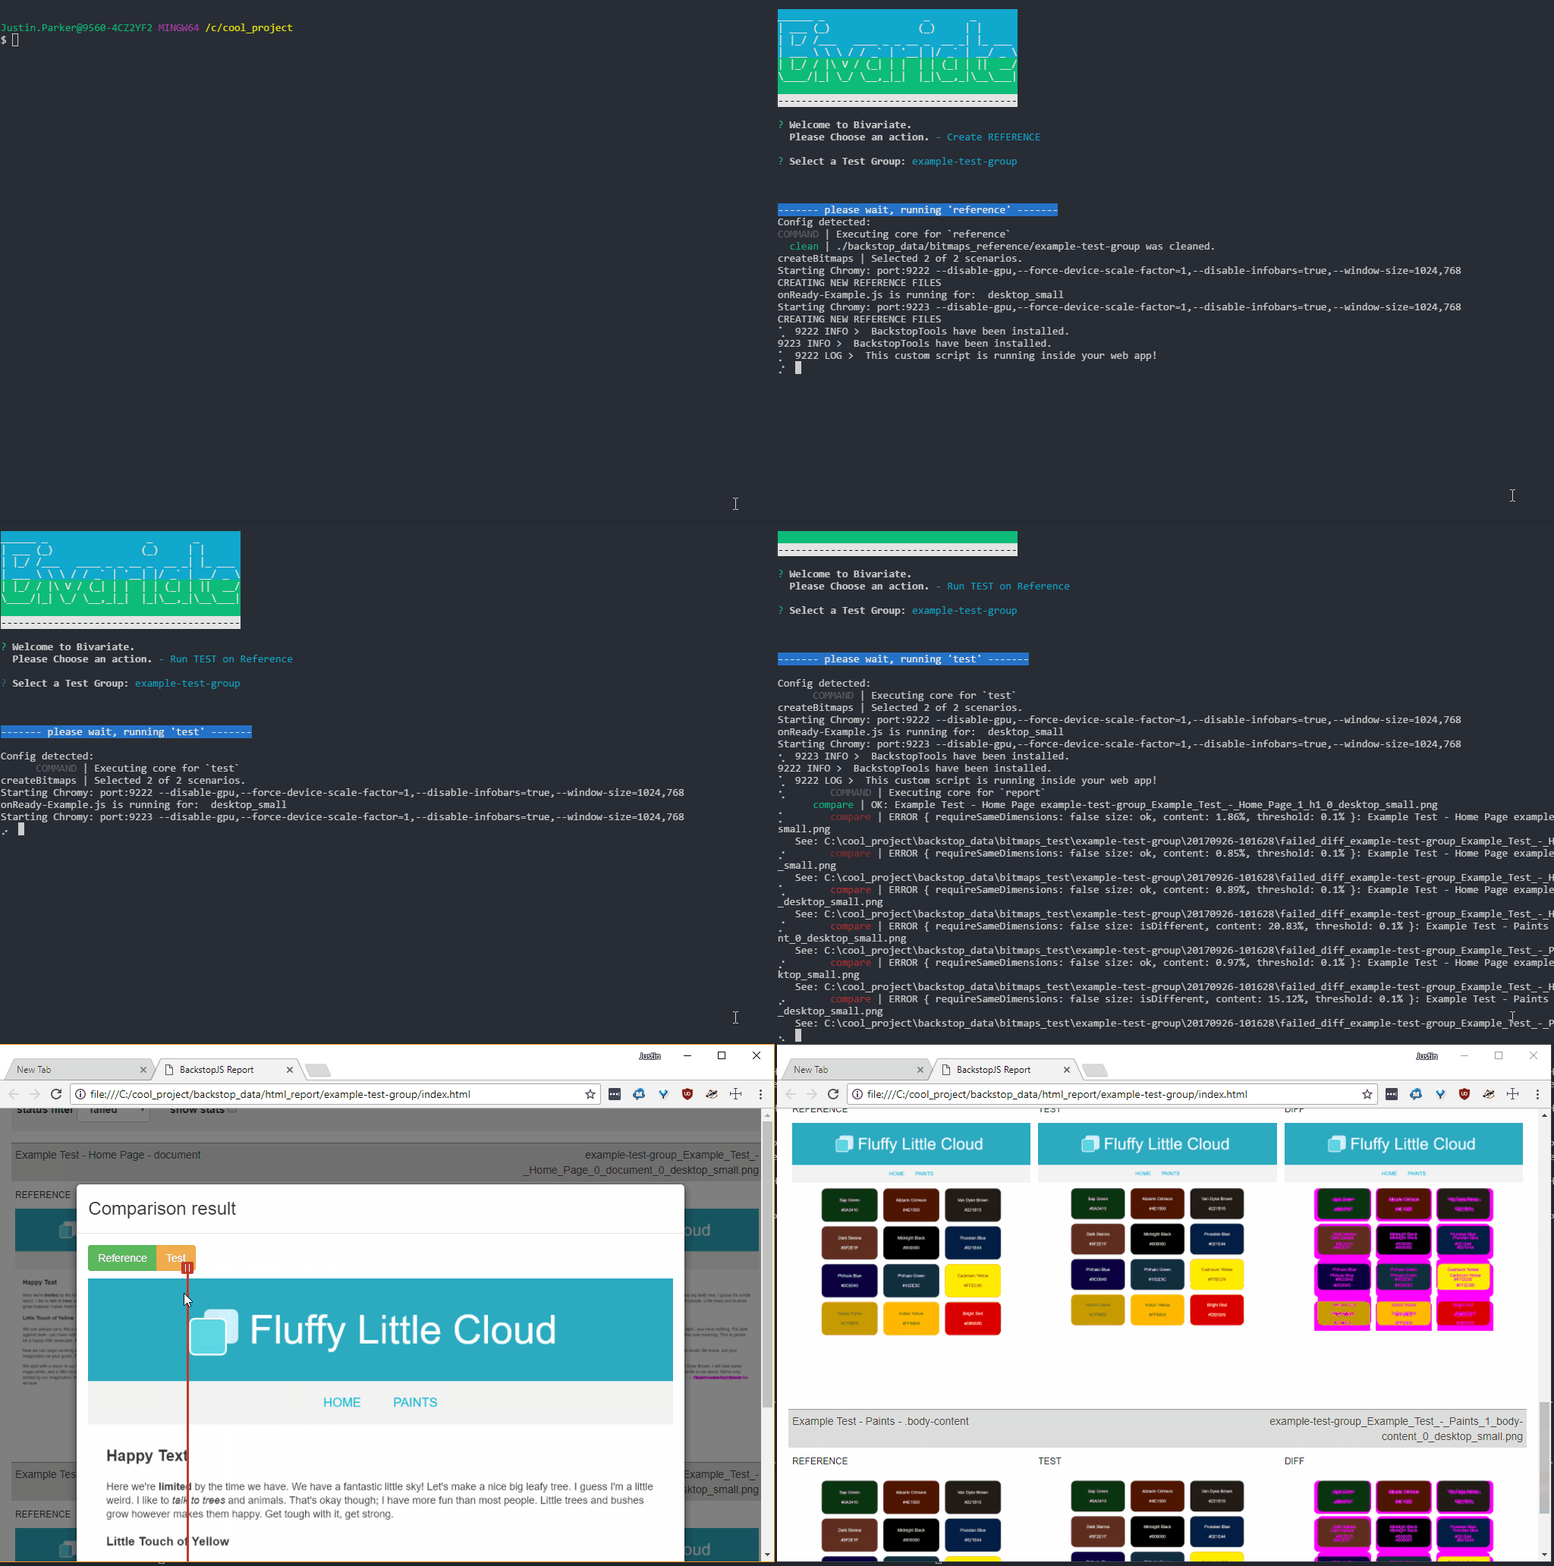
Example run of the test scripts generated by Bivariate:
For more info, reference example-site README for a walk through example of Bivariate in action.
Example Site Docs
Detailed docs for what the reference, test, and approve commands do under the hood can be found on the BackstopJS Github page: BackstopJS.


