Curriculum Web Template
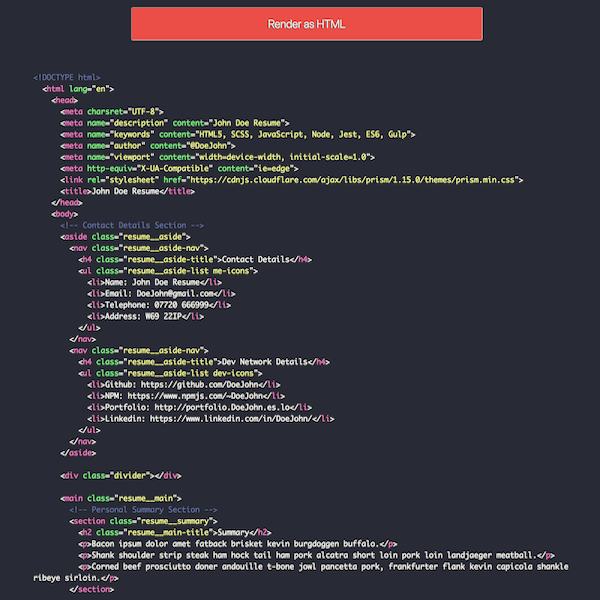
With this package you can create a Curriculum/Resume as a web page and display it in two flavours, one that uses Prismjs (a syntax higlighter) and the other one that is the HTML rendered.
| Prism version | Rendered version |
|---|---|
 |
 |
You can see it running here
How to use this repo, you can either clone it or install it from the npm registry.
Clone it
# clone the repo > git clone https://github.com/byverdu/curriculum-web-template.git> cd curriculum-web-template # By default the "postinstall" script will run "yarn build" after all the packages are installled, # you might want to edit all the config files before "yarn install" # if you want to build yourself and skip this step, set the `skip_postinstall` to true > skip_postinstall='yes' yarn install # install dependencies > yarn install# or with npm > npm install # for brevity I will skip the npm flavour # build the files > yarn build # development without changing webpack config files > yarn dev# visit http://localhost:8080 #development can be done in a different port by just setting thar var > PORT=9090 yarn dev# visit http://localhost:9090 # development changing webpack config files > yarn dev:webpacknpm it or yarn it
You can find this package on the npm registry, so you can install it with npm install cv-web-template or yarn add cv-web-template;
Afterwards the process to have it all running will be the same that if you were cloning it.
Set up
This repo uses webpack to bundle all the files and you can find them under the ./dist folder. All the js and css files are added inline in the html file and essentially you will only need the index.html and favicon.*;
The js entry point can be found at ./src/index.js, here is where the content is appended to the DOM, the styles are imported and some event listeners are added to the DOM too.
For simplicity you will not get any webserver with this repo so you need to find your way in order to serve the page.
Data entry point
You must edit the ./src/config/index.js file in order to feed the bundle with the data that you want.
In the config file you will find the required sections that you need to change:
- Content for
<head>tag. - Content for contact details split in 2 parts:
- Personal details
- Developer details
- Content for Summary section
- Content for Experiences section
- Content for Education section
- Content for Skills section
- Content for
<footer>tag
Keep the format of the data because the templates functions are expecting thodse formats.
The entry point for the index.html file and favicon are specified at ./webpack/plugins.js at line 53. By default the path is ./src/toCopy
Theme
You can choose for any theme specified at the PrismJs website or the defualt one (dracula) that has been done for this repo or create your custom one. Just modify the prismTheme var in the config file.
If you decide to create your own theme, you must edit a couple of scss files too. First ./src/sass/reusable/prism-custom.scss in order to create a theme for Prism and also the key custom in the $prism-themes map at ./src/sass/reusable/vars.scss to provide values for the rendered version.
In the config file you have the ability to change the main CSS class name used for the styles and markup rootCssClass, which defaults to resume;
prismTheme and rootCssClass, are passed as a SCSS variables before the CSS is compiled by webpack. They are defined in ./webpack/rules.js at line 27.
CSS selectors for the rendered theme are tightly coupled with the class names used in the markup, have it mind if you plan to change them
Templates
Each section of the page has it's own template that basically returns a string with the data interpolated. They can be find at ./src/templates/templates.js and they are documented at ./src/docs/docs.md.
In ./src/templates/index.js you will find that is the file where all the html structure is build as a string, this is the excatly place where you can add or delete some markup to suit your needs. Also, in this file is important to mention that there is two exports:
- headAndBody, used for the PrismJS version
- body, use for the rendered version.
The main difference is that when using the PrismJS version the <head> tag is shown as per how a real html markup in a website is but that is not needed for the rendered version because the <head> tag is already provided by the main index.html compiled by webpack.
Yes, some variables are passed to webpack to populate the values for the
It is very important that you have in mind that for the PrismJs version you are using a
<pre>and<code>tags where the SPACES and TABS are crucial in order to keep a nice indentation. HTML does not need to be ugly or unreadable :)
Utils
Some utils methods can be find at ./src/utils/index.js and they are documented at ./src/docs/docs.md
Because of the importance of spaces and tabs, there are a few utils methods that can help you with that:
newLineAndTabsBuildernewLineAndSpacesBuilderwhiteSpaceBuilder
Also you can find some utils to help you with the creation of:
htmlCommentBuilderdividerBuilderhtmlTagBuilder