selenium-cucumber-js

JavaScript browser automation framework using official selenium-webdriver and cucumber-js.
Table of Contents
Installation
npm install selenium-cucumber-js --save-devUsage
node ./node_modules/selenium-cucumber-js/index.js -s ./step-definitionsOptions
-h, --help output usage information-V, --version output the version number-s, --steps <path> path to step definitions. defaults to ./step-definitions-p, --pageObjects <path> path to page objects. defaults to ./page-objects-o, --sharedObjects [paths] path to shared objects . defaults to ./shared-objects-b, --browser <path> name of browser to use. defaults to chrome-k, --browser-teardown <optional> browser teardown strategy after every scenario . defaults to "always"-r, --reports <path> output path to save reports. defaults to ./reports-d, --disableLaunchReport disable the auto opening the browser with test report-j, --junit <path> output path to save junit-report.xml defaults to ./reports-t, --tags <tagName> name of tag to run-f, --featureFile <path> a specific feature file to run-x, --timeOut <n> steps definition timeout in milliseconds. defaults to 10 seconds-n, --noScreenshot disable auto capturing of screenshots when an error is encounteredBy default tests are run using Google Chrome, to run tests using another browser supply the name of that browser along with the -b switch. Available options are:
| Browser | Example |
|---|---|
| Chrome | -b chrome |
| Firefox | -b firefox |
| Phantom JS | -b phantomjs |
| Electron | -b electron |
| Custom | -b customDriver.js |
To use your own driver, create a customDriver.js file in the root of your project and provide the filename with the -b switch.
Configuration file
Configuration options can be set using a selenium-cucumber-js.json file at the root of your project. The JSON keys use the "long name" from the command line options. For example the following duplicates default configuration:
Whereas the following would set configuration to match the expected directory structure of IntelliJ's Cucumber plugin, and make default timeout one minute. Note that the default browser has not been overridden and will remain 'chrome'.
Feature files
A feature file is a Business Readable, Domain Specific Language file that lets you describe software’s behavior without detailing how that behavior is implemented. Feature files are written using the Gherkin syntax and must live in a folder named features within the root of your project.
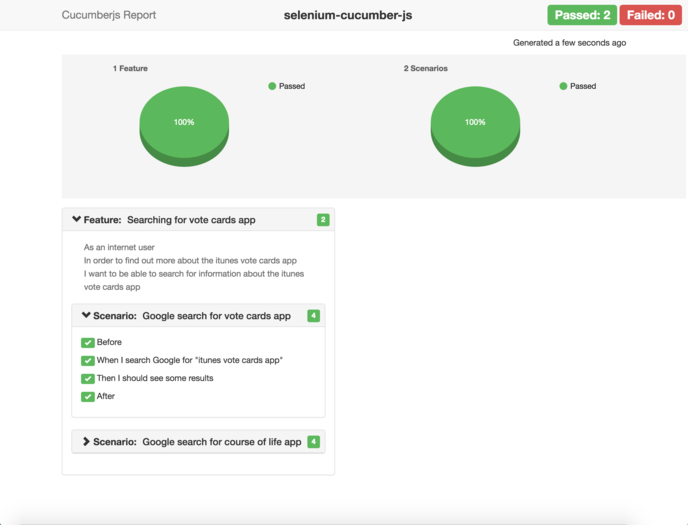
# ./features/google-search.feature Feature: Searching for vote cards app As an internet user In order to find out more about the itunes vote cards app I want to be able to search for information about the itunes vote cards app Scenario: Google search for vote cards app When I search Google for "itunes vote cards app" Then I should see some resultsBrowser teardown strategy
The browser automatically closes after each scenario to ensure the next scenario uses a fresh browser environment. But you can change this behavior with the "-k" or the "--browser-teardown" parameter.
| Value | Description |
|---|---|
always |
the browser automatically closes (default) |
clear |
the browser automatically clears cookies, local and session storages |
none |
the browser does nothing |
Step definitions
Step definitions act as the glue between features files and the actual system under test.
To avoid confusion always return a JavaScript promise your step definition in order to let cucumber know when your task has completed.
// ./step-definitions/google-search-steps.js module { this;};The following variables are available within the Given(), When() and Then() functions:
| Variable | Description |
|---|---|
driver |
an instance of selenium web driver (the browser) |
selenium |
the raw selenium-webdriver module, providing access to static properties/methods |
page |
collection of page objects loaded from disk and keyed by filename |
shared |
collection of shared objects loaded from disk and keyed by filename |
helpers |
a collection of helper methods things selenium does not provide but really should! |
by |
the selenium By class used to locate elements on the page |
until |
the selenium until class used to wait for elements/events |
expect |
instance of chai expect to expect('something').to.equal('something') |
assert |
instance of chai assert to assert.isOk('everything', 'everything is ok') |
trace |
handy trace method to log console output with increased visibility |
Page objects
Page objects are accessible via a global page object and are automatically loaded from ./page-objects (or the path specified using the -p switch). Page objects are exposed via a camel-cased version of their filename, for example ./page-objects/google-search.js becomes page.googleSearch. You can also use subdirectories, for example ./page-objects/dir/google-search.js becomes page.dir.googleSearch.
Page objects also have access to the same runtime variables available to step definitions.
An example page object:
// ./page-objects/google-search.js moduleexports = url: 'http://www.google.co.uk' elements: searchInput: byname'q' searchResultLink: by /** * enters a search term into Google's search box and presses enter * @param * @returns */ { var selector = pagegoogleSearchelementssearchInput; // return a promise so the calling function knows the task has completed return driver; };And its usage within a step definition:
// ./step-definitions/google-search-steps.jsthis;Shared objects
Shared objects allow you to share anything from test data to helper methods throughout your project via a global shared object. Shared objects are automatically loaded from ./shared-objects (or the path specified using the -o switch) and made available via a camel-cased version of their filename, for example ./shared-objects/test-data.js becomes shared.testData. You can also use subdirectories, for example ./shared-objects/dir/test-data.js becomes shared.dir.testData.
Shared objects also have access to the same runtime variables available to step definitions.
An example shared object:
// ./shared-objects/test-data.js moduleexports = username: "import-test-user" password: "import-test-pa**word"And its usage within a step definition:
module { this;};Helpers
selenium-cucumber-js contains a few helper methods to make working with selenium a bit easier, those methods are:
// Load a URL, returning only when the <body> tag is presenthelpers; // get the value of a HTML attributehelpers; // get a list of elements matching a query selector who's inner text matches param.helpers; // get first elements matching a query selector who's inner text matches textToMatch paramhelpers; // click element(s) that are not visible (useful in situations where a menu needs a hover before a child link appears)helpers; // wait until a HTML attribute equals a particular valuehelpers; // wait until a HTML attribute existshelpers; // wait until a HTML attribute no longer existshelpers; // get the content value of a :before pseudo elementhelpers; // get the content value of a :after pseudo elementhelpers; // clear the cookieshelpers; // clear both local and session storageshelpers; // clear both cookies and storageshelpers; // waits until an element to exist and returns ithelpers; // scroll until element is visiblehelpers; // select a value inside a dropdown list by its texthelpers; // waits and returns an array of all windows openedhelpers;Visual Comparison
The selenium-cucumber-js framework uses Applitools Eyes to add visual checkpoints to your JavaScript Selenium tests. It takes care of getting screenshots of your application from the underlying WebDriver, sending them to the Applitools Eyes server for validation and failing the test when differences are detected. To perform visual comparisons within your tests, obtain an Applitools Eyes API Key and assign it to the eye_key property of the selenium-cucumber-js.json config file in the root of your project.
For example the following configuration could be used with an increased timeout which allows enough time for visual checks:
And its usage within page Objects:
moduleexports = url: 'https://applitools.com/helloworld' elements: clickme: bytagName'button' searchResultLink: by { // Start the test and set the browser's viewport size to 800x600. eyes; // Navigate the browser to the "hello world!" web-site. driver; // Visual checkpoint #1. eyes; // Click the "Click me!" button. driver; // Visual checkpoint #2. eyes; // End the test. eyes; };Before/After hooks
You can register before and after handlers for features and scenarios:
| Event | Example |
|---|---|
| BeforeFeature | this.BeforeFeatures(function(feature, callback) {}) |
| AfterFeature | this.AfterFeature(function(feature, callback) {}); |
| BeforeScenario | this.BeforeScenario(function(scenario, callback) {}); |
| AfterScenario | this.AfterScenario(function(scenario, callback) {}); |
module { // add a before feature hook this; // add an after feature hook this; // add before scenario hook this; // add after scenario hook this;};Reports
HTML and JSON reports are automatically generated and stored in the default ./reports folder. This location can be changed by providing a new path using the -r command line switch:
How to debug
Most selenium methods return a JavaScript Promise that is resolved when the method completes. The easiest way to step in with a debugger is to add a .then method to a selenium function and place a debugger statement within it, for example:
module { this;};Directory structure
You can use the framework without any command line arguments if your application uses the following folder structure:
.├── features│ └── google-search.feature├── step-definitions│ └── google-search-steps.js├── page-objects│ └── google-search.js└── shared-objects│ ├── test-data.js│ └── stuff.json└── reports ├── cucumber-report.json └── cucumber-report.htmlDemo
This project includes an example to help you get started. You can run the example using the following command:
node ./node_modules/selenium-cucumber-js/index.jsBugs
Please raise bugs via the selenium-cucumber-js issue tracker and, if possible, please provide enough information to allow the bug to be reproduced.
Contributing
Everyone is very welcome to contribute to this project. You can contribute just by submitting bugs or suggesting improvements by opening an issue on GitHub.
Troubleshooting
IntelliJ Cucumber Plugin
IntelliJ based IDE's have a plugin that allows the tester to control click on a Given, When, Then statement within a Cucumber feature file and have the user taken to the associated step definition. This plugin relies on your project having the following folder structure:
.└── features │ google-search.feature └── step_definitions │ └── google-search-steps.js └── page_objects │ └── google-search.js └── shared_objects │ ├── test-data.js │ └── stuff.json └── reports ├── cucumber-report.json └── cucumber-report.htmlThis can be achieved by restructuring your project to match the layout above (notice the underscores), and running your tests with the following switches:
node ./node_modules/selenium-cucumber-js/index.js -s ./features/step_definitions -p ./features/page_objects -o ./features/shared_objects -r ./features/reportsVSCode Cucumber Plugin
Visual Studio Code has also an extension for Cucumber (Gherkin) Language Support + Format + Steps/PageObjects Autocomplete. You can find how to install and use at Cucumber (Gherkin) Full Support.
Following the default structure, the settings.json should look like this:
License
Licensed under ISC License © John Doherty